Difference between revisions of "Remote-replication (DR)"
m |
m (→Setup Process Overview) |
||
| (188 intermediate revisions by the same user not shown) | |||
| Line 1: | Line 1: | ||
| + | [[Category:admin_guide]] | ||
| + | |||
=== Volume & Share Remote-Replication (DR Setup) Overview === | === Volume & Share Remote-Replication (DR Setup) Overview === | ||
| − | QuantaStor supports both Storage | + | QuantaStor supports remote-replication of both Storage Volumes (SAN) and Network Shares (NAS). Remote-replication is typically setup with a Remote-Replication Schedule but can also be done as a one-time replication without a schedule. Remote-replication is done asynchronously and is block-level incremental for both Storage Volumes and Network Shares. Block-level incremental means that only the changes (aka deltas) made to the source volumes and shares are replicated to the destination. This makes efficient use of WAN bandwidth and enables near-CDP type functionality replication schedules can be set to replicate ever couple minutes to keep the destination copies in close lock-step with the sources. |
| + | |||
| + | ''' OSNEXUS Videos ''' | ||
| + | * [[Image:youtube_icon.png|50px|link=https://www.youtube.com/watch?v=33jctl-UEUM]] [https://www.youtube.com/watch?v=33jctl-UEUM Covers QuantaStor 5 Remote-replication Setup [16:08]] | ||
| + | |||
| + | ==== Full Copy vs Incremental Replication ==== | ||
| + | |||
| + | All replication starts with a full copy of the source to the destination and this can take some time depending on the speed of the network and the amount of data to be transferred. After the initial full copy all subsequent replication operations are delta based so only the changes (block level incremental) are transferred. Replication supports compression and encryption options. | ||
| + | |||
| + | ==== Cascading & N-way Replication ==== | ||
| − | + | Remote-replication of any set of Network Shares and Storage Volumes can be setup to replicate to multiple destinations, this is called N-way replication. For example, a Network Share 'datastore1' can be setup to be replicated to destination pool-2 and pool-3. This is done by setting up two replication schedules, one to replicate to 'pool-2' and a second to replicate 'datastore1' to destination 'pool-3' where the destination pools can be on any QuantaStor systems within the Storage Grid. | |
| − | + | Cascading replication may also be setup where a given source like 'datastore1' is first replicated to one destination like 'pool-2' from which it is then replicated to destination 'pool-3'. Cascading replication reduces the load on the primary storage as the replication is done once to a secondary system and then from there the same data is sent to a tertiary system without any load on the primary. Cascading replication is setup by creating multiple Replication Schedules and may cascade multiple times from system to system. | |
| − | === Minimum Requirements for Remote-replication | + | === Minimum Requirements for Remote-replication === |
| − | * 2x QuantaStor storage | + | * 2x QuantaStor storage systems within a QuantaStor Grid each with a ''Storage Pool''. |
| − | * Storage pools do not need to be the same size or and the hardware and disk types on the | + | * Storage pools do not need to be the same size or and the hardware and disk types on the systems can be asymmetrical (non-matching pool size and hardware configurations). |
| − | * Replication may be cascaded across many | + | * Replication may be cascaded across many systems from pool to pool. |
| − | * Replication may be configured to be N-way, replicating from one-to-many or many-to-one | + | * Replication may be configured to be N-way, replicating from one-to-many or many-to-one system. |
* Replication is incremental/delta based so only the changes are sent and only for actual data blocks, empty space is not transmitted. | * Replication is incremental/delta based so only the changes are sent and only for actual data blocks, empty space is not transmitted. | ||
* Replication is supported for both Storage Volumes and Network Shares. | * Replication is supported for both Storage Volumes and Network Shares. | ||
* Replication interval may be set to as low as 5 minutes for interval based schedule configurations or scheduled to run at specific hours on specific days. | * Replication interval may be set to as low as 5 minutes for interval based schedule configurations or scheduled to run at specific hours on specific days. | ||
* All data is AES 256 encrypted on the wire and leverages AES-NI chipset features to accelerate encryption/decryption performance by roughly 8x. Typical performance overhead due to encryption is 20%. | * All data is AES 256 encrypted on the wire and leverages AES-NI chipset features to accelerate encryption/decryption performance by roughly 8x. Typical performance overhead due to encryption is 20%. | ||
| + | * Source and destination Storage Pools must be of the same underlying filesystem type (ZFS to ZFS, Ceph to Ceph). | ||
| + | * Replication is not yet supported for Network Shares in scale-out CephFS based Storage Pools. See ''Backup Policies'' for an alternative approach. | ||
=== Setup Process Overview === | === Setup Process Overview === | ||
| − | # Select the | + | # Select the 'Remote Replication' tab and choose '''Create''' from the 'Replication Link' toolbar. This will exchange keys between the two systems so that a replication schedule can be created. You can create an unlimited number of links. The link also stores information about the ports to be used for remote-replication traffic. |
| − | # Select the | + | '''Navigation:''' Remote Replication --> Storage System Replication Links --> Replication Link --> Create ''(toolbar)'' |
| + | |||
| + | # Select the 'Volume & Share Replication Schedules' section in the left pane and choose '''Create''' in the 'Replication Schedule' toolbar to bring up the dialog to [[Remote-replication_/_Disaster_Recovery_Setup#Creating_a_Storage_System_Link_for_Replication | create a new remote replication schedule.]] | ||
## Select the replication link that will indicate the direction of replication. | ## Select the replication link that will indicate the direction of replication. | ||
## Select the storage pool on the destination system where the replicated shares and volumes will reside | ## Select the storage pool on the destination system where the replicated shares and volumes will reside | ||
## Select the times of day or interval at which replication will be run | ## Select the times of day or interval at which replication will be run | ||
## Select the volumes and shares to be replicated | ## Select the volumes and shares to be replicated | ||
| − | ## Click OK to create the schedule | + | ## Click '''OK''' to create the schedule |
| − | # Interval based replication schedules start momentarily after creation else one may test the schedule by | + | # Interval based replication schedules start momentarily after creation else one may test the schedule by selecting a Replication Schedule and right clicking. Then clicking '''Trigger Replication Schedule...''' to start it immediately. |
=== Diagram of Completed Configuration === | === Diagram of Completed Configuration === | ||
| Line 33: | Line 48: | ||
[[File:osn_dr_workflow.png|700px]] | [[File:osn_dr_workflow.png|700px]] | ||
| − | == | + | == Storage System Replication Links == |
| − | The first step in setting up remote-replication is to establish a ''Storage System Link'' between two | + | The first step in setting up remote-replication is to establish a ''Storage System Link'' between two systems in the storage grid. One must have at least two nodes (Storage Systems) configured into a QuantaStor storage grid in order to setup remote replication. QuantaStor's storage grid communication mechanism connects systems (nodes) together so that they can share information, coordinate activities like remote-replication and high-availability features, while simplifying automation and management operations. After one has setup a storage grid of two or more systems, Storage System Links may be created. The Storage System Link represents a low level security key exchange between the two nodes so that they may transmit data between pools and the link also specifies which network interface should be used for the transmission of data across the link. |
| − | === | + | === Bandwidth Throttling === |
| − | + | WAN links are often limited in bandwidth in a range between 2MB-60MBytes/sec for on-premises deployments and 20MBytes-100MBytes/sec and higher in datacenters depending on the service provider. QuantaStor does automatic load balancing of replication activities to limit the impact to active workloads and to limit the use of your available WAN or LAN bandwidth. The limitation of bandwidth is set in the ''Storage System Replication Link'' which can be created and modified in the top section under the Remote Replication tab. | |
| − | + | === Creating a Storage System Link for Replication === | |
| − | [[File: | + | [[File:Create Replication Link Web.jpg|thumb|512px|To open the dialog choose the 'Remote Replication' tab then choose '''Create''' from the 'Replication Link' toolbar. This dialog can also be accessed via a right click in the "Storage System Replication Links" left pane and choosing '''Create Storage Replication Link...'''.]] |
| + | |||
| + | Creation of the Storage System Link may be done through the QuantaStor Manager web interface by selecting the 'Remote Replication' tab, and then choosing the '''Create''' button from the 'Storage System Link' in the toolbar. Select the IP address on each system to be utilized for communication of remote replication network traffic. | ||
| + | |||
| + | '''Navigation:''' Remote Replication --> Storage System Replication Links --> Replication Link --> Create ''(toolbar)'' | ||
| + | |||
| + | Replication for two nodes. | ||
| + | |||
| + | [[File:Remote Replication two Nodes.jpg|712px]] | ||
Once the links have been created they'll appear as two separate directional links in the web user interface as shown in the above screenshot. | Once the links have been created they'll appear as two separate directional links in the web user interface as shown in the above screenshot. | ||
| − | + | === Configuring Storage System Links for High-Availability Configurations === | |
| − | Storage System Links are bi-directional and deletion of a link in one direction will automatically delete the link in the reverse direction. Remote-replication links which maintain the replication status information between network shares and storage volumes are unaffected by the deletion of | + | Storage System Links are bi-directional and deletion of a link in one direction will automatically delete the link in the reverse direction. Remote-replication links which maintain the replication status information between network shares and storage volumes are unaffected by the deletion of storage systems link but if no valid storage system link is available when a remote replication schedule is activated then an alert notice will be raised. The HA failover system is designed to work in tandem with the DR system so in the event that a ''Storage Pool'' is manually or automatically failed-over to another system the scheduler will automatically select and use the appropriate Storage System Link pair to replicate between the designated pools. Note though, that one must establish all the necessary storage system links so that remote replication may continue uninterrupted. For example, if one has systems A & B configured with an HA pool which has volumes replicating to a HA pool managed by systems C & D then for Storage System Link pairs must be setup. Specifically A <--> C, A <--> D, B <--> C, B <--> D so that no matter how the source and destination pools are moved between node pairs that the remote replication schedule will be able to continue replication normally. |
| − | + | === Modifying a Storage System Link === | |
Use the modify dialog to adjust the replication schedule as needed. Activation of the schedule by the schedule manager within QuantaStor will continue normally per the new settings automatically at the next activation point. | Use the modify dialog to adjust the replication schedule as needed. Activation of the schedule by the schedule manager within QuantaStor will continue normally per the new settings automatically at the next activation point. | ||
| − | + | '''Navigation:''' Remote Replication --> Storage System Replication Links --> Replication Link --> Modify ''(toolbar)'' | |
| − | + | [[File:Modify Remote Replication Link Web.jpg|512px|To access this dialog either right click on a Storage System Link from either the left or center pane or press the '''Modify Storage System Link...''' button in the "Storage System Link" toolbar.]] | |
| + | === Deleting a Storage System Link === | ||
| + | [[File:Delete Remote Replication Link Web.jpg|512px|thumb|To access the dialog either right click on "Storage System Link" in the left or center pane and click '''Delete Storage System Replication Link...''', else '''Delete''' from the "Replication Link" toolbar.]] | ||
| − | To remove a storage system link simply right-click on the link within the web user interface and choose ''Delete Storage System Link..''. | + | To remove a storage system link simply right-click on the link within the web user interface, ''Tree View'', and choose '''Delete Storage System Replication Link..'''. |
| − | + | Deletion of a storage system replication link will also delete the reverse direction link as they are added and removed as pairs. If the IP addresses or other configuration settings on a given set of systems has changed one may delete the links and recreate them without having to adjust the replication schedules. The ''schedules automatically select the currently available link'' necessary for a given replication task. | |
| − | + | '''Navigation:''' Remote Replication --> Storage System Replication Links --> Replication Link --> Delete ''(toolbar)'' | |
| − | + | == Creating a one-time Remote Replicas == | |
| − | Once a | + | Once a storage system link pair has been established replication features for the replication of volumes and network shares between the systems are made available. Instant replication of volumes and shares is accessible by right-clicking on a given volume or share to be replicated, then choose '''Create Remote Replica...''' from the menu. Creating a remote replica is much like creating a local clone, only the data is being copied over to a storage pool in a remote storage system. |
| − | When selecting replication options first select the destination storage system to replicate too (only systems which have established and online storage system links will be displayed) | + | When selecting replication options, first select the destination storage system to replicate too (only systems which have established and online storage system links will be displayed). The destination storage pool within that system should be utilized to hold the remote replica. |
| − | If the volume or share had been previously replicated then an incremental ''diff'' replication is optimal | + | If the volume or share had been previously replicated then an incremental ''diff'' replication is optimal. One can force a complete replication as well and these will be numbered at the destination with a suffix like ''.1_chkpnt'', ''.2_chkpnt'' and so on. Incremental replication from that point will show the destination check-point with a GMT based timestamp in the name of the check-point. |
| − | == | + | == Remote Replication Schedules (Disaster Recovery Failover) == |
| − | Remote replication schedules provide a mechanism for | + | Remote replication schedules provide a mechanism for automatic replication of changes to volumes & shares to destination Storage Pool. On the destination Storage Pool the copied volumes and shares are referred to as checkpoints and are easily identified by their _chkpnt suffix. Replication schedules run on a delay timer which indicates the delay time between replications or a fixed schedule. If a calendar based replication schedule is still running when the schedule is to be run again it will delay until the next interval time. Interval based replication schedules have a set amount of delay time between each completed replication and will not activate again until the last transfer has completed plus the specified delay time has elapsed. |
| − | + | === Creating Remote Replication Schedules === | |
| − | + | To create a schedule navigate to the 'Volume & Share Replication Schedules' section of the tree view after selecting the 'Remote Replication' tab at the top of the screen. Right-click on the section header and choose 'Create Schedule...'. Alternatively, from the 'Replication Schedule' toolbar select '''Create''' as is shown below. | |
| − | + | '''Navigation:''' Remote Replication --> Volume & Share Replication Schedules --> Replication Schedule --> Create ''(toolbar)'' | |
| − | |||
| − | [[File: | + | [[File:Create Rplctn Schedule Web.jpg|512px|frame|To access this dialog either click '''Create''' from the 'Replication Schedule' toolbar or right click on left or center panes for 'Volume & Share Replication Schedules' and click on '''Create Schedule...".]] |
| − | + | Besides selection of the volumes and/or shares to be replicated you must select the number of snapshot checkpoints to be maintained on the local and remote systems as shown below. You can use these snapshots for off-host backup and other data recovery purposes as well so there is no need to have a Snapshot Schedule which would be redundant with the snapshots which will be crated by your replication schedule. If you choose a 'Max Delta Points' of 5 then up to 5 snapshot checkpoints will be retained. If for example you were replicating nightly at 1 a.m. each day of the week from Monday to Friday then you will have a week's worth of snapshots as data recovery points. If you are replicating 4 times each day and need a week of snapshots then you would need 5x4 or a 'Max Delta Points' setting of 20. | |
| − | + | [[File:Create Rep Schd - Snap Settings.jpg|512px]] | |
| − | [[File: | + | === Interval vs Calendar Schedules === |
| + | [[File:Replication_Schd_-_Schd_Intv.jpg|512px|thumb|Schedule intervals between replication activity.]] | ||
| − | + | Replication can be done on a schedule at specific times and days of the week or can be done continuously based upon an interval. The interval represents the amount of time between replication activities where no replication is done. The system automatically detects active schedules and will not active a given schedule again while any volumes or shares are still being replicated. As such the replication schedule interval is ''more of a delay interval'' between replications and can be safely set to a low value. Since only the changes are replicated it is often better to replicate more frequently to replicate throughout the day versus replicating all at once at the end of the day. | |
| − | + | '''Navigation:''' Remote Replication --> Volume & Share Replication Schedules --> Replication Schedule --> Create ''(toolbar)'' | |
| − | + | === Modifying Remote Replication Schedules === | |
| − | + | Schedules may be adjusted at any time by right-clicking on the schedule then choosing ''Modify Schedule..'' to make changes. | |
| − | + | ||
| − | + | ||
| − | + | ||
| − | + | ||
| − | + | ||
| − | + | ||
| − | + | ||
| − | + | ||
| − | + | ||
| − | + | '''Navigation:''' Remote Replication --> Storage System Replication Links --> Replication Link --> Modify ''(toolbar)'' | |
| − | + | [[File:Mdfy Replication Schedule - Web.jpg|1024px]] | |
| − | + | == Managing Replication Checkpoints == | |
| − | === | + | === Volume Checkpoints === |
Checkpoint volumes have the suffix ''_chkpnt'' typically followed by a ''GMT'' timestamp. At the completion of each replication cycle the check-point volume parent which has no ''GMT'' timestamp suffix will contain all the latest information from the last transfer. In the event of a failure of a primary node one need only access a given check-point ''Storage Volume'' and it will switch to the ''Active Replica Checkpoint'' stage. This indicates that the check-point volume may have been used or written to by users so care should be taken to rollback that information using ''Replica Rollback...'' to the primary side as part of the DR fail-back process to preserve any changes. | Checkpoint volumes have the suffix ''_chkpnt'' typically followed by a ''GMT'' timestamp. At the completion of each replication cycle the check-point volume parent which has no ''GMT'' timestamp suffix will contain all the latest information from the last transfer. In the event of a failure of a primary node one need only access a given check-point ''Storage Volume'' and it will switch to the ''Active Replica Checkpoint'' stage. This indicates that the check-point volume may have been used or written to by users so care should be taken to rollback that information using ''Replica Rollback...'' to the primary side as part of the DR fail-back process to preserve any changes. | ||
| − | === | + | === Network Share Checkpoints === |
| + | |||
| + | Network share check-points also contain the ''_chkpnt'' suffix just as with ''Storage Volume'' replica check-points and this can create some challenges if users are expecting to find their data under a share with the same name. For example, a share named ''backups'' will have the name ''backups_chkpnt'' at the destination / DR site system. There is an easy way to resolve this through the use of Network Share Aliases. Simply right-click on the check-point for the ''Network Share'' (eg. backups_chkpnt) and choose ''Create Alias/Sub-share...'' which allows one to assign alternate names to a share as can be seen below. After the alias is created as ''backups'' the share will be accessible both as ''backups'' and ''backups_chkpnt''. If users find the dual-naming confusing then the ''browsable'' setting may be adjusted on the ''backups_chkpnt'' to hide it from users using the ''Modify Share'' dialog. | ||
| + | |||
| + | '''Navigation:''' Storage Management --> Volume & Share Replication Schedules --> Create Alias... ''(rightclick)'' | ||
| + | |||
| + | [[File:Create Network Share Alias.jpg|512px]] | ||
| + | |||
| + | === Manual DR Failover - Activating Checkpoints === | ||
| + | |||
| + | [[File:qs_activate_checkpoints.png|600px|thumb|Choose 'Activate Checkpoints' to activate the use of _chkpnt Volumes and Shares at the DR site.]] | ||
| + | |||
| + | To activate the Storage Volume and Network Share checkpoints associated with a given Remote Replication Schedule, simply right-click on the schedule in the 'Volume & Share Replication Schedules' section and choose 'Activate Checkpoints...'. From that dialog one can select the specific subset of checkpoints to be activated or all the checkpoints. If selected the 'Auto-create Network Share Aliases' option will create aliases for the '_chkpnt' Network Shares so that they may be referenced at the DR site using the same names as the source/origin share names without the '_chkpnt' suffix. | ||
| + | |||
| + | === Automatic DR Failover - Activating Checkpoints via VIF === | ||
| + | |||
| + | [[File:Mod Rplctn Schd - Auto Activation.jpg|600px|thumb|Choose 'Enable Automatic Checkpoint Activation' then a Site Cluster VIF to activate the schedule.]] | ||
| + | |||
| + | In some environments it may be preferable to have the DR site checkpoints activate automatically in the event of an outage of a given primary site. This may be easily setup by creating a 'Site Cluster' in the 'High-availability VIF Management' section. The Site Cluster must spans the source and destination systems so that when the source side system goes offline the VIF will automatically move to the destination side. After the 'Site Cluster' is created one will next create a Site VIF (virtual network interface). When the VIF becomes active at the destination side it will automatically activate the Remote Replication Schedule's checkpoints just as if it was done manually using the Activate Checkpoints dialog. Once the VIF has been created within the Site Cluster choose the 'Modify Remote Replication Schedule' option in the WUI and then select the 'Automatic Activation' tab. Within there select the 'Enable Automatic Checkpoint Activation' option and then choose the VIF to activate. | ||
| + | |||
| + | === Resolving DR Failover - Deactivating Checkpoints === | ||
| + | |||
| + | After a DR site failover has been done by 'Activating Checkpoints' they must be deactivated before replication may resume and overwrite changes to the destination _chkpnts. | ||
| + | This can be easily done using the 'Deactivate Checkpoints...' dialog by right-clicking on the replication schedule and then choosing that option from the pop-up menu. To automatically activate and resume normal replication after deactivating the checkpoints select the 'Re-enable Replication Schedule' option within the dialog. Alternatively one may use the 'Enable Schedule' dialog to re-enable the schedule as a second step. | ||
| + | |||
| + | === Manual Activation/Deactivation of Checkpoints === | ||
| + | |||
| + | Via the 'Modify Network Share' and 'Modify Storage Volume' dialogs there is a check-box option to toggle the 'Active Replica Checkpoint' flag. This option may only be toggled on shares and volumes that are checkpoints with the _chkpnt suffix. | ||
| + | |||
| + | === Session based Activation of Checkpoint Status === | ||
| + | |||
| + | If a given destination side Storage Volume or Network Share checkpoint is accessed via iSCSI or SMB respectively, QuantaStor will automatically mark the given checkpoint as an active checkpoint. This ensures any changes to the destination are not lost. The replication scheduler in QuantaStor does a check before starting any new replication to ensure the destination checkpoints are not active and if detected as active the Replication Schedule is automatically transitioned to the ''Offline'' state. | ||
| + | |||
| + | === Resolving a DR Site Failover === | ||
| + | |||
| + | Once a given set of checkpoints have been marked as 'Active Checkpoints' these may be used as part of a Disaster Recovery (DR) failover strategy for any amount of time. To transition back to normal operation of the Replication Schedule to send data from the sources to the destination checkpoints one will choose one of two options. | ||
| + | |||
| + | ==== Option 1: Throw out the destination side changes & resume replication ==== | ||
| − | + | In the process of testing one's DR site failover it'll be common to activate the DR site checkpoints periodically and then simply re-activate the Remote Replication schedule. The easiest way to do this is to use the 'Deactivate Checkpoints' dialog as it makes it easy to deactivate all the checkpoints at once and re-enable the Replication Schedule in a single operation. | |
| − | + | [[File:Deactivate Chkpts for Replication Schd.jpg|512px]] | |
| − | + | ==== Option 2: Send checkpoint side changes back to the source side, then resume replication from source to destination ==== | |
| + | [[File:Rollback Strg Rep - Web.jpg|512px|thumb|Sending the changes made to the DR site checkpoints back to the source side.]] | ||
| − | + | The process of sending the changes made to the DR site checkpoints back to the source side is called 'Rollback from Replica...' in QuantaStor and is done from the 'Volume & Share Replica Associations' section. Within that section one must select the link between a given source and destination and then choose 'Rollback from Replica...' in the pop-up menu. This must be done for each share and volume to be rolled back to the source side. '''Once the rollback activity is completed be sure''' to do a 'Rescan Storage Pools...' from the Storage Management-->Storage Pools section on each source side system. Once all the rollback replication activity has completed the source side will have a GMT snapshot with the same timestamp as the destination side. In effect rollback is done by taking a snapshot of the destination side changes and then sending these delta based incremental changes back to the source side volume/share. Use caution with this as the source side will be an identical copy of the destination after rollback so any changes made to the source side will be overwritten. | |
| − | + | ||
| − | + | ||
| − | + | After the data has been sent (rolled-back from DR site) use the steps from Option 1 to resume regular replication. | |
Latest revision as of 09:33, 9 December 2023
Contents
- 1 Volume & Share Remote-Replication (DR Setup) Overview
- 2 Minimum Requirements for Remote-replication
- 3 Setup Process Overview
- 4 Diagram of Completed Configuration
- 5 Storage System Replication Links
- 6 Creating a one-time Remote Replicas
- 7 Remote Replication Schedules (Disaster Recovery Failover)
- 8 Managing Replication Checkpoints
- 8.1 Volume Checkpoints
- 8.2 Network Share Checkpoints
- 8.3 Manual DR Failover - Activating Checkpoints
- 8.4 Automatic DR Failover - Activating Checkpoints via VIF
- 8.5 Resolving DR Failover - Deactivating Checkpoints
- 8.6 Manual Activation/Deactivation of Checkpoints
- 8.7 Session based Activation of Checkpoint Status
- 8.8 Resolving a DR Site Failover
QuantaStor supports remote-replication of both Storage Volumes (SAN) and Network Shares (NAS). Remote-replication is typically setup with a Remote-Replication Schedule but can also be done as a one-time replication without a schedule. Remote-replication is done asynchronously and is block-level incremental for both Storage Volumes and Network Shares. Block-level incremental means that only the changes (aka deltas) made to the source volumes and shares are replicated to the destination. This makes efficient use of WAN bandwidth and enables near-CDP type functionality replication schedules can be set to replicate ever couple minutes to keep the destination copies in close lock-step with the sources.
OSNEXUS Videos
Full Copy vs Incremental Replication
All replication starts with a full copy of the source to the destination and this can take some time depending on the speed of the network and the amount of data to be transferred. After the initial full copy all subsequent replication operations are delta based so only the changes (block level incremental) are transferred. Replication supports compression and encryption options.
Cascading & N-way Replication
Remote-replication of any set of Network Shares and Storage Volumes can be setup to replicate to multiple destinations, this is called N-way replication. For example, a Network Share 'datastore1' can be setup to be replicated to destination pool-2 and pool-3. This is done by setting up two replication schedules, one to replicate to 'pool-2' and a second to replicate 'datastore1' to destination 'pool-3' where the destination pools can be on any QuantaStor systems within the Storage Grid.
Cascading replication may also be setup where a given source like 'datastore1' is first replicated to one destination like 'pool-2' from which it is then replicated to destination 'pool-3'. Cascading replication reduces the load on the primary storage as the replication is done once to a secondary system and then from there the same data is sent to a tertiary system without any load on the primary. Cascading replication is setup by creating multiple Replication Schedules and may cascade multiple times from system to system.
Minimum Requirements for Remote-replication
- 2x QuantaStor storage systems within a QuantaStor Grid each with a Storage Pool.
- Storage pools do not need to be the same size or and the hardware and disk types on the systems can be asymmetrical (non-matching pool size and hardware configurations).
- Replication may be cascaded across many systems from pool to pool.
- Replication may be configured to be N-way, replicating from one-to-many or many-to-one system.
- Replication is incremental/delta based so only the changes are sent and only for actual data blocks, empty space is not transmitted.
- Replication is supported for both Storage Volumes and Network Shares.
- Replication interval may be set to as low as 5 minutes for interval based schedule configurations or scheduled to run at specific hours on specific days.
- All data is AES 256 encrypted on the wire and leverages AES-NI chipset features to accelerate encryption/decryption performance by roughly 8x. Typical performance overhead due to encryption is 20%.
- Source and destination Storage Pools must be of the same underlying filesystem type (ZFS to ZFS, Ceph to Ceph).
- Replication is not yet supported for Network Shares in scale-out CephFS based Storage Pools. See Backup Policies for an alternative approach.
Setup Process Overview
- Select the 'Remote Replication' tab and choose Create from the 'Replication Link' toolbar. This will exchange keys between the two systems so that a replication schedule can be created. You can create an unlimited number of links. The link also stores information about the ports to be used for remote-replication traffic.
Navigation: Remote Replication --> Storage System Replication Links --> Replication Link --> Create (toolbar)
- Select the 'Volume & Share Replication Schedules' section in the left pane and choose Create in the 'Replication Schedule' toolbar to bring up the dialog to create a new remote replication schedule.
- Select the replication link that will indicate the direction of replication.
- Select the storage pool on the destination system where the replicated shares and volumes will reside
- Select the times of day or interval at which replication will be run
- Select the volumes and shares to be replicated
- Click OK to create the schedule
- Interval based replication schedules start momentarily after creation else one may test the schedule by selecting a Replication Schedule and right clicking. Then clicking Trigger Replication Schedule... to start it immediately.
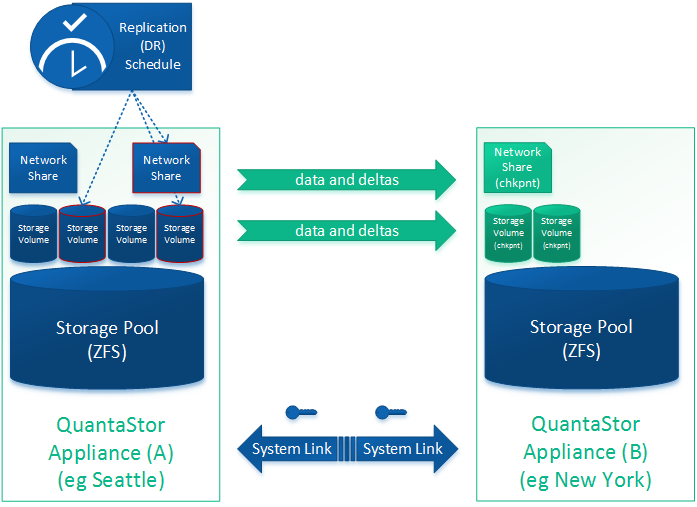
Diagram of Completed Configuration
Storage System Replication Links
The first step in setting up remote-replication is to establish a Storage System Link between two systems in the storage grid. One must have at least two nodes (Storage Systems) configured into a QuantaStor storage grid in order to setup remote replication. QuantaStor's storage grid communication mechanism connects systems (nodes) together so that they can share information, coordinate activities like remote-replication and high-availability features, while simplifying automation and management operations. After one has setup a storage grid of two or more systems, Storage System Links may be created. The Storage System Link represents a low level security key exchange between the two nodes so that they may transmit data between pools and the link also specifies which network interface should be used for the transmission of data across the link.
Bandwidth Throttling
WAN links are often limited in bandwidth in a range between 2MB-60MBytes/sec for on-premises deployments and 20MBytes-100MBytes/sec and higher in datacenters depending on the service provider. QuantaStor does automatic load balancing of replication activities to limit the impact to active workloads and to limit the use of your available WAN or LAN bandwidth. The limitation of bandwidth is set in the Storage System Replication Link which can be created and modified in the top section under the Remote Replication tab.
Creating a Storage System Link for Replication
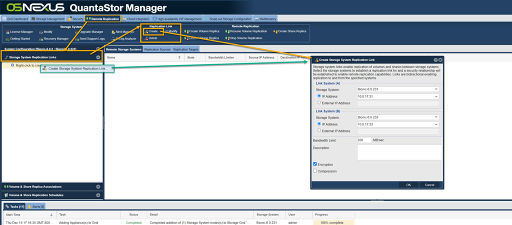
Creation of the Storage System Link may be done through the QuantaStor Manager web interface by selecting the 'Remote Replication' tab, and then choosing the Create button from the 'Storage System Link' in the toolbar. Select the IP address on each system to be utilized for communication of remote replication network traffic.
Navigation: Remote Replication --> Storage System Replication Links --> Replication Link --> Create (toolbar)
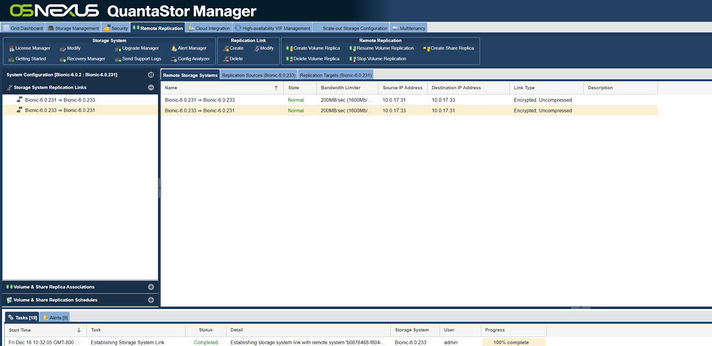
Replication for two nodes.
Once the links have been created they'll appear as two separate directional links in the web user interface as shown in the above screenshot.
Configuring Storage System Links for High-Availability Configurations
Storage System Links are bi-directional and deletion of a link in one direction will automatically delete the link in the reverse direction. Remote-replication links which maintain the replication status information between network shares and storage volumes are unaffected by the deletion of storage systems link but if no valid storage system link is available when a remote replication schedule is activated then an alert notice will be raised. The HA failover system is designed to work in tandem with the DR system so in the event that a Storage Pool is manually or automatically failed-over to another system the scheduler will automatically select and use the appropriate Storage System Link pair to replicate between the designated pools. Note though, that one must establish all the necessary storage system links so that remote replication may continue uninterrupted. For example, if one has systems A & B configured with an HA pool which has volumes replicating to a HA pool managed by systems C & D then for Storage System Link pairs must be setup. Specifically A <--> C, A <--> D, B <--> C, B <--> D so that no matter how the source and destination pools are moved between node pairs that the remote replication schedule will be able to continue replication normally.
Modifying a Storage System Link
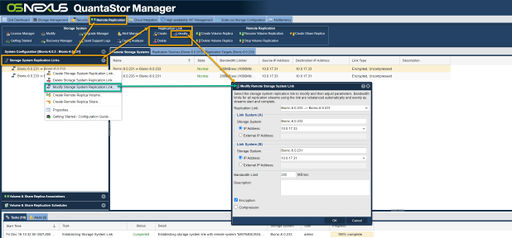
Use the modify dialog to adjust the replication schedule as needed. Activation of the schedule by the schedule manager within QuantaStor will continue normally per the new settings automatically at the next activation point.
Navigation: Remote Replication --> Storage System Replication Links --> Replication Link --> Modify (toolbar)
Deleting a Storage System Link
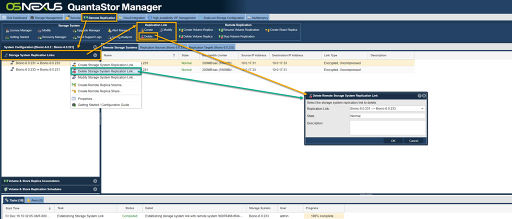
To remove a storage system link simply right-click on the link within the web user interface, Tree View, and choose Delete Storage System Replication Link...
Deletion of a storage system replication link will also delete the reverse direction link as they are added and removed as pairs. If the IP addresses or other configuration settings on a given set of systems has changed one may delete the links and recreate them without having to adjust the replication schedules. The schedules automatically select the currently available link necessary for a given replication task.
Navigation: Remote Replication --> Storage System Replication Links --> Replication Link --> Delete (toolbar)
Creating a one-time Remote Replicas
Once a storage system link pair has been established replication features for the replication of volumes and network shares between the systems are made available. Instant replication of volumes and shares is accessible by right-clicking on a given volume or share to be replicated, then choose Create Remote Replica... from the menu. Creating a remote replica is much like creating a local clone, only the data is being copied over to a storage pool in a remote storage system.
When selecting replication options, first select the destination storage system to replicate too (only systems which have established and online storage system links will be displayed). The destination storage pool within that system should be utilized to hold the remote replica.
If the volume or share had been previously replicated then an incremental diff replication is optimal. One can force a complete replication as well and these will be numbered at the destination with a suffix like .1_chkpnt, .2_chkpnt and so on. Incremental replication from that point will show the destination check-point with a GMT based timestamp in the name of the check-point.
Remote Replication Schedules (Disaster Recovery Failover)
Remote replication schedules provide a mechanism for automatic replication of changes to volumes & shares to destination Storage Pool. On the destination Storage Pool the copied volumes and shares are referred to as checkpoints and are easily identified by their _chkpnt suffix. Replication schedules run on a delay timer which indicates the delay time between replications or a fixed schedule. If a calendar based replication schedule is still running when the schedule is to be run again it will delay until the next interval time. Interval based replication schedules have a set amount of delay time between each completed replication and will not activate again until the last transfer has completed plus the specified delay time has elapsed.
Creating Remote Replication Schedules
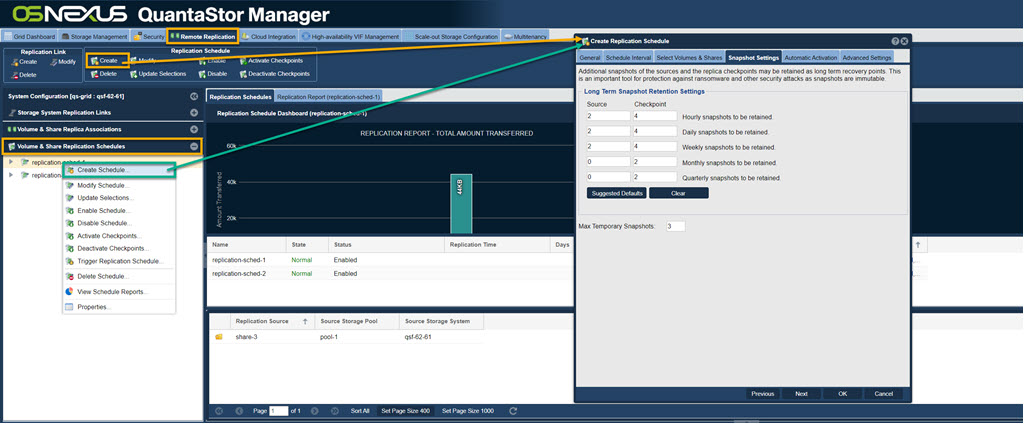
To create a schedule navigate to the 'Volume & Share Replication Schedules' section of the tree view after selecting the 'Remote Replication' tab at the top of the screen. Right-click on the section header and choose 'Create Schedule...'. Alternatively, from the 'Replication Schedule' toolbar select Create as is shown below.
Navigation: Remote Replication --> Volume & Share Replication Schedules --> Replication Schedule --> Create (toolbar)
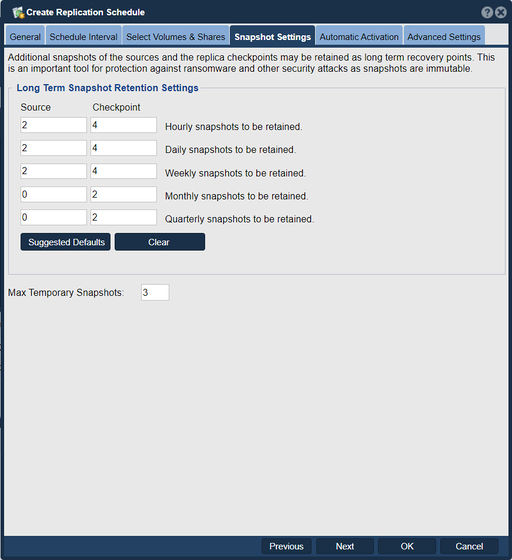
Besides selection of the volumes and/or shares to be replicated you must select the number of snapshot checkpoints to be maintained on the local and remote systems as shown below. You can use these snapshots for off-host backup and other data recovery purposes as well so there is no need to have a Snapshot Schedule which would be redundant with the snapshots which will be crated by your replication schedule. If you choose a 'Max Delta Points' of 5 then up to 5 snapshot checkpoints will be retained. If for example you were replicating nightly at 1 a.m. each day of the week from Monday to Friday then you will have a week's worth of snapshots as data recovery points. If you are replicating 4 times each day and need a week of snapshots then you would need 5x4 or a 'Max Delta Points' setting of 20.
Interval vs Calendar Schedules
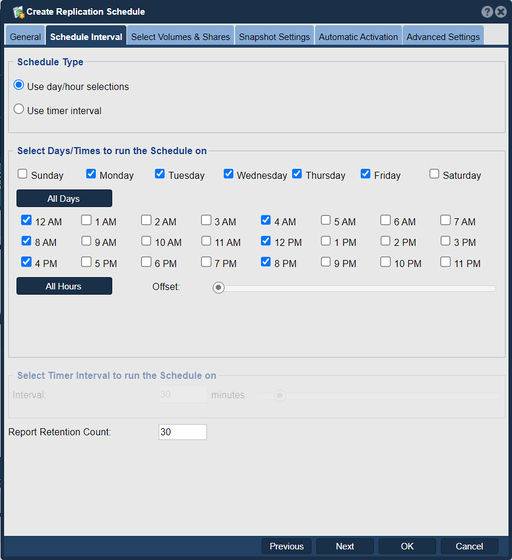
Replication can be done on a schedule at specific times and days of the week or can be done continuously based upon an interval. The interval represents the amount of time between replication activities where no replication is done. The system automatically detects active schedules and will not active a given schedule again while any volumes or shares are still being replicated. As such the replication schedule interval is more of a delay interval between replications and can be safely set to a low value. Since only the changes are replicated it is often better to replicate more frequently to replicate throughout the day versus replicating all at once at the end of the day.
Navigation: Remote Replication --> Volume & Share Replication Schedules --> Replication Schedule --> Create (toolbar)
Modifying Remote Replication Schedules
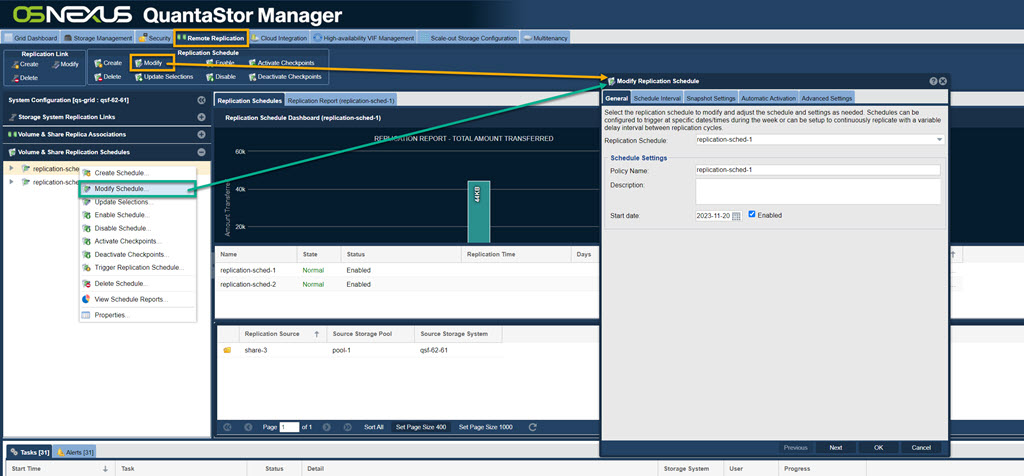
Schedules may be adjusted at any time by right-clicking on the schedule then choosing Modify Schedule.. to make changes.
Navigation: Remote Replication --> Storage System Replication Links --> Replication Link --> Modify (toolbar)
Managing Replication Checkpoints
Volume Checkpoints
Checkpoint volumes have the suffix _chkpnt typically followed by a GMT timestamp. At the completion of each replication cycle the check-point volume parent which has no GMT timestamp suffix will contain all the latest information from the last transfer. In the event of a failure of a primary node one need only access a given check-point Storage Volume and it will switch to the Active Replica Checkpoint stage. This indicates that the check-point volume may have been used or written to by users so care should be taken to rollback that information using Replica Rollback... to the primary side as part of the DR fail-back process to preserve any changes.
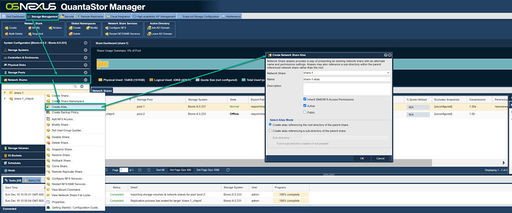
Network share check-points also contain the _chkpnt suffix just as with Storage Volume replica check-points and this can create some challenges if users are expecting to find their data under a share with the same name. For example, a share named backups will have the name backups_chkpnt at the destination / DR site system. There is an easy way to resolve this through the use of Network Share Aliases. Simply right-click on the check-point for the Network Share (eg. backups_chkpnt) and choose Create Alias/Sub-share... which allows one to assign alternate names to a share as can be seen below. After the alias is created as backups the share will be accessible both as backups and backups_chkpnt. If users find the dual-naming confusing then the browsable setting may be adjusted on the backups_chkpnt to hide it from users using the Modify Share dialog.
Navigation: Storage Management --> Volume & Share Replication Schedules --> Create Alias... (rightclick)
Manual DR Failover - Activating Checkpoints
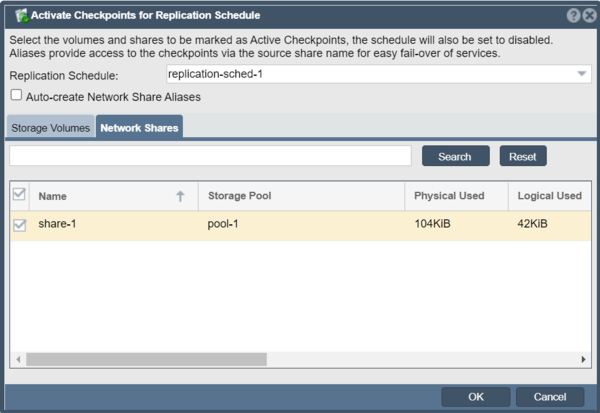
To activate the Storage Volume and Network Share checkpoints associated with a given Remote Replication Schedule, simply right-click on the schedule in the 'Volume & Share Replication Schedules' section and choose 'Activate Checkpoints...'. From that dialog one can select the specific subset of checkpoints to be activated or all the checkpoints. If selected the 'Auto-create Network Share Aliases' option will create aliases for the '_chkpnt' Network Shares so that they may be referenced at the DR site using the same names as the source/origin share names without the '_chkpnt' suffix.
Automatic DR Failover - Activating Checkpoints via VIF
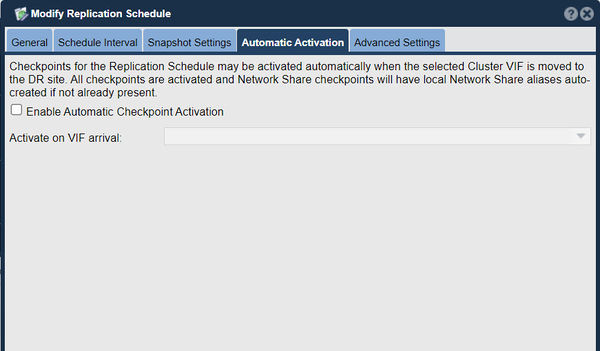
In some environments it may be preferable to have the DR site checkpoints activate automatically in the event of an outage of a given primary site. This may be easily setup by creating a 'Site Cluster' in the 'High-availability VIF Management' section. The Site Cluster must spans the source and destination systems so that when the source side system goes offline the VIF will automatically move to the destination side. After the 'Site Cluster' is created one will next create a Site VIF (virtual network interface). When the VIF becomes active at the destination side it will automatically activate the Remote Replication Schedule's checkpoints just as if it was done manually using the Activate Checkpoints dialog. Once the VIF has been created within the Site Cluster choose the 'Modify Remote Replication Schedule' option in the WUI and then select the 'Automatic Activation' tab. Within there select the 'Enable Automatic Checkpoint Activation' option and then choose the VIF to activate.
Resolving DR Failover - Deactivating Checkpoints
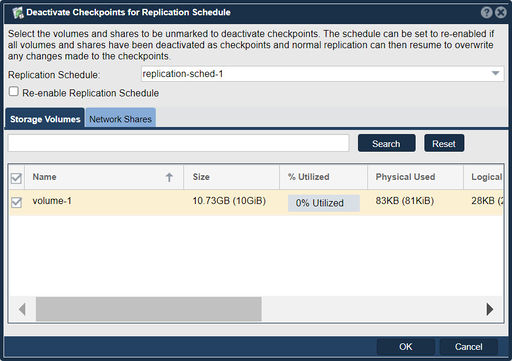
After a DR site failover has been done by 'Activating Checkpoints' they must be deactivated before replication may resume and overwrite changes to the destination _chkpnts. This can be easily done using the 'Deactivate Checkpoints...' dialog by right-clicking on the replication schedule and then choosing that option from the pop-up menu. To automatically activate and resume normal replication after deactivating the checkpoints select the 'Re-enable Replication Schedule' option within the dialog. Alternatively one may use the 'Enable Schedule' dialog to re-enable the schedule as a second step.
Manual Activation/Deactivation of Checkpoints
Via the 'Modify Network Share' and 'Modify Storage Volume' dialogs there is a check-box option to toggle the 'Active Replica Checkpoint' flag. This option may only be toggled on shares and volumes that are checkpoints with the _chkpnt suffix.
Session based Activation of Checkpoint Status
If a given destination side Storage Volume or Network Share checkpoint is accessed via iSCSI or SMB respectively, QuantaStor will automatically mark the given checkpoint as an active checkpoint. This ensures any changes to the destination are not lost. The replication scheduler in QuantaStor does a check before starting any new replication to ensure the destination checkpoints are not active and if detected as active the Replication Schedule is automatically transitioned to the Offline state.
Resolving a DR Site Failover
Once a given set of checkpoints have been marked as 'Active Checkpoints' these may be used as part of a Disaster Recovery (DR) failover strategy for any amount of time. To transition back to normal operation of the Replication Schedule to send data from the sources to the destination checkpoints one will choose one of two options.
Option 1: Throw out the destination side changes & resume replication
In the process of testing one's DR site failover it'll be common to activate the DR site checkpoints periodically and then simply re-activate the Remote Replication schedule. The easiest way to do this is to use the 'Deactivate Checkpoints' dialog as it makes it easy to deactivate all the checkpoints at once and re-enable the Replication Schedule in a single operation.
Option 2: Send checkpoint side changes back to the source side, then resume replication from source to destination
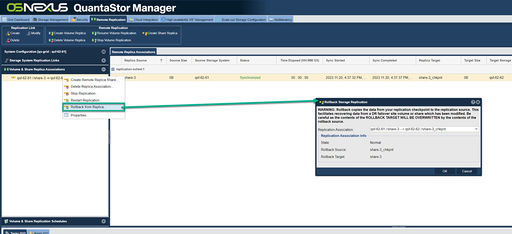
The process of sending the changes made to the DR site checkpoints back to the source side is called 'Rollback from Replica...' in QuantaStor and is done from the 'Volume & Share Replica Associations' section. Within that section one must select the link between a given source and destination and then choose 'Rollback from Replica...' in the pop-up menu. This must be done for each share and volume to be rolled back to the source side. Once the rollback activity is completed be sure to do a 'Rescan Storage Pools...' from the Storage Management-->Storage Pools section on each source side system. Once all the rollback replication activity has completed the source side will have a GMT snapshot with the same timestamp as the destination side. In effect rollback is done by taking a snapshot of the destination side changes and then sending these delta based incremental changes back to the source side volume/share. Use caution with this as the source side will be an identical copy of the destination after rollback so any changes made to the source side will be overwritten.
After the data has been sent (rolled-back from DR site) use the steps from Option 1 to resume regular replication.
