Storage Pools
Contents
- 1 Storage Pool Management
- 1.1 Pool RAID Layout Selection / General Guidelines
- 1.2 Creating Storage Pools
- 1.3 Boosting Performance with SSD Caching
- 1.4 Storage Pool Layout Types (ZFS based)
- 1.5 Identifying Storage Pools
- 1.6 Deleting Storage Pools
- 1.7 Importing Storage Pools
- 1.8 Hot-Spare Management Policies
- 1.9 Troubleshooting
Storage Pool Management
Storage pools combine or aggregate one or more physical disks (SATA, NL-SAS, NVMe, or SAS SSD) into a pool of fault tolerant storage. From the storage pool users can provision both SAN/storage volumes (iSCSI/FC targets) and NAS/network shares (CIFS/NFS). Storage pools can be provisioned using using all major RAID types (RAID0/1/10, single-parity RAIDZ1/5/50, double-parity RAIDZ2/6/60, triple-parity RAIDZ3, and DRAID) and in general OSNEXUS recommends RAIDZ2 4d+2p for the best combination of fault-tolerance and performance for most workloads. For assistance in selecting the optimal layout we recommend engaging the OSNEXUS SE team to get advice on configuring your system to get the most out of it.
Pool RAID Layout Selection / General Guidelines
We strongly recommend using RAIDZ2 4d+2p or RAID10/mirroring for all virtualization workloads and databases. RAIDZ3 or RAIDZ2 are ideal for archive applications that require higher-capacity for applications that produce mostly sequential IO patterns. RAID10 will maximize random IOPS but is more expensive since usable capacity before compression is 50% of the raw capacity or 33% with triple mirroring. Compression is the enabled by default, and can deliver performance gains for some workloads in addition to increasing usable capacity. We recommend leaving it enabled unless you're certain the data will be uncompressible such as with pre-encrypted data and pre-compressed video/image formats. For archival storage or other similar workloads RAIDZ2 or RAIDZ3 is best and provides higher usable capacity. Single-parity (RAIDZ1) is not sufficiently fault tolerant and is not supported in production deployments. RAID0 provides no fault-tolerance or bit-rot detection and is also not supported for use in production deployments.
Creating Storage Pools
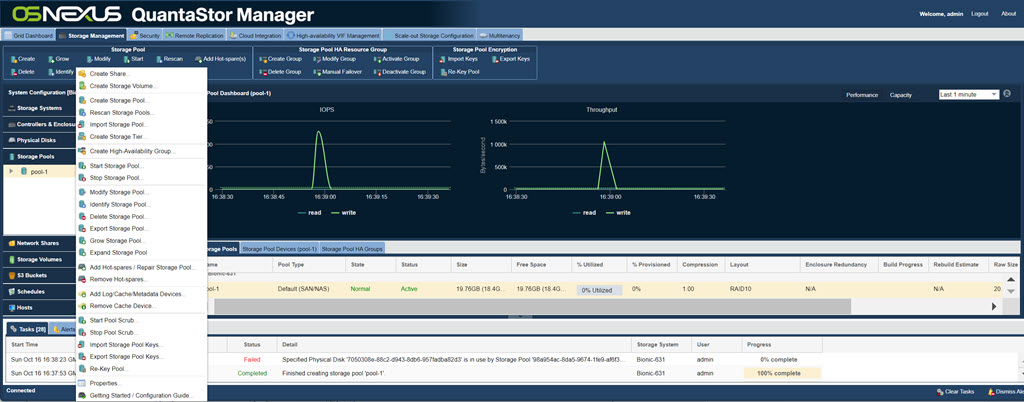
Navigation: Storage Management --> Storage Pools --> Storage Pool --> Create (toolbar)
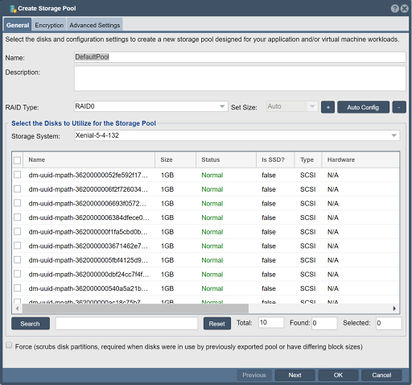
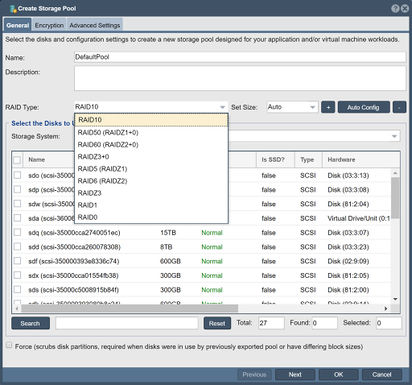
One of the first steps in configuring an system is to create a Storage Pool. The Storage Pool is an aggregation of one or more devices into a fault-tolerant "pool" of storage that will continue operating without interruption in the event of disk failures. The amount of fault-tolerance is dependent on multiple factors including hardware type, RAID layout selection and pool configuration. QuantaStor's block storage (Storage Volumes) as well as file storage (Network Shares) are both provisioned from Storage Pools. A given pool of storage can be used for block (SAN) and file (NAS) storage use cases at the same time. Additionally, clients can access the storage using multiple protocols at the same time. For example Storage Volumes may be accessed via iSCSI & FC at the same time and Network Shares may be accessed via NFS & SMB at the same time. Creating a storage pool is very straight forward, simply name the pool (eg: pool-1), select disks and a layout (Double-Parity recommended for most use cases) for the pool, and then press OK. If you're not familiar with RAID levels then choose the Double-Parity layout and select devices in groups of 6x (4d+2p). There are a number of advanced options available during pool creation but the most important one to consider is encryption as this cannot be turned on after the pool is created.
Enclosure Aware Intelligent Disk Selection
For systems employing multiple JBOD disk enclosures QuantaStor automatically detects which enclosure each disk is sourced from and selects disks in a spanning "round-robin" fashion during the pool provisioning process to ensure fault-tolerance at the JBOD level. This means that should a JBOD be powered off the pool will continue to operate in a degraded state. If the detected number of enclosures is insufficient for JBOD fault-tolerance the disk selection algorithm switches to a sequential selection mode which groups vdevs by enclosure. For example a pool with RAID10 layout provisioned from disks from two or more JBOD units will use the "round-robin" technique so that mirror pairs span the JBODs. In contrast a storage pool with the RAID50 layout (4d+1p) with two JBOD/disk enclosures will use the sequential selection mode.
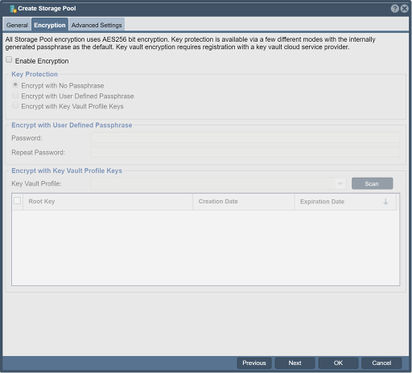
Enabling Encryption (One-click Encryption)
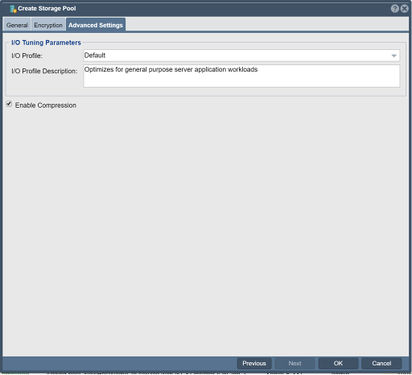
Encryption must be turned on at the time the pool is created. If you need encryption and you currently have a storage pool that is un-encrypted you'll need to copy/migrate the storage to an encrypted storage pool as the data cannot be encrypted in-place after the fact. Other options like compression, cache sync policy, and the pool IO tuning policy can be changed at any time via the Modify Storage Pool dialog. To enable encryption select the Advanced Settings tab within the Create Storage Pool dialog and check the [x] Enable Encryption checkbox.
Passphrase protecting Pool Encryption Keys
For QuantaStor used in portable systems or in high-security environments we recommend assigning a passphrase to the encrypted pool which will be used to encrypt the pool's keys. The drawback of assigning a passphrase is that it will prevent the system from automatically starting the storage pool after a reboot. Passphrase protected pools require that an administrator login to the system and choose 'Start Storage Pool..' where the passphrase may be manually entered and the pool subsequently started. If you need the encrypted pool to start automatically or to be used in an HA configuration, do not assign a passphrase. If you have set a passphrase by mistake or would like to change it you can change it at any time using the Change/Clear Pool Passphrase... dialog at any time. Note that passphrases must be at least 10 characters in length and no more than 80 and may comprise alpha-numeric characters as well as these basic symbols: ".-:_" (period, hyphen, colon, underscore).
Enabling Compression
Pool compression is enabled by default as it typically increases usable capacity and boosts read/write performance at the same time. This boost in performance is due to the fact that modern CPUs can compress data much faster than the media can read/write data. The reduction in the amount of data to be read/written due to compression subsequently boosts performance. For workloads which are working with compressed data (common in M&E) we recommend turning compression off. The default compression mode is LZ4 but this can be changed at any time via the Modify Storage Pool dialog.
Boosting Performance with SSD Caching
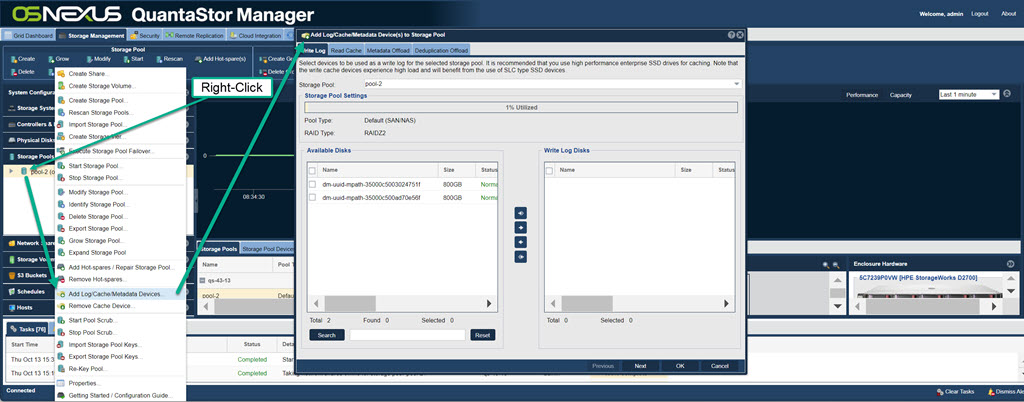
ZFS based storage pools support the addition of SSD devices for use as read cache or write log. SSD cache devices must be dedicated to a specific storage pool and cannot be shared across multiple storage pools. Some hardware RAID controllers support SSD caching but in our testing we've found that ZFS is more effective at managing the layers of cache than the RAID controllers so we do not recommend using SSD caching at the hardware RAID controller.
Accelerating All Performance with SSD Meta-data & Small File Offload (ZFS special VDEVs)
Scale-up Storage Pools using HDDs should always include 3x SSDs for metadata offload and small file offload. This feature of the filesystem is so powerful and impactful to improving performance for scrubs, replication, HA failover, small-file performance and more that we do not design any HDD based pools without it. All-flash storage pools do not need it and should not use it unless you're looking to optimize the use of QLC media. QLC media is not ideal for small block IO so using TLC media to offload the filesystem metadata and small files is a good idea. That would be the only use case for using metadata-offload SSDs with an all-flash storage pool.
Accelerating Write Performance with SSD Write Log (ZFS SLOG/ZIL)
Scale-up Storage Pools use the OpenZFS filesystem which has the option of adding an external log device (SLOG/ZIL) rather than using the primary data VDEVs for logging. Modern deployments use the SLOG/ZIL write-log offload less and less so we don't recommend it for most deployments. This is because the feature is generally used to boost the performance of HDD based pools that are being used for database and VM workloads. Modern deployments should not use HDD based pools for database and VM use cases. Now that NVMe SSDs and SAS SSDs are much more affordable than they were from 2010-2020 it is best to make an all-flash pool for all workloads that are IOPS intensive. Interestingly with new types of NVMe entering the market there may be a renewed use of SLOG/ZIL in the future to optimize the use of QLC NVMe devices with TLC NVMe media. Note that the default 'sync' mode for Storage Pools is the 'standard' mode which bypasses the SLOG/ZIL unless the write is using the O_SYNC flag which is used by hypervisors and databases. If you're using a SLOG/ZIL for other workloads you'll notice that it is getting bypassed all the time. In such cases you can change the 'sync' mode to 'always' as a way of forcing the write-log to be used for all IO but note that if your log device is not fast enough you may actually see a performance decrease. That said, with dual-ported NVMe based HA configurations with NVMe media that can do 4GB/sec and faster, the 'sync=always' pool sync policy may come in vogue again. Note also that multiple pairs of SLOG/ZIL devices can be added to boost log performance. For example, if you add 4x 3.84TB NVMe devices you'll have two mirror pairs and if they can each do 4GB/sec then in aggregate you'll have a 8GB/sec log. If you have a HDD based pool then such a log would be able to ingest and coalesce 80x HDDs worth of write IO and make the pool usable for a broader set of use cases.
Accelerating Read Performance with SSD Read Cache (L2ARC)
You can add up to 4x devices for SSD read-cache (L2ARC) to any ZFS based storage pool and these devices do not need to be fault tolerant. You can add up to 4x devices directly to the storage pool by selecting 'Add Cache Devices..' after right-clicking on any storage pool. You can also opt to create a RAID0 logical device using the RAID controller out of multiple SSD devices and then add this device to the storage pool as SSD cache. The size of the SSD Cache should be roughly the size of the working set for your application, database, or VMs. For most applications a pair of 400GB SSD drives will be sufficient but for larger configurations you may want to use upwards of 2TB or more of SSD read cache. Note that the SSD read-cache doesn't provide an immediate performance boost because it takes time for it to learn which blocks of data should to be cached to provide better read performance.
RAM Read Cache Configuration (ARC)
ZFS based storage pools use what are called "ARC" as a in-memory read cache rather than the Linux filesystem buffer cache to boost disk read performance. Having a good amount of RAM in your system is critical to deliver solid performance. It is very common with disk systems for blocks to be read multiple times. The frequently accessed "hot data" is cached into RAM where it can serve read requests orders of magnitude faster than reading it from spinning disk. Since the cache takes on some of the load it also reduces the load on the disks and this too leads to additional boosts in read and write performance. It is recommended to have a minimum of 32GB to 64GB of RAM in small systems, 96GB to 128GB of RAM for medium sized systems and 256GB or more in large systems. Our design tools can help with solution design recommendations here.
Storage Pool Layout Types (ZFS based)
Navigation: Storage Management --> Storage Pools --> Storage Pool --> Create (toolbar)
QuantaStor supports all industry standard RAID levels (RAID1/10/5(Z1)/50/6(Z2)/60), some additional advanced RAID levels (RAID1 triple copy, RAIDZ3 triple-parity), and simple striping with RAID0. Over time all disk media degrades and as such we recommend marking at least one device as a hot-spare disk so that the system can automatically heal itself when a bad device needs replacing. One can assign hot-spare disks as universal spares for use with any storage pools as well as pinning of hot-spares to specific storage pools. Finally, RAID0 is not fault-tolerant at all but it is your only choice if you have only one disk and it can be useful in some scenarios where fault-tolerance is not required. Here's a breakdown of the various RAID types and their pros & cons.
- Striping RAID0 layout is also called 'striping' and it writes data across all the disk drives in the storage pool in a round robin fashion. This has the effect of greatly boosting performance. The drawback of RAID0 is that it is not fault tolerant, meaning that if a single disk in the storage pool fails then all of your data in the storage pool is lost. As such RAID0 is not recommended except in special cases where the potential for data loss is non-issue.
- Mirroring RAID1/mirroring is also called 'mirroring' because it achieves fault tolerance by writing the same data to two disk drives so that you always have two copies of the data. If one drive fails, the other has a complete copy and the storage pool continues to run. RAID1 and it's variant RAID10 are ideal for databases and other applications which do a lot of small write I/O operations.
- Striped-Mirroring RAID10 is similar to RAID1 in that it utilizes mirroring, but RAID10 also does striping over the mirrors. This gives you the fault tolerance of RAID1 combined with the performance of RAID10. The drawback is that half the disks are used for fault-tolerance so if you have 8 1TB disks utilized to make a RAID10 storage pool, you will have 4TB of usable space for creation of volumes. RAID10 will perform very well with both small random IO operations as well as sequential operations and it is highly fault tolerant as multiple disks can fail as long as they're not from the same mirror-pairing. If you have the disks and you have a mission critical application we highly recommend that you choose the RAID10 layout for your storage pool.
- Single-Parity RAID5/RAIDZ1 achieves fault tolerance via a single parity block per data stripe. It's fast but not fault-tolerant enough for production workloads and should be avoided.
- Double-parity RAID60/RAIDZ2 provides two parity blocks per data stripe and provides robust throughput and IOPS performance. It is our recommended layout for most workloads and is the default in QuantaStor.
- Triple-parity RAIDZ3 Is a triple-parity layout and is ideal for long term archive and backup applications as it can sustain three simultaneous disk failures per device group (VDEV).
- Distributed-RAID DRAID This layout is a variation of the Double-parity and Triple-parity layouts that provides much faster rebuilds by distributing the data and parity information over a much larger group of devices. We recommend this on systems with multiple large 60, 84, and 90, and 106 bay JBODs used for backup and archive use cases.
It can be useful to create more than one storage pool so that you have low cost fault-tolerant storage available in RAIDZ2/60 for backup and archive and higher IOPS storage in RAID10/mirrored layout for virtual machines, containers and databases.
Identifying Storage Pools
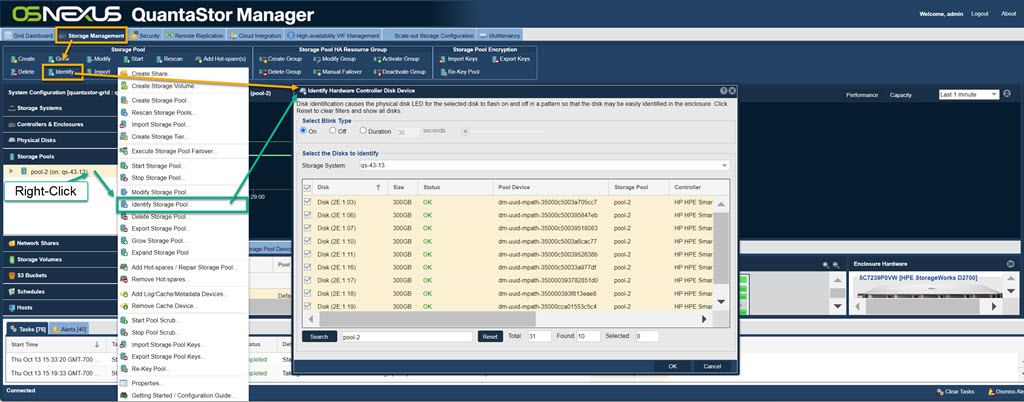
Navigation: Storage Management --> Controllers & Enclosures --> Identify (rightclick)
or
Navigation: Storage Management --> Storage Pools --> Identify (toolbar)
The group of disk devices which comprise a given storage pool can be easily identified within a rack by using the Storage Pool Identify dialog which will blink the LEDs in a pattern.
Deleting Storage Pools
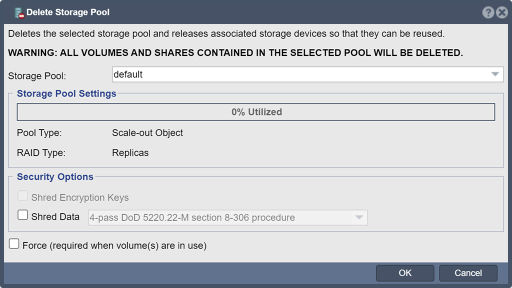
Navigation: Storage Management --> Storage Pools --> Storage Pool --> Delete (toolbar)
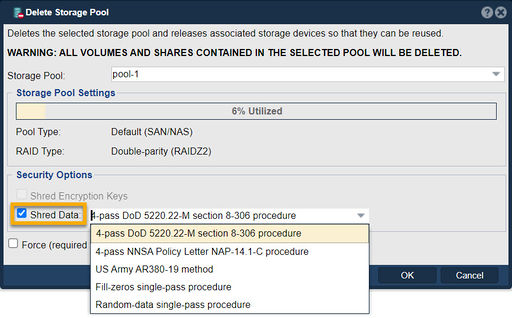
Storage pool deletion is final so be careful and double check to make the correct pool is selected. For secure deletion of storage pools please select one of the data scrub options such as the default 4-pass DoD (Department of Defense) procedure.
Data Shredding Options
QuantaStor uses the Linux scrub utility which is compliant to various government standards to securely shred data on devices. QuantaStor provides three data scrub procedure options including DoD, NNSA, and USARMY data scrub modes:
- DoD mode (default)
- 4-pass DoD 5220.22-M section 8-306 procedure (d) for sanitizing removable and non-removable rigid disks which requires overwriting all addressable locations with a character, its complement, a random character, then verify. **
- NNSA mode
- 4-pass NNSA Policy Letter NAP-14.1-C (XVI-8) for sanitizing removable and non-removable hard disks, which requires overwriting all locations with a pseudorandom pattern twice and then with a known pattern: random(x2), 0x00, verify. **
- US ARMY mode
- US Army AR380-19 method: 0x00, 0xff, random. **
- Fill-zeros
- Fills with zeros with a single-pass procedure
- Random-data
- Fills with random-data using a single-pass procedure
** Note: short descriptions of the QuantaStor supported scrub procedures are borrowed from the scrub utility manual pages which can be found here.
Importing Storage Pools
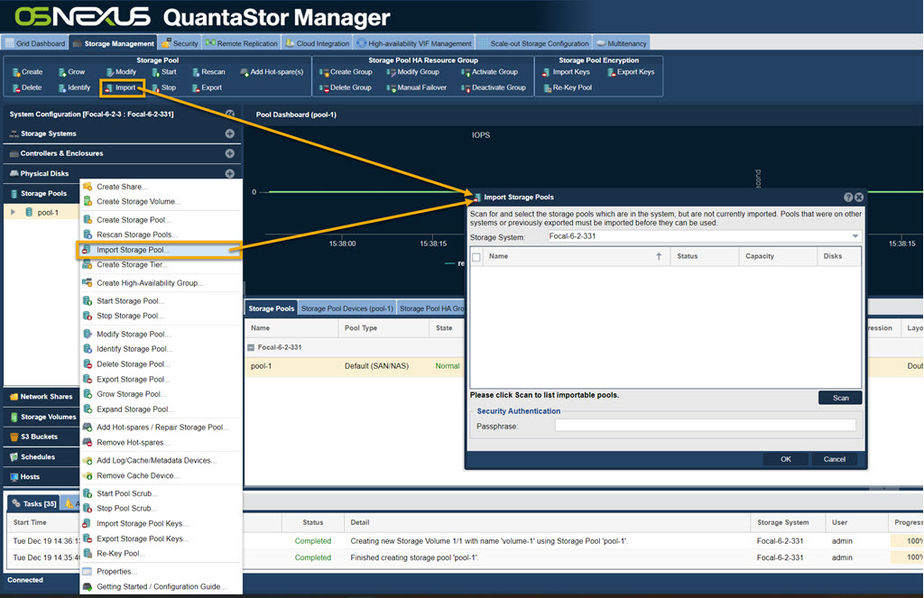
Storage pools can be physically moved from system to another system by moving all of the disks associated with that given pool from the old system to a new system . After the devices have been moved over one should use the Scan for Disks... option in the web UI so that the devices are immediately discovered by the system . After that the storage pool may be imported using the Import Pool... dialog in the web UI or via QS CLI/REST API commands.
Importing Encrypted Storage Pools
The keys for the pool (qs-xxxx.key) must be available in the /etc/cryptconf/keys directory in order for the pool to be imported. Additionally, there is an XML file for each pool which contains information about which devices comprise the pool and their serial numbers which is located in the /etc/cryptconf/metadata directory which is called (qs-xxxx.metadata) where xxxx is the UUID of the pool. We highly recommend making a backup of the /etc/cryptconf folder so that one has a backup copy of the encryption keys for all encrypted storage pools on a given system. With these requirements met, the encrypted pool may be imported via the Web Management interface using the Import Storage Pools dialog the same one used do for non-encrypted storage pools.
Importing 3rd-party OpenZFS Storage Pools
Importing OpenZFS based storage pools from other servers and platforms (Illumos/FreeBSD/ZoL) is made easy with the Import Storage Pool dialog. QuantaStor uses globally unique identifiers (UUIDs) to identify storage pools (zpools) and storage volumes (zvols) so after the import is complete one would notice that the system will have made some adjustments as part of the import process. Use the Scan button to scan the available disks to search for pools that are available to be imported. Select the pools to be imported and press OK to complete the process.
For more complex import scenarios there is a CLI level utility that can be used to do the pool import which is documented here Console Level OpenZFS Storage Pool Importing.
Hot-Spare Management Policies
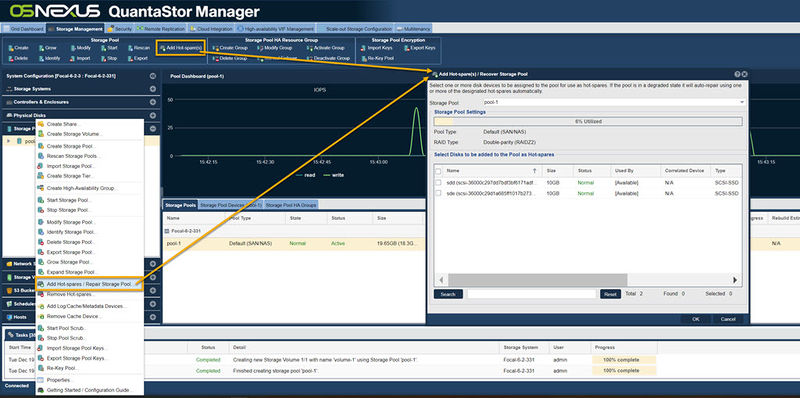
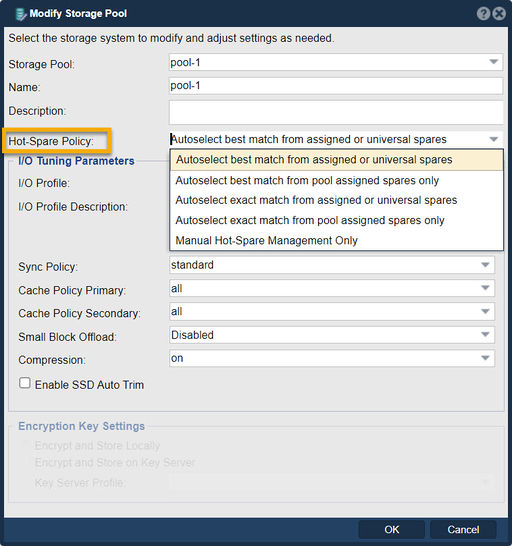
Select Recovery from the Storage Pool toolbar or right click on a Storage Pool from the the tree view and click on Recover Storage Pool / Add Spares....
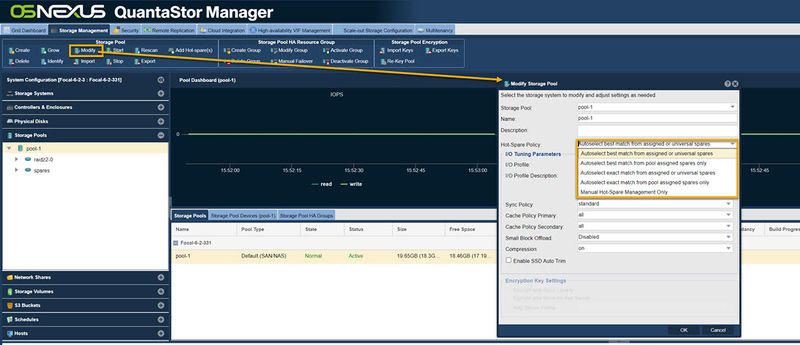
Hot Spares can also be selected from the Modify Storage Pool dialog by clicking on Modify in the Storage Pool toolbar.
Modern versions of QuantaStor include additional options for how Hot Spares are automatically chosen at the time a rebuild needs to occur to replace a faulted disk. Policies can be chosen on a per Storage Pool basis and include:
- Auto-select best match from assigned or universal spares (default)
- Auto-select best match from pool assigned spares only
- Auto-select exact match from assigned or universal spares
- Auto-select exact match from pool assigned spares only
- Manual Hot-spare Management Only
If the policy is set to one that includes 'exact match', the Storage Pool will first attempt to replace the failed data drive with a disk that is of the same model and capacity before trying other options. The Manual Hot-spare Management Only mode will disable QuantaStor's hot-spare management system for the pool. This is useful if there are manual/custom reconfiguration steps being run by an administrator via a root SSH session.
Troubleshooting
Degraded Pool
When a pool becomes degraded this state indicates more media devices has failed or become disconnected from the system. If the pool has an assigned hot-spare after a minute it will try to repair the pool using the spare. If the system has no hot-spares add a device that is the same size (or larger) and type as the failed device and mark it as a hot-spare in the Physical Disks section. QuantaStor will automatically inject the spare device into the pool to start the resilvering/rebuild process to bring the pool back to full health.
Rebuild Taking Long Time
The amount of time it takes to heal a pool varies based on the speed and type of the media (HDD, SSD, NVMe) how much load is on the system and how many vdevs you have in the pool. All storage pools should be comprised of at least two VDEVs so that the pool can better manage workloads during drive rebuilds. If the pool is HDD based we highly recommend adding 3x SSDs/NVMe for meta-data offload. Rebuilds are very metadata intensive so having the metadata in an all-flash vdev ("special" type vdev) greatly speeds up pool rebuilds and pool scrubs.
Pool Performance Inconsistent
Inconsistent performance can be an indicator of media that is failing. QuantaStor looks for predictive drive failure indicators and reports on that and also marks bad and failing media with a 'Warning' state. To check the media first navigate to the Physical Disks section and check to see that all devices are in the Normal state. If any are in the Warning or Error state click on them, then review the State Detail in the Properties section to get information about what is wrong with the device. If predictive drive failures are reporting then the media should be replaced. When predictive drive failures are detected QuantaStor generates alerts so it is also important to make sure you have email or other alert notification options configured in the Alert Manager section.
If all the media shows as Normal we recommend running a 'Read Performance Test' and this is also available in the Physical Disks section. The read performance test will read from all the selected devices using a basic 'dd' read. If you see large inconsistencies in the performance between one or two devices and the rest that can be an indicator that there's a problem with those devices. We recommend opening a support ticket, sending logs, and getting assistance with reviewing the media health.
Small File Performance Issues
If you're having performance issues with small files in a HDD based pool we recommend adding 3x SSDs to the pool as meta-data offload with a 32K small-file offload size. Best performance for IOPS, small files, databases, VMs, and other workloads with effectively random and small block IO access patterns is to use small parity length layout (RAIDZ2 / 4d+2p) or mirroring (RAID10). The other important factor is having many VDEVs, at least 3 and ideally 4 or more. If you don't have enough VDEVs expand you system to increase the number of VDEVs which are referred to as Storage Pool Device Groups in QuantaStor.
Failed Pool
due to media connectivity
If a pool is in the Failed state that indicates that more devices in the pool have failed within a given VDEV/stripe than can be repaired and the pool has stopped. Often this problem is related to device connectivity and not failed media. For example, if an extern JBOD is powered off this will remove access to many devices and if the pool is not striped across many JBODs the pool will stop in a Failed state. To address this check any external JBODs and make sure they're cabled up properly and powered on.
due to HA failover
Another reason one could see a Failed state is in a HA configuration where the other node has taken over the pool. The System seeing the pool in the Failed state is reporting that because it no longer has write access to the pool. In an HA cluster configuration the node that had the pool at the time it transitioned to the Failed state will need to be rebooted. This is because any write I/O in-flight is effectively stuck in the disk IO stack and this cannot be cleared without a reboot. QuantaStor has many guards in place to prevent a Failed pool from being re-imported on a system until it is rebooted.
due to too many failed devices
If you see multiple devices in a single VDEV that are failed beyond what the pool can repair (for example 3x devices in a VDEV of 4d+2p) then the pool may not be recoverable without assistance from a drive repair service. In such conditions we recommend powering everything off and trying to restart the system (cold boot including cold boot of any JBODs) a few times to see if one or more of the failed devices can recover.
due to 'foreign media'
If your system is using media from a hardware RAID card (not recommended) you may have the media passed through to QuantaStor using several single RAID0 devices as many early hardware RAID card models did not support a true JBOD passthrough mode. These cards can get into a state where the media is not recognized as owned by the RAID card which can happen if the RAID card is replace. You can address this in the QuantaStor web management interface via the hardware Controllers & Enclosures section. Locate the hardware RAID card for the system then right-click and choose 'Import Foreign Units..' from the pop-up menu. This will import any/all hardware RAID units discovered by the controller and then you'll be able to start the storage pool.
Multiple Pool Failovers
Storage Pools configured for HA have an associated High-availability Group with a set of HA failover policies. The default policy is to do a failover if all data ports go offline. Systems should have ethernet ports connected to two separate switches that a switch outage does not bring all ports offline. Similarly with systems with FC ports a FC switch should always be used in-between the QuantaStor system and the client machines else the HA Group policy should be reconfigured to not failover when all FC ports are down as a direct connection to a FC initiator that is restarting will confuse the system into thinking all ports are down and that a failover is needed. QuantaStor will use the heart-beat network ports to communicate with the secondary node to ensure that connectivity is available before doing a failover so if both nodes lose access there is not an unnecessary pool failover.
