Veeam Deployment Guide
Contents
- 1 Overview
- 2 Veeam Integration Points
- 3 Initial Setup Requirements
- 4 Designing QuantaStor Systems for Veeam
- 5 Protocol Selection
- 6 Provisioning Block Storage based Backup Repositories
- 7 Provisioning File Storage based Backup Repositories
- 8 Provisioning S3 Object Storage based Backup Repositories
- 9 Creating QuantaStor System Internals Backup
Overview
Veeam integrates with QuantaStor for backing up VMware/Hyper-V, Linux, and Windows workstations and servers. QuantaStor can be configured to deliver file, block, and or S3 object storage to Veeam for use as a backup Repository. This Deployment Guide goes over the Veeam and QuantaStor configuration steps to set up Veeam Backup & Recovery for each of these options (file, block, object).
Veeam Integration Points
- Use Veeam Backup & Replication for a variety of backup and recovery use cases including Microsoft Office 365, Nutanix AHV, VMware, Hyper-V, Solaris, cloud instances, physical servers and more.
- Use Veeam® Agent for Microsoft Windows to enable backup and recovery of Windows-based servers and workstations, running on premises, remotely or in the public cloud.
- Use Veeam Agent for Linux as a simple backup agent to backup Linux systems. The Linux Agent can also be installed directly into QuantaStor systems as they are Linux based and used to backup QuantaStor system internals (/etc/cryptconf/, /var/opt/osnexus/) and Storage Pools.
Initial Setup Requirements
This deploy guide assumes that you have your Veeam Backup & Replication software installed on your backup server and one or more QuantaStor storage servers in your environment. The QuantaStor system should have at least one Storage Pool created that can be used to provision file storage (Network Shares), block storage (Storage Volumes), or object storage (S3 Bucket) for the Veeam backup server(s) to write to as a Repository.
Designing QuantaStor Systems for Veeam
OSNEXUS provides web based design tools for designing your QuantaStor based storage solution for Veeam. If your requirements are for less than 2PB of usable capacity these needs are often most efficiently met using a QuantaStor scale-up NAS system (see https://osnexus.com/zfs-designer) whereas larger multi-PB and fast growing configurations benefit the most from a scale-out QuantaStor configuration that will deliver S3 object storage and/or SMB storage to Veeam (see https://osnexus.com/ceph-designer). For solution engineering assistance with designing a QuantaStor storage system that’s ideal for your environment write to info@osnexus.com or contact your OSNEXUS reseller.
QuantaStor may be deployed on a single x86 64bit server or VM for compact simple deployments which can use server internal storage or JBOD attached storage. Larger backup environments should be set up as QuantaStor highly-available storage clusters and for that we recommend designing your QuantaStor system using the above noted design utilities or with assistance from OSNEXUS or OSNEXUS partner.
Protocol Selection
Scale-out QuantaStor configurations with 4x or more QuantaStor servers may be set up to deliver file, block, or S3 object storage to Veeam. S3 object storage based Repositories are typically the best option for scale-out configurations.
Scale-up QuantaStor configurations with 1x or more QuantaStor servers can deliver both file and block storage to Veeam. SMB based file storage Repositories are typically the best option for scale-up configurations.
Go to the Repository provisioning section below for ‘Provisioning Block Storage based Repositories’, ‘Provisioning File Storage based Repositories’ or Provisioning S3 Object Storage based Repositories’ that best meets your requirements and the setup of your QuantaStor storage systems.
Provisioning Block Storage based Backup Repositories
This guide assumes that you have already provisioned a scale-up or scale-out Storage Pool to provision the block storage (Storage Volume) from. OSNEXUS recommends provisioning your Storage Volumes (LUNs) with a block size of 1M for best performance, but block size options including 128K and 256K are also good choices. There is no limit in QuantaStor for the size of your Storage Volumes (LUNs) and they can be grown dynamically. Note though that there are file-system allocation/cluster size considerations to take into account on Windows. Please be sure to review the Windows file-system documentation before resizing Storage Volumes.
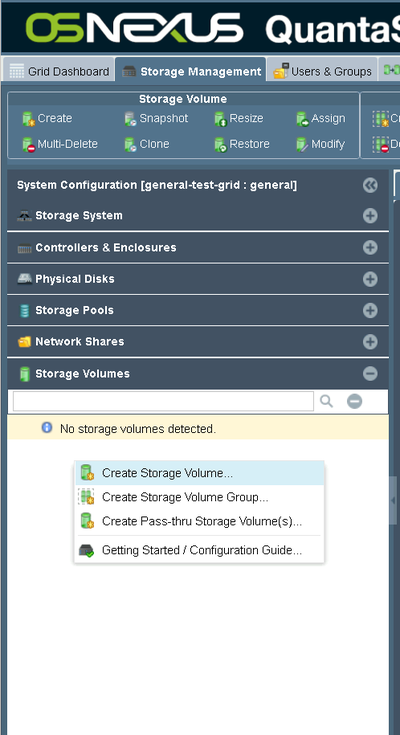
Begin by logging into your QuantaStor server and navigating to the Storage Volumes section under the main Storage Management tab after you have logged into your QuantaStor storage grid. Next, right-click and select “Create Storage Volume” as shown or choose “Create” from the Storage Volume toolbar button group at the top of the screen.
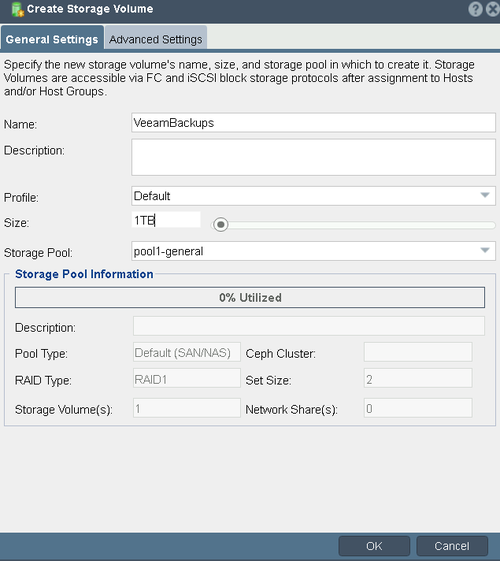
Next, enter a name for your Storage Volume and the desired size for the volume (LUN) in the General Settings tab. Note that you can increase but not decrease the size of a Storage Volume after it has been provisioned. By default, all Storage Volumes are thin-provisioned but this can be customized in the Advanced Settings tab. When the new Storage Volume is created it will have a new target IQN associated with it that has the name of the Storage Volume in it so that it is easy to identify.
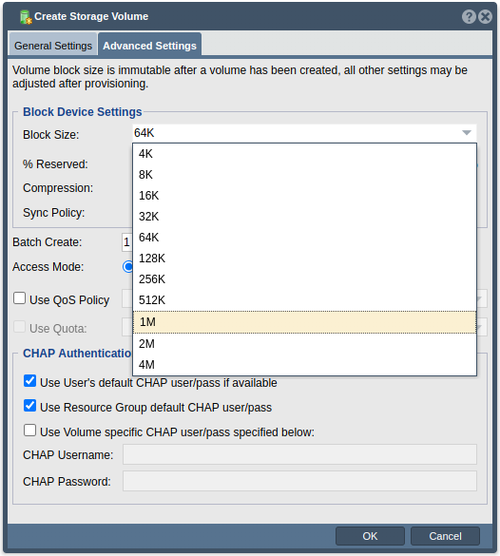
Go to the “Advanced Settings” tab in the same window and select “1M” for your desired block size. This is the recommended setting for block volumes meant for Veeam Backups for optimal performance.
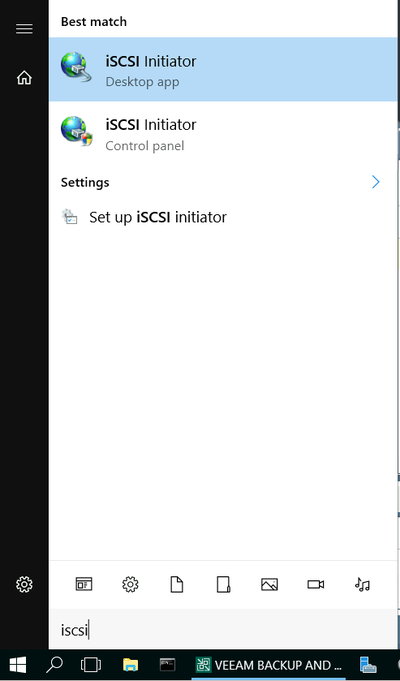
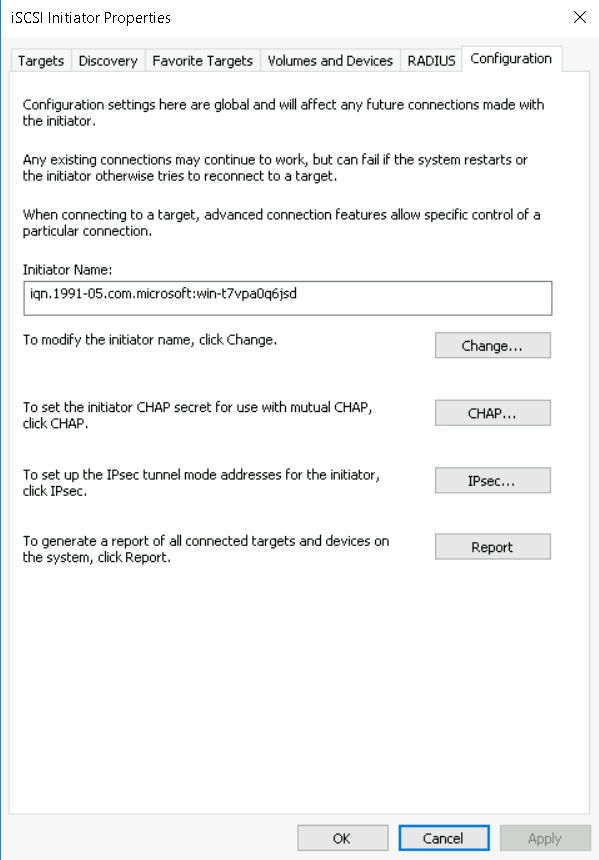
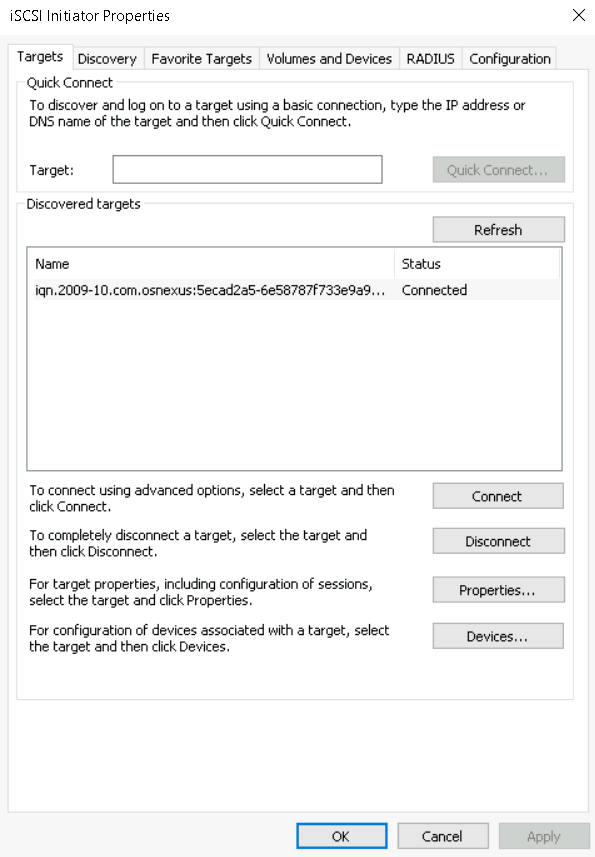
In your Windows Veeam Proxy machine go to the iSCSI Initiator setup. You can do this by clicking the Start Menu and typing ‘iSCSI’ to find the above menu item.
Once the iSCSI Initiator Properties window opens, go to the ‘Configuration’ tab and copy the ‘Initiator Name’. This will be used as a Host entry in QuantaStor.
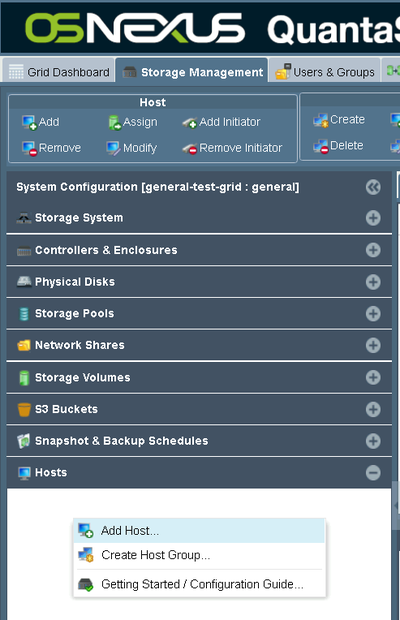
Next, in the QuantaStor web interface, navigate to the “Hosts” section as pictured above and right-click to select ‘Add Host’.
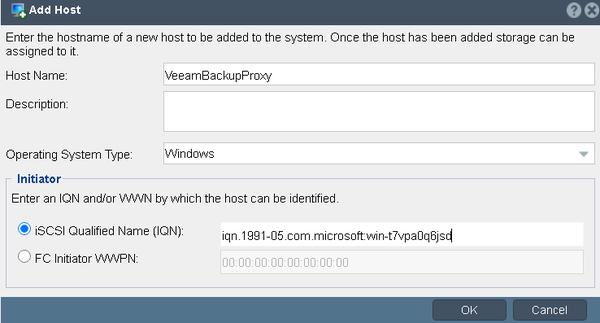
In the Window that appears, enter your iSCSI Initiator ID (IQN) which you copied in the previous step and give the ‘Host Name’ so you can easily identify the machine which is associated with the Veeam Backups Storage Volume. You can also add additional notes in the ‘Description’ field. Once you are done, press ‘OK’.
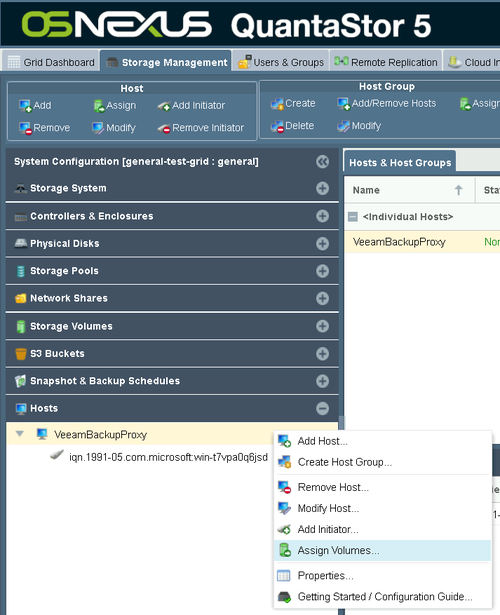
Once the Host entry has been created, right-click on it and select ‘Assign Volumes’. All Storage Volumes must be explicitly assigned to a Host in order for it to be accessed. QuantaStor does not support public/all access to Storage Volumes for security purposes so this step cannot be skipped.
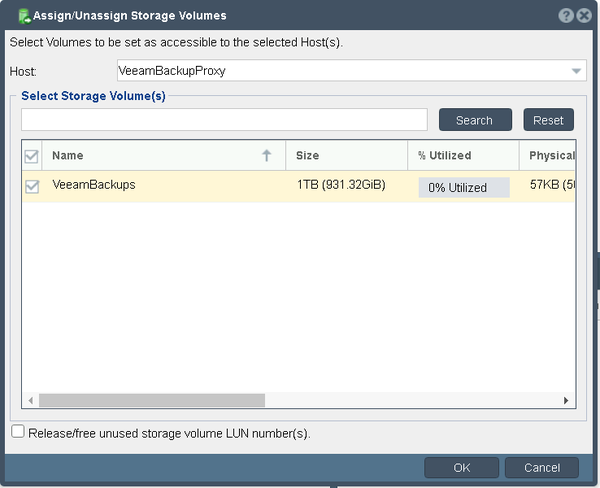
In the Assign/Unassign Storage Volumes dialog that appears, select the Storage Volume created in the previous step and press ‘OK’. This will allow the selected Host to access all of the selected Storage Volumes. Unselect volumes to detach/remove access from volumes for the selected Host.
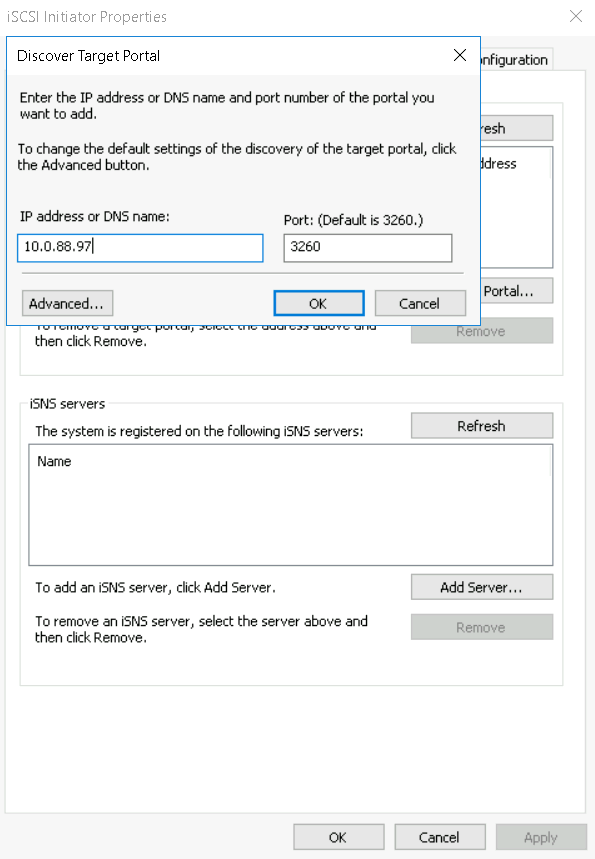
Now return to the iSCSI Initiator window in your Windows server and select ‘Discovery’ tab, then select ‘Discover Portal’. In the small window that appears, type in the IP address that the Windows Veeam Proxy will use to access the iSCSI Storage Volume on the QuantaStor storage server and press OK. This should be an IP address to a fast 10GbE/40GbE or 100GbE port of your QuantaStor storage server. For highly-available Storage Pools this should be the IP of a VIF associated with the pool or scale-cluster. This will ensure continuous access if a server is rebooted.
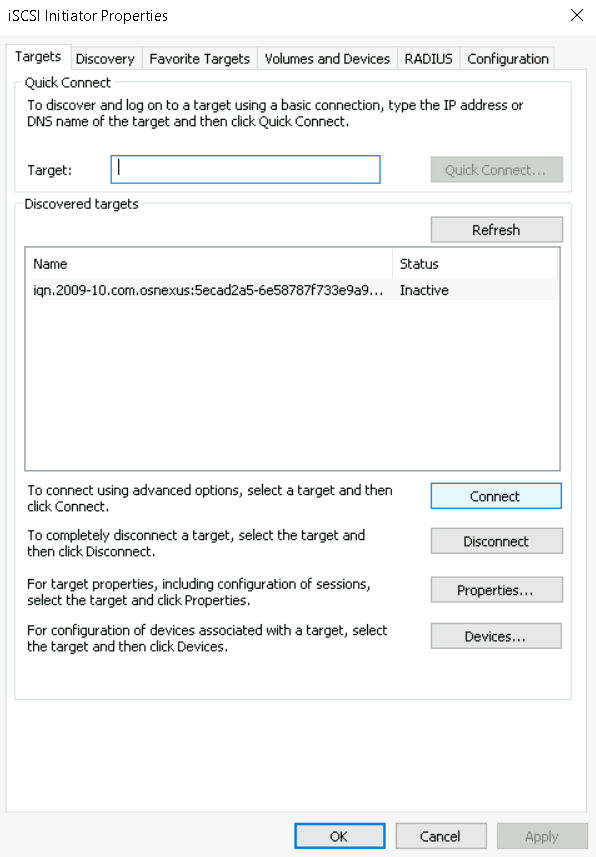
Next, go to the Targets tab in the same window and click the “Connect” button.
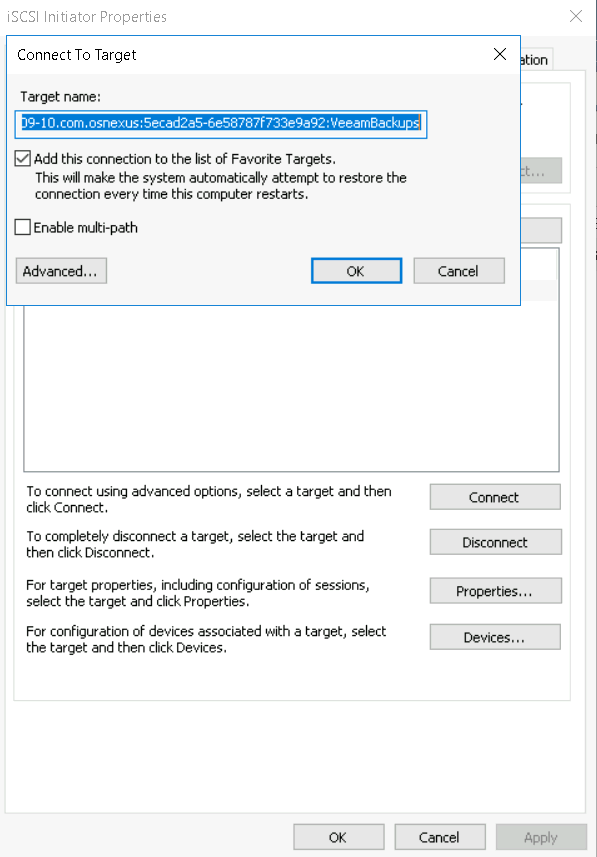
In the window that appears you can simply press OK. For ideal fault tolerance and performance, you will want to have multi-path enabled with the MPIO driver enabled and configured to enable multipathing for SCSI vendor ID “OSNEXUS “ and product ID “QUANTASTOR ”. For more information about that, please follow the configuration steps outlined in this guide: https://wiki.osnexus.com/index.php?title=Multipath_IO_Configuration
Once you are done, you should see an additional iSCSI connection to your QuantaStor Storage Volume in the “Connected” state.
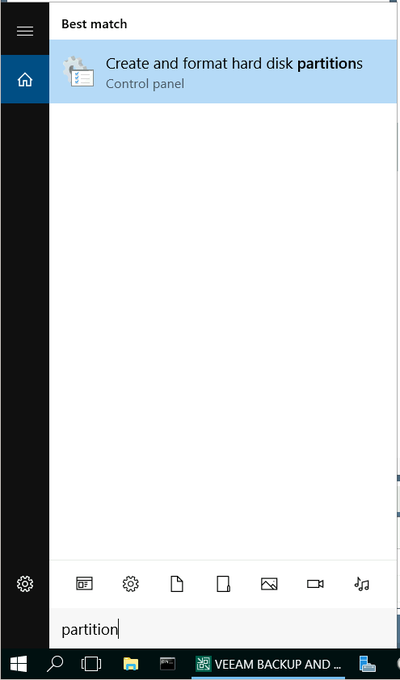
Next, go to the start menu and type “Partition” in order to open the “Create and format hard disk partitions” menu in Windows.
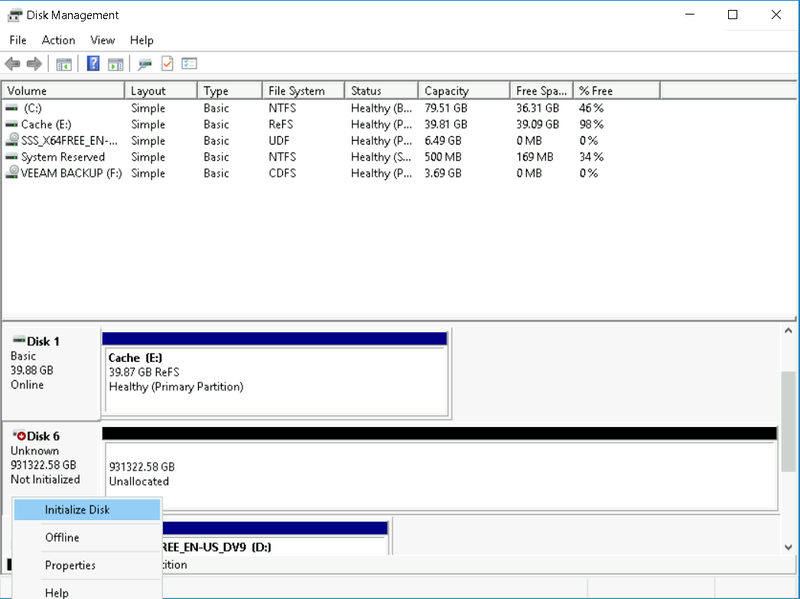
When this menu opens, be careful NOT to click ‘OK’. Since there may be multiple disks available to this machine, we want to close this menu without initialization and then scroll to find the correct disk based on the size we used when we created the Storage Volume.
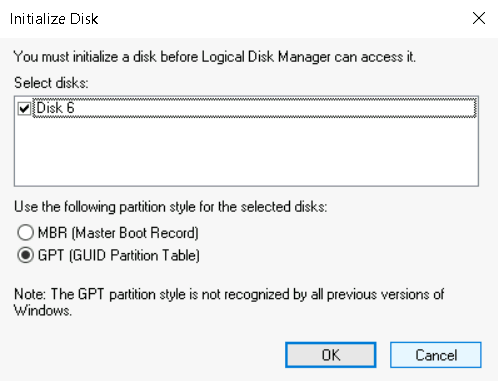
Once you have found the correct disk, right-click on the left side and select “Initialize Disk” and choose “GPT” in the window that pops up next.
Then right-click on the right side and choose “New Simple Volume”.
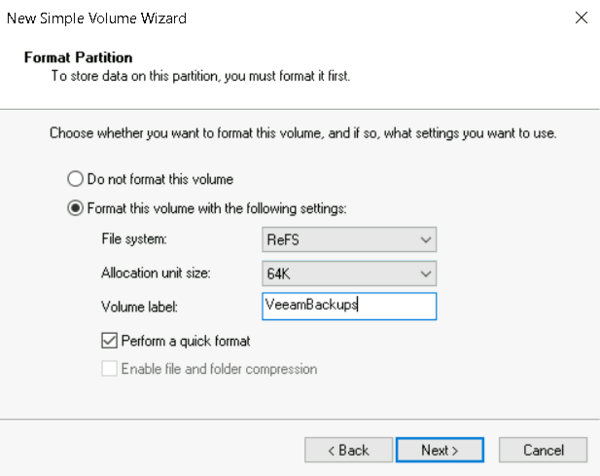
On the “Format Partition” window, select ReFS in order to enable additional functionality for Veeam Backups and select 64K Allocation unit size in order to improve performance of backups. Finally, select a Volume label and press Next until the wizard is finished and wait for the partition to finish formatting.
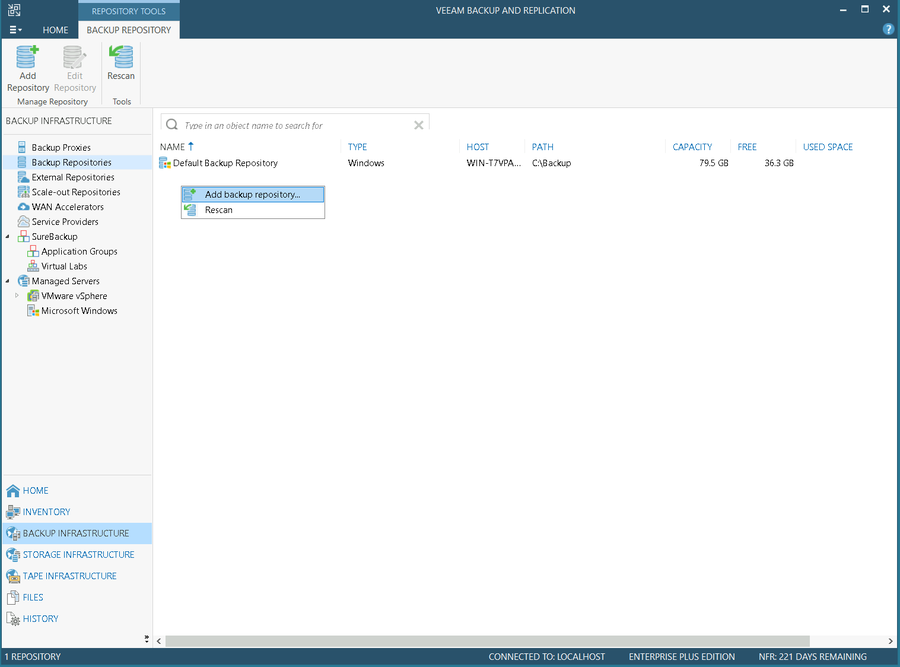
In Veeam Backups, select the “Backup Infrastructure” menu at the bottom and the “Backup Repositories” submenu above. Right-click in the right side menu and select “Add backup repository”.
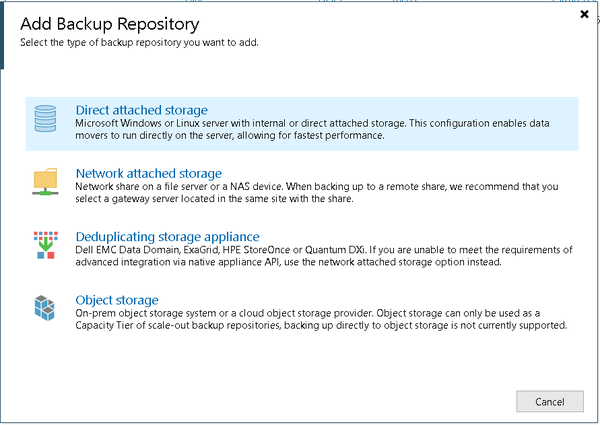
In the window that appears, select “Direct attached storage” which also encompasses this use case of iSCSI/FC SAN attached storage.
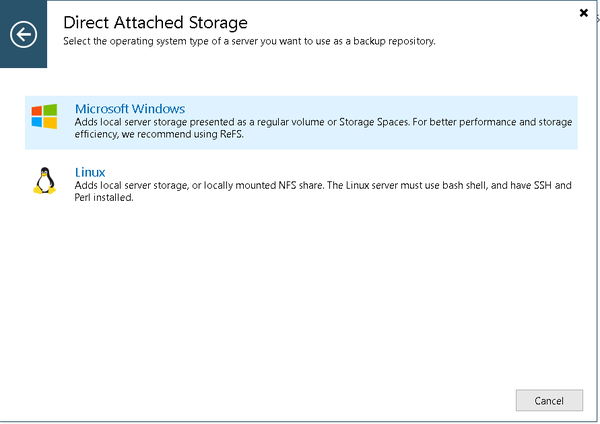
Select “Microsoft Windows” on the next part of the wizard.
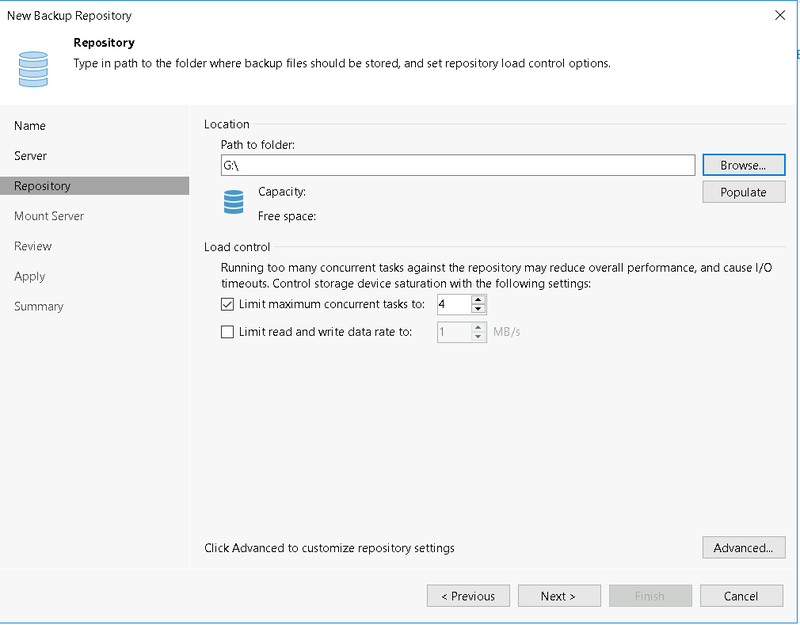
On the Repository window, select the drive letter or device path to your newly-attached iSCSI volume from the QuantaStor cluster/server and click through to finish adding the Repository.
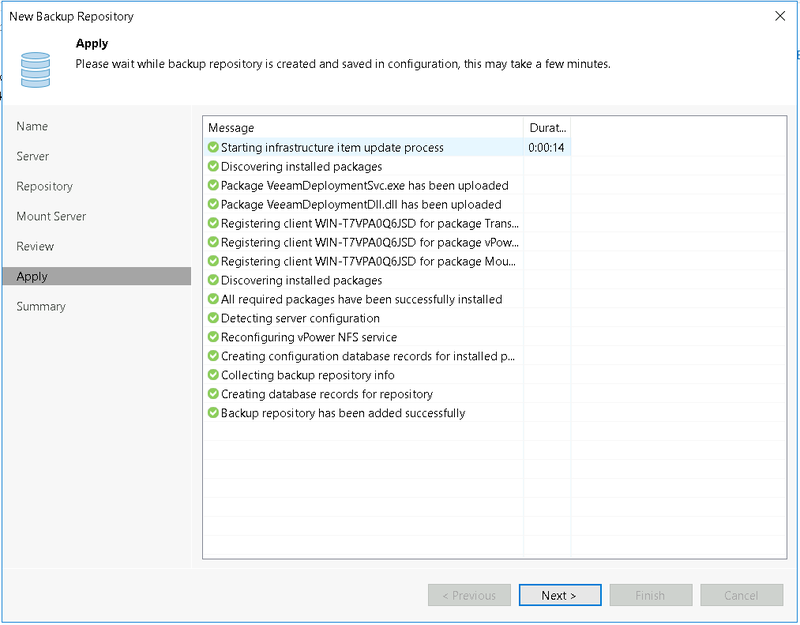
The summary page should look similar to the above.
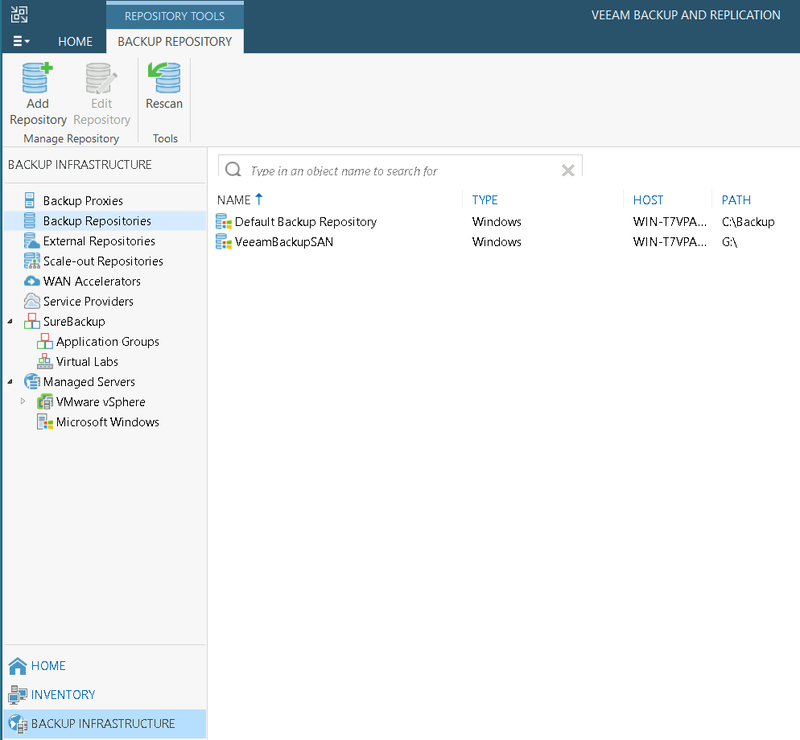
You should now have an additional repository to use for backups.
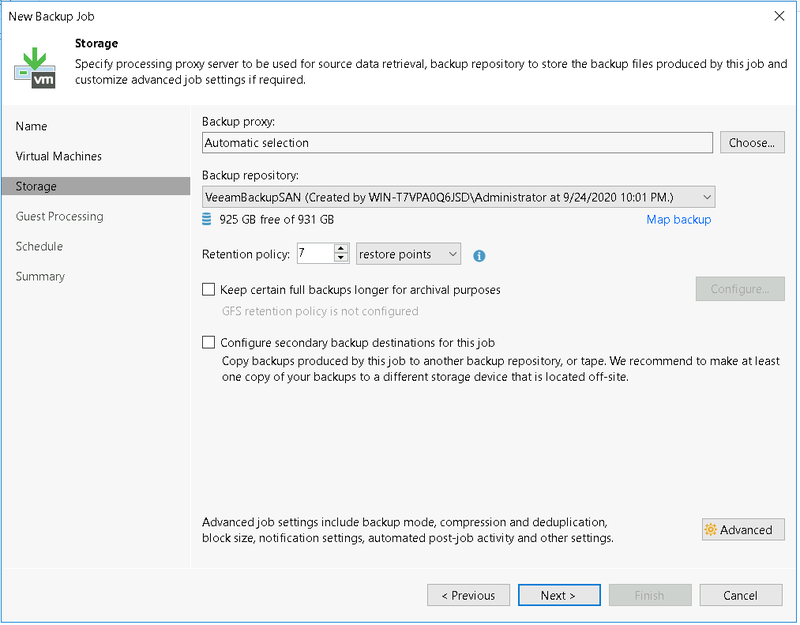
When creating a new backup, be sure to select your new repository as seen above.
Provisioning File Storage based Backup Repositories
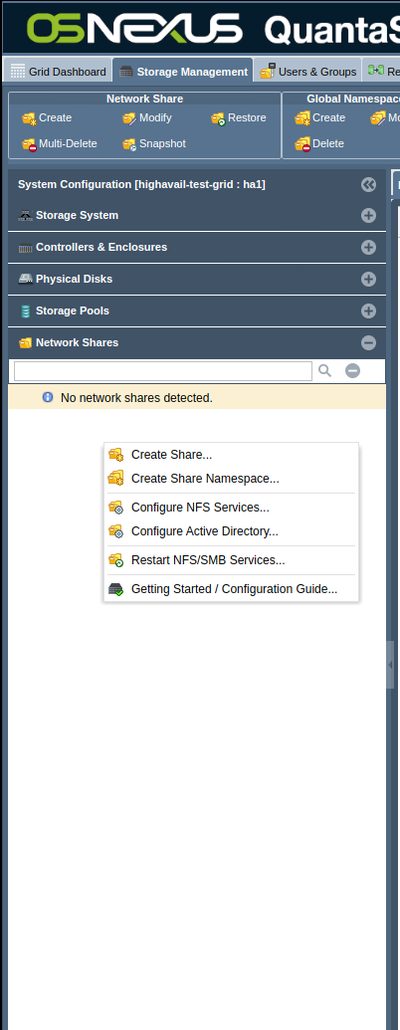
Begin by logging into your QuantaStor server (any server in a given Storage Grid will do) and then navigate to the “Network Shares” section. Next select “Create” in the toolbar or right-click to select “Create Share” from the pop-up menu.
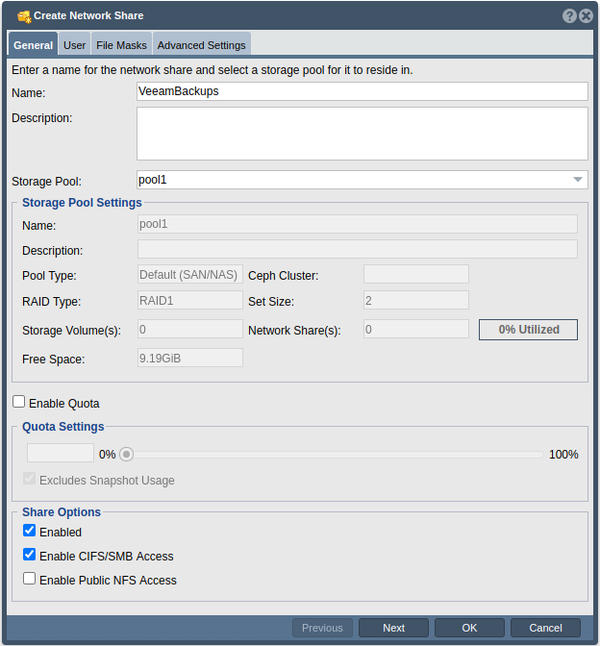
In the “Create Network Share” window that appears, select your desired share name and be sure to select the Storage Pool that the share will be created on. Since Veeam will only be accessing the storage via SMB, access via NFS is not required. As such, deselect “Enable Public NFS Access” to block NFS access.
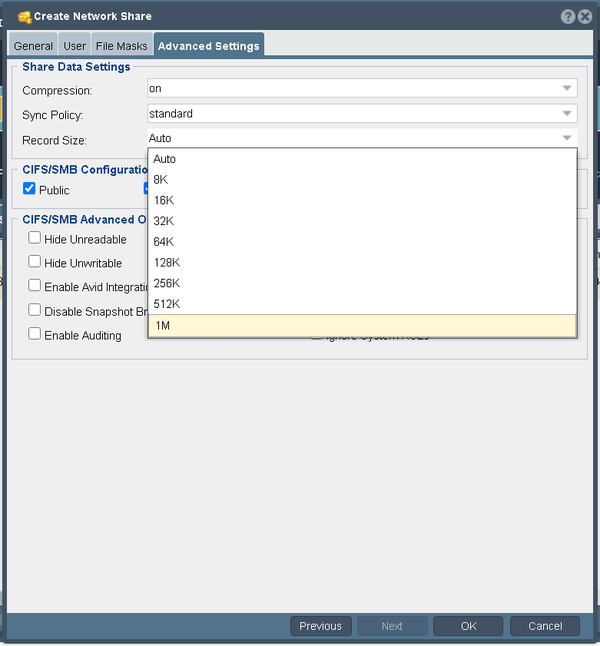
Select the “Advanced Settings” tab and select “1M” for the Record Size to optimize performance for the backup workload.
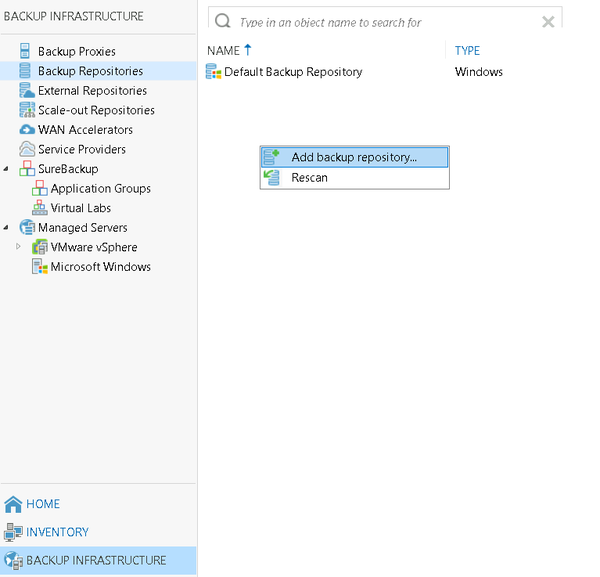
In Veeam Backups, select the “Backup Infrastructure” menu at the bottom and the “Backup Repositories” submenu above. Right-click in the right side menu and select “Add backup repository”.
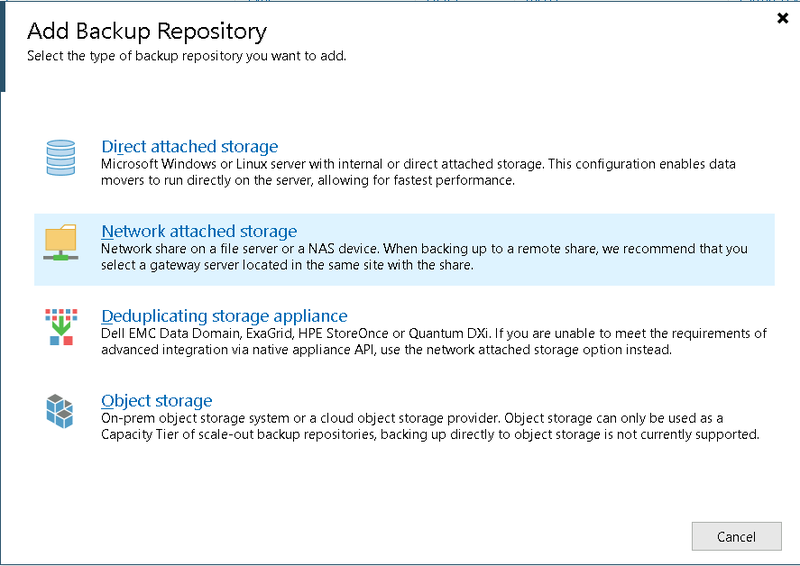
In the window that appears, select “Network attached storage”.
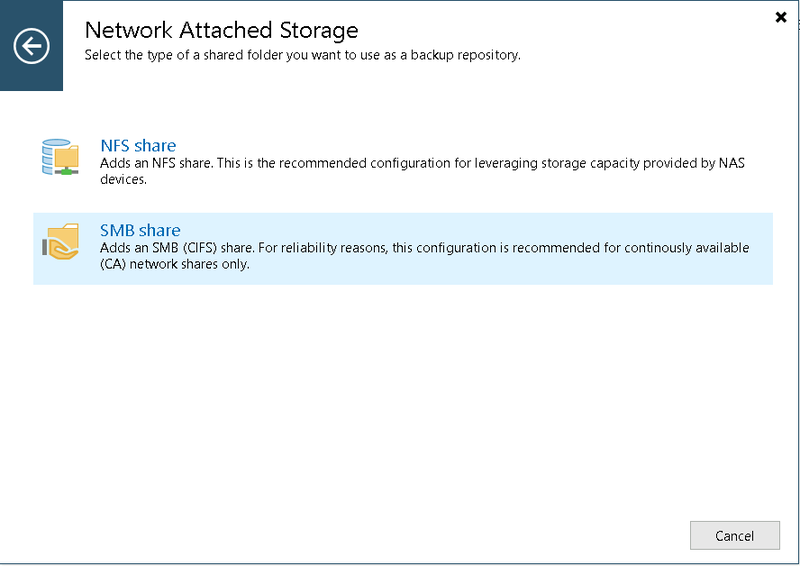
Select “SMB Share” on the following screen, this is the optimal protocol choice for Windows servers.
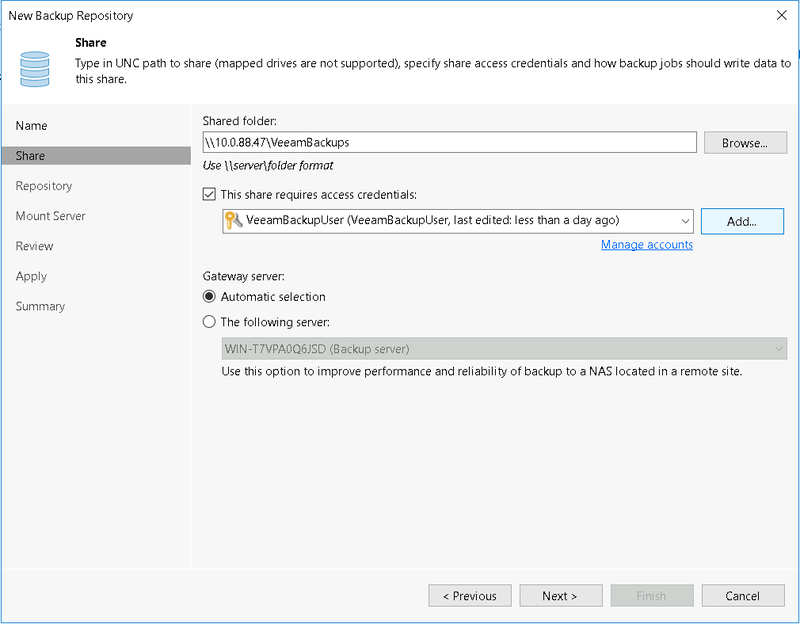
On the “Share” screen select the shared folder and the appropriate credentials to access the share.
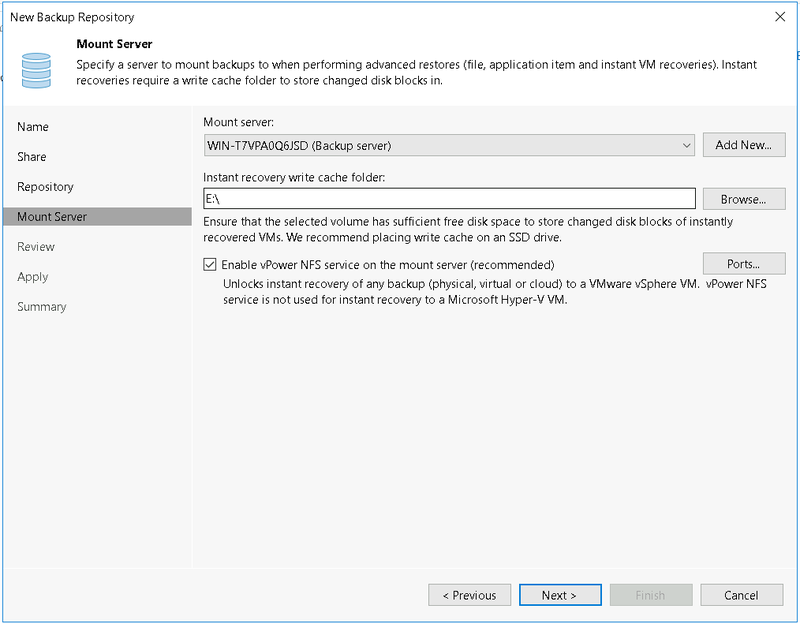
On the “Mount Server” window, select the “Instant recovery write cache” folder to be used for Veeam Backups if required.
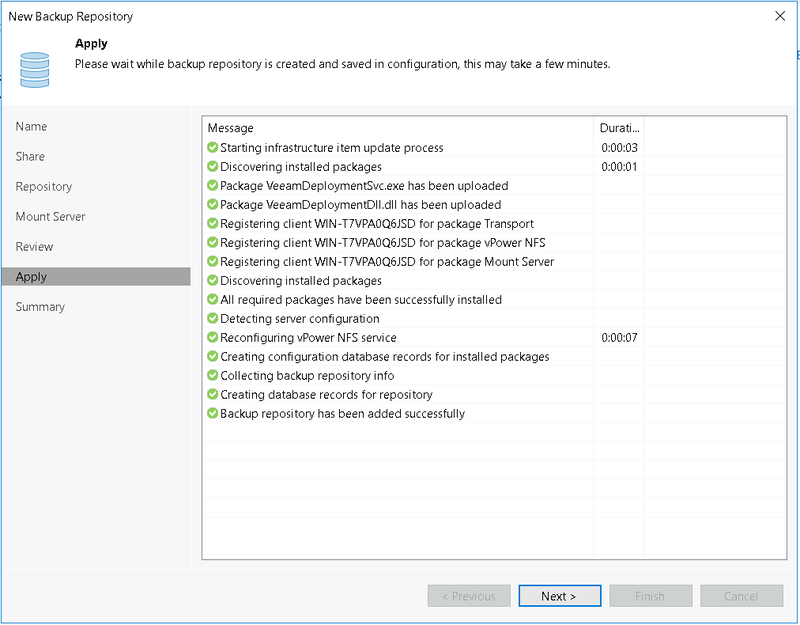
Go through the rest of the dialog options and click “Next” on the “Apply” screen and finish the wizard.
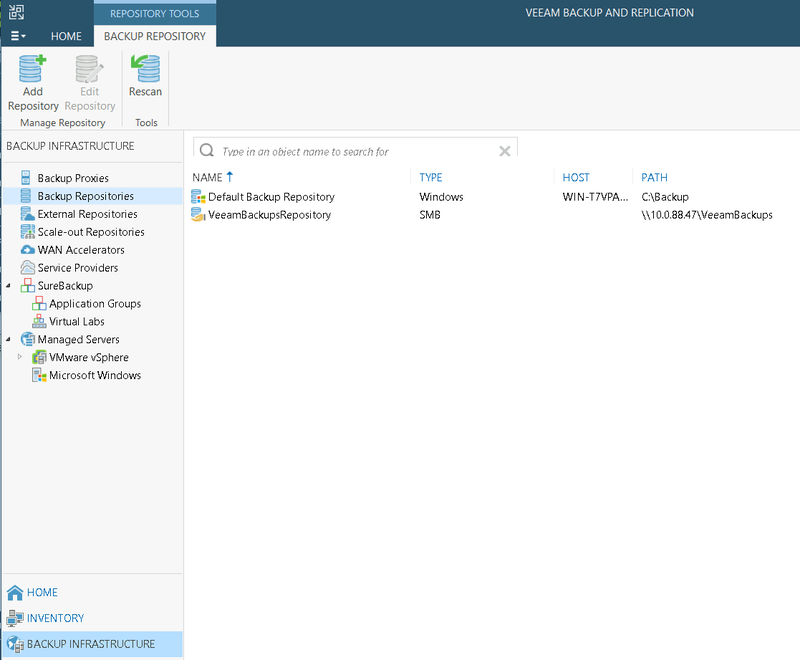
Your Backup Repositories list should show an additional repository for use.
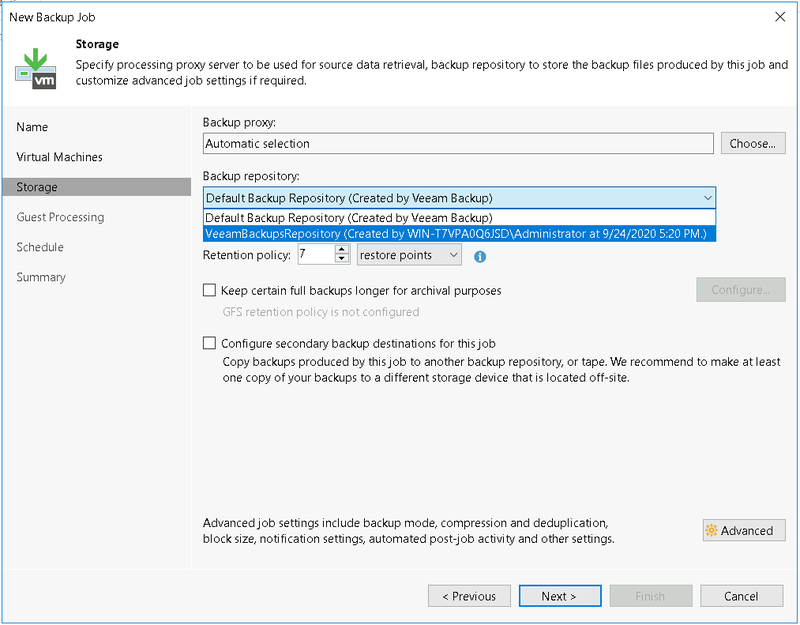
When creating a new backup job, be sure to select the appropriate new Backup repository.
Provisioning S3 Object Storage based Backup Repositories
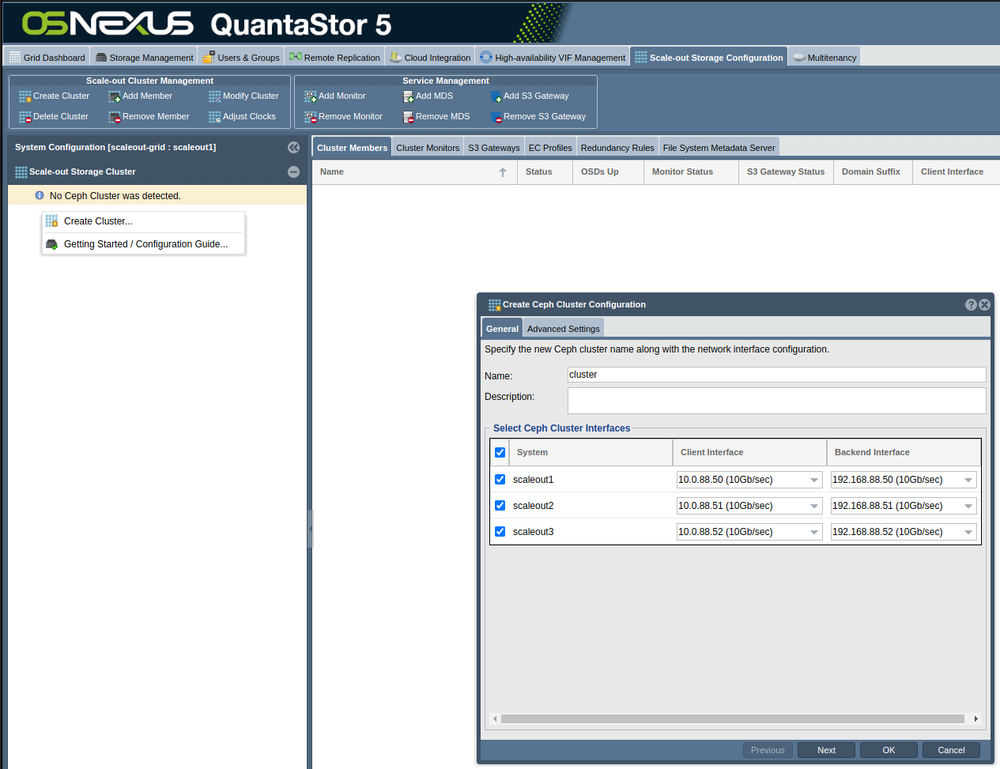
Begin by logging into the web management interface for your QuantaStor storage grid. If HTTPS access is redirecting you to the S3 REST interface you can add :8080 to the URL to specifically indicate the alternate port number for the QuantaStor web interface to access it. If you have not already created your scale-out cluster, select the servers that will be used in your cluster by right-clicking in the Scale-out Storage Cluster section and selecting “Create Cluster.” Select the front and backend IPs to be used, and press OK if there are no other options required in the Advanced Settings tab.
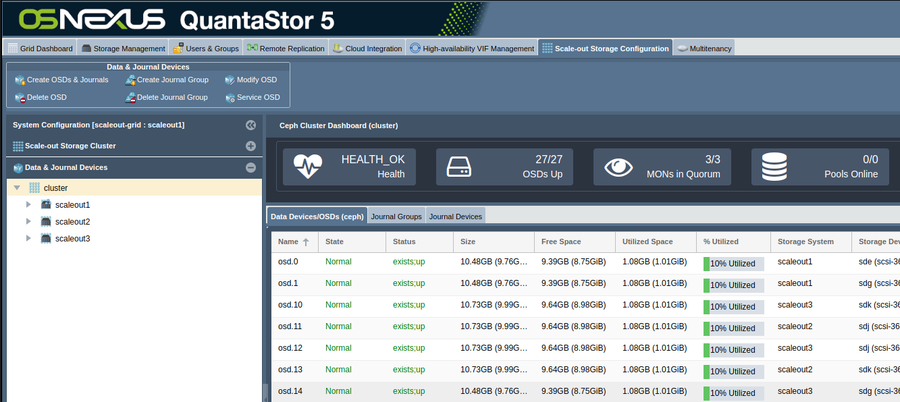
Once the cluster is finished creating itself, all should show Normal status.
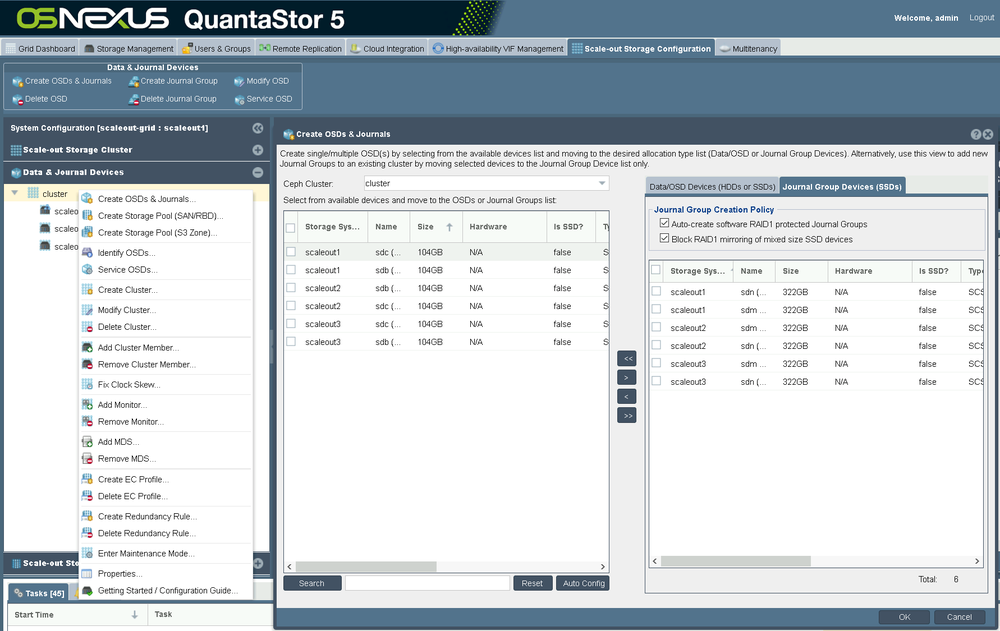
Right-click the cluster and select “Create OSDs & Journals” and choose spinning media for OSDs and SSDs for Journal device, then select “OK” to have all devices created.
Once all OSDs show as Normal, move on to create a new scale-out storage pool.
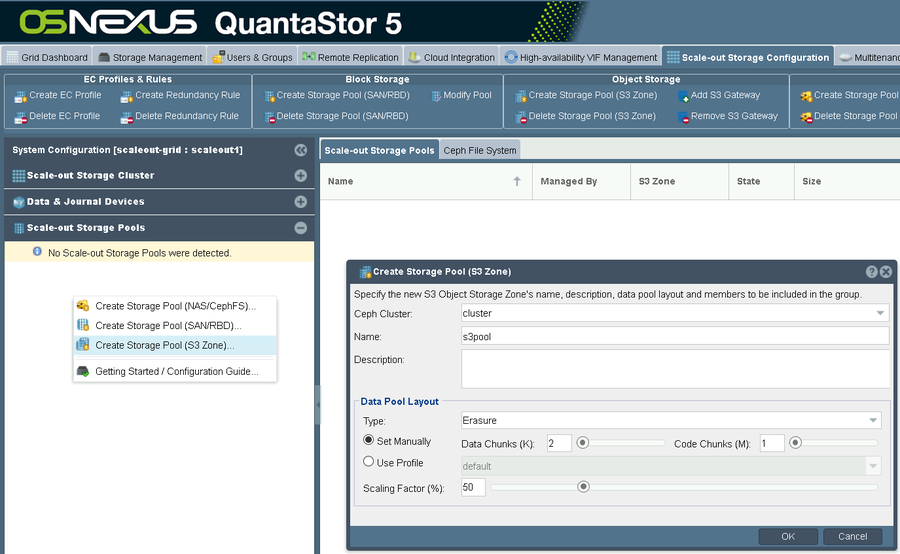
Right-click in the Scale-out Storage Pools section and select “Create Storage Pool (S3 Zone). Give your pool a name and press OK.
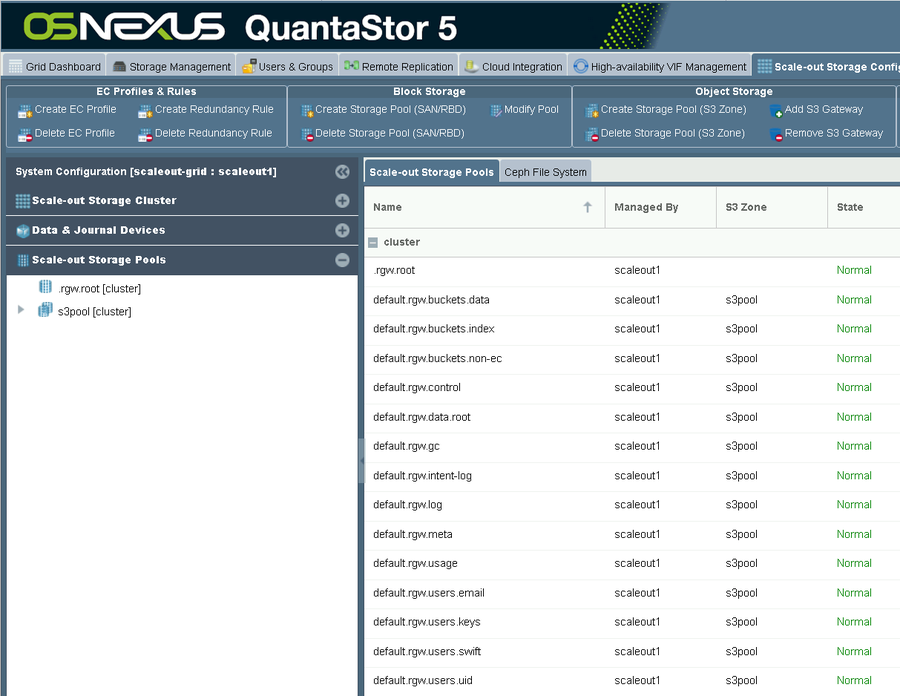
Once the pool is created as shown above, move on to create an S3 user to be used with the Veeam Backups.
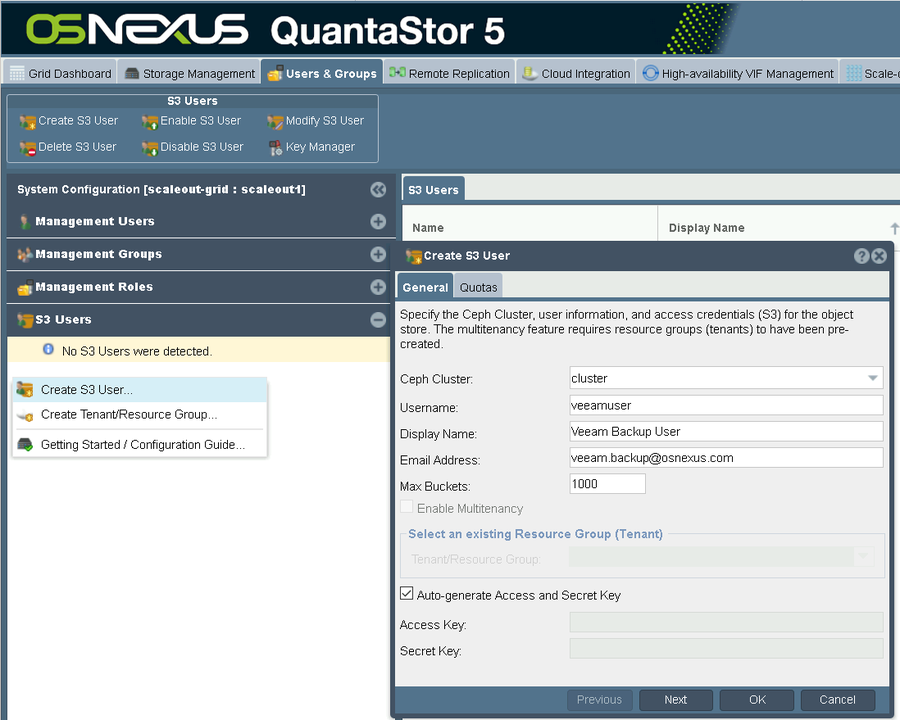
In the Users & Groups tab in QuantaStor, go to the S3 Users section and right-click to select “Create S3 User”. In the window that opens, select the appropriate details and press OK to create the user.
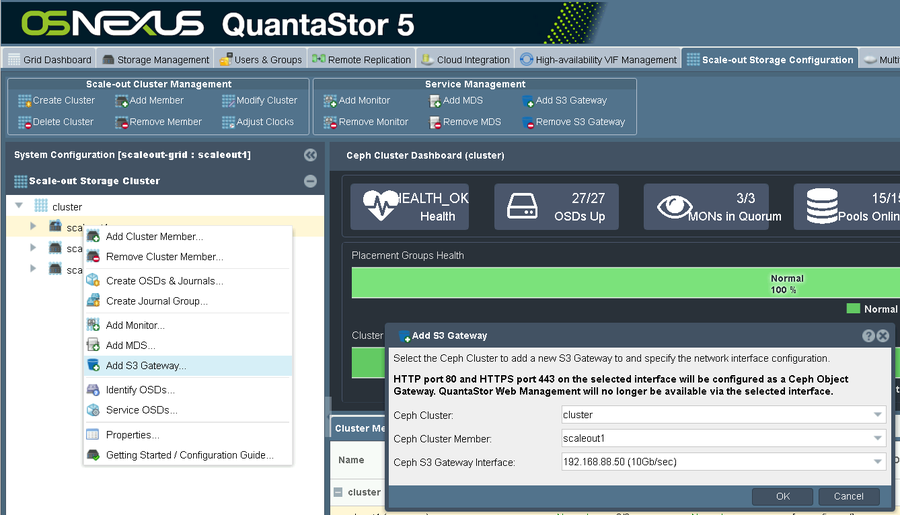
Go back to the “Scale-out Storage Configuration tab and right-click a server in your cluster to add an S3 gateway. In the window that appears, select the appropriate interface, and press “OK”.
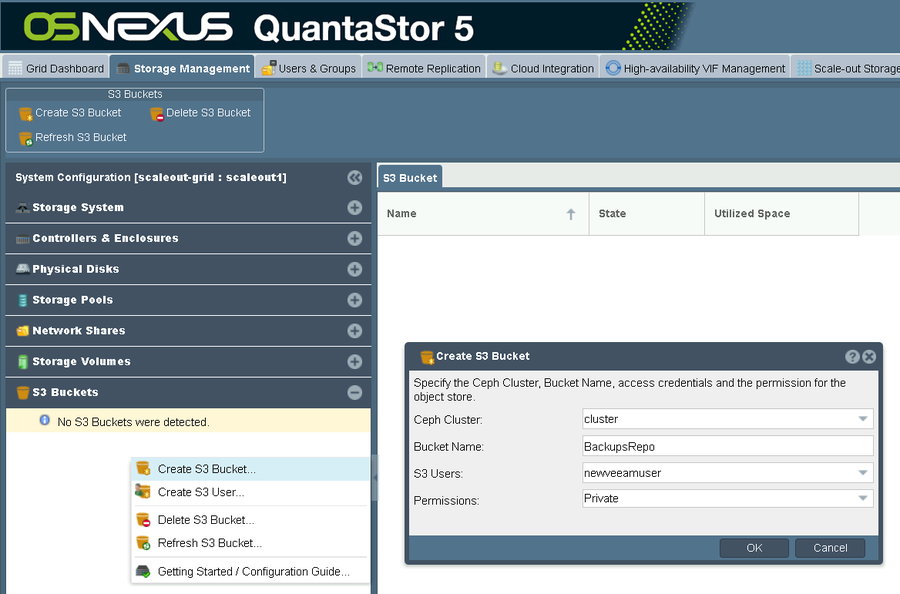
In the Storage Management tab in QuantaStor go to the S3 Bucket section and right-click to Create a new S3 Bucket. Once you have selected the appropriate Bucket Name, S3 User, and Permissions, press OK.
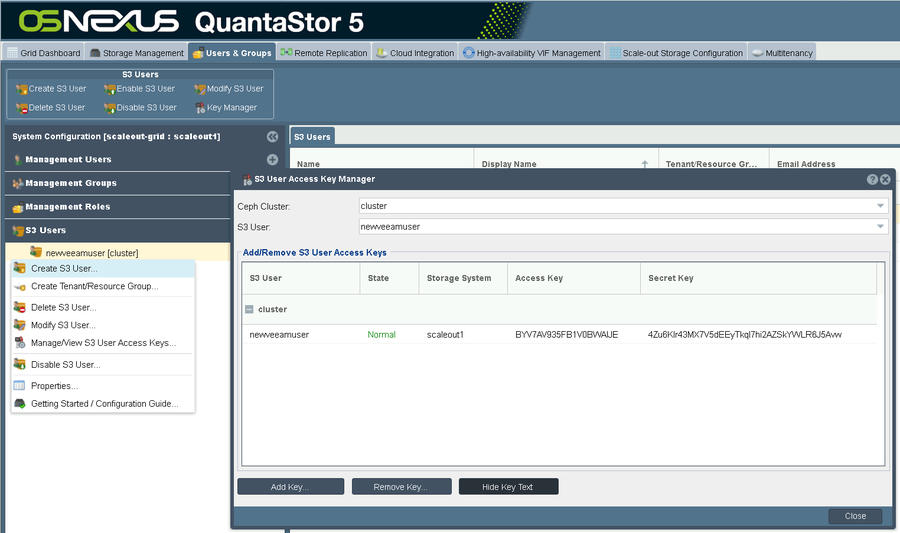
If you chose to automatically generate user Access and Secret keys in the previous steps, go back to the Users & Groups tab and select “Manage/View S3 User Access Keys” in order to find the new user and view its keys by selecting the “Show Key Text” button.
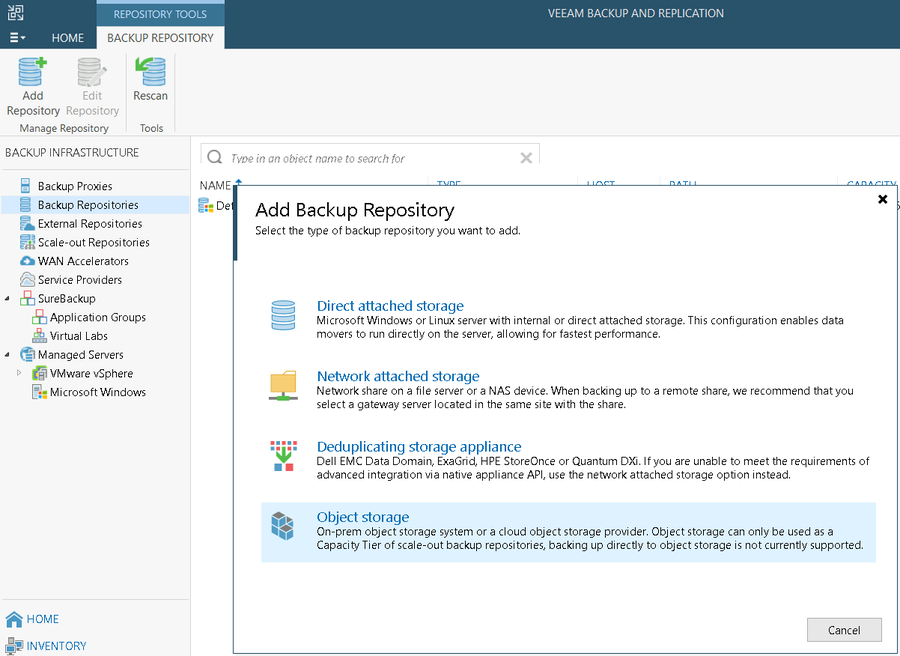
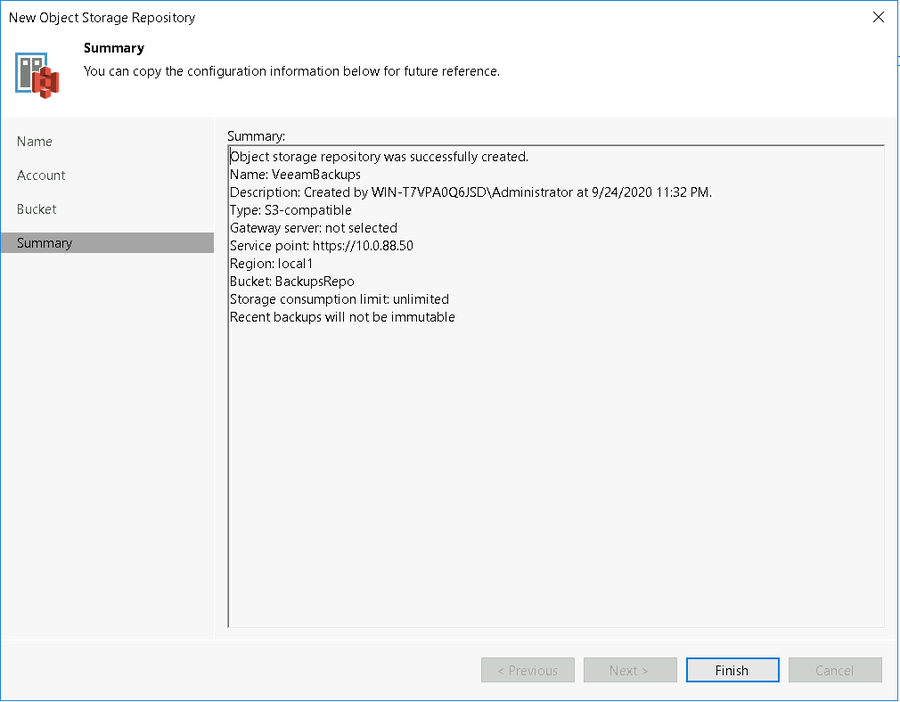
In Veeam Backups, select the “Backup Infrastructure” menu at the bottom and the “Backup Repositories” submenu above. Right-click in the right side menu and select “Add backup repository”. In the window that appears, select “Object Storage”.
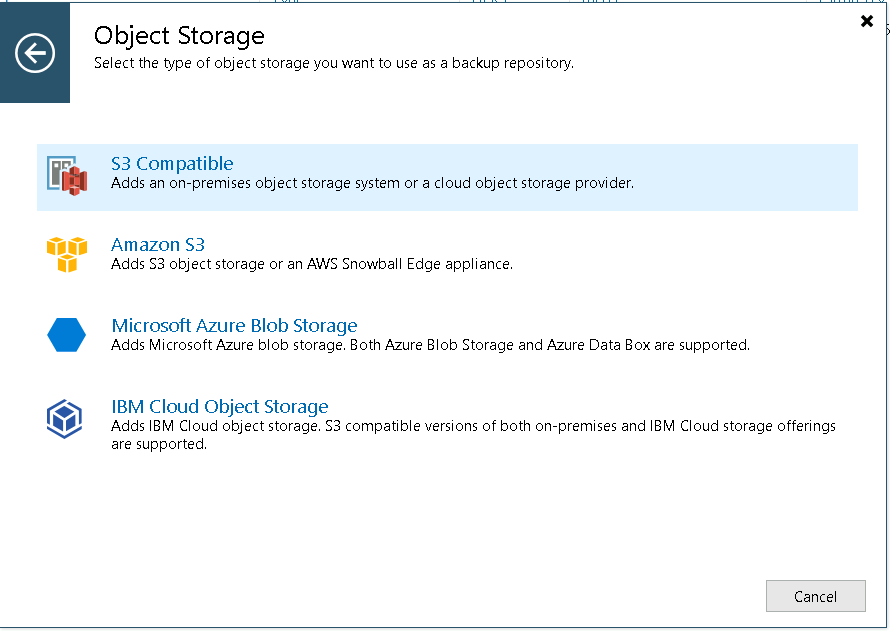
In the following screen select “S3 Compatible” as the object storage type.
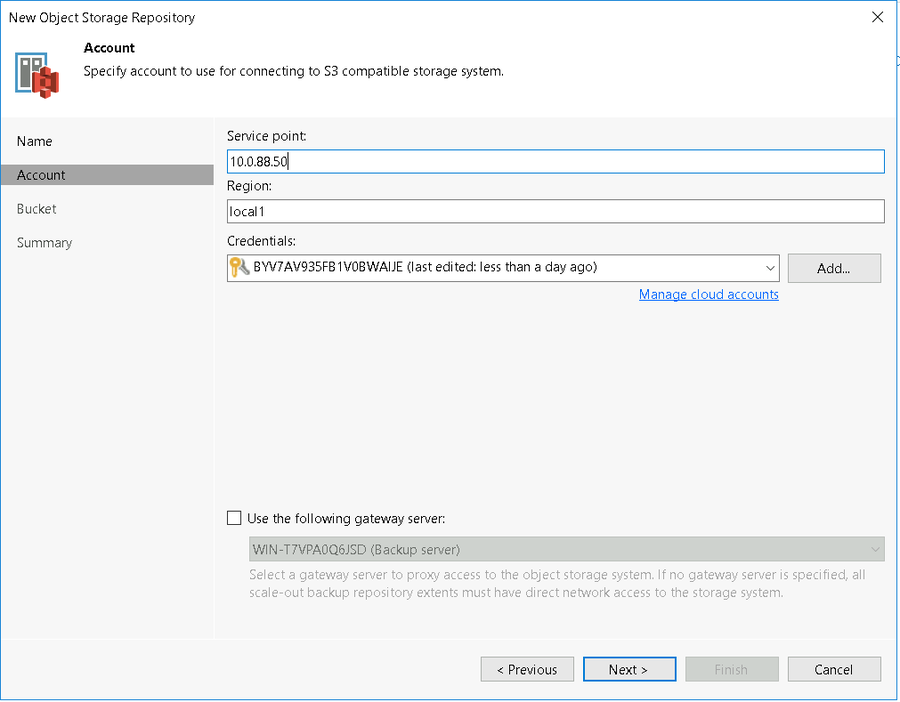
In the Account screen, select the IP address that you used for an S3 Gateway, give the Region a name, and add the appropriate User account credentials and press Next.
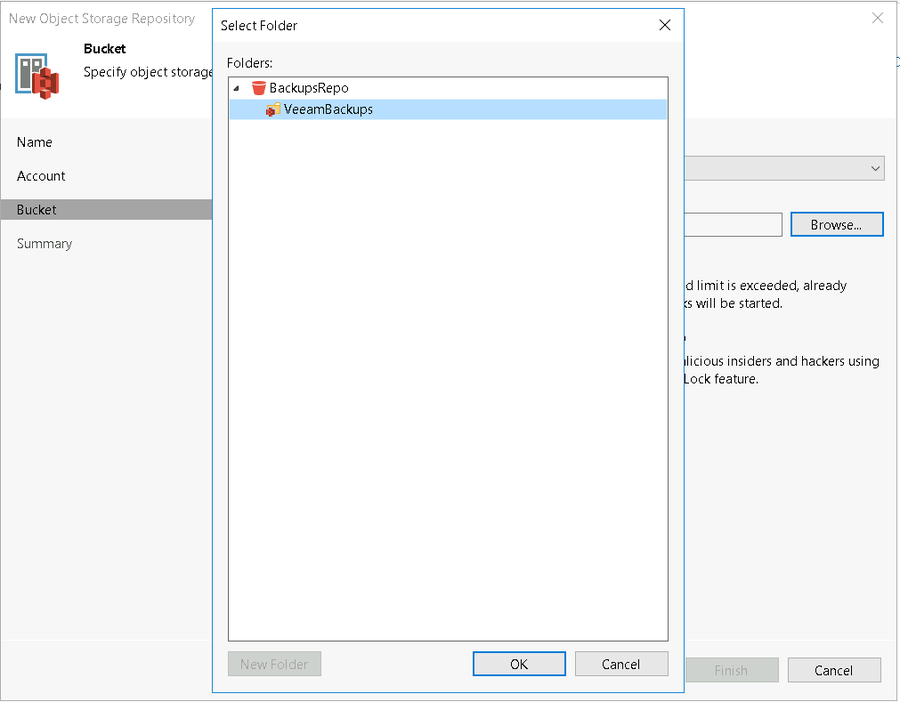
Browse the buckets available, and make a new folder for the backups in the selected backup.
Finish creating the Repository in the wizard.
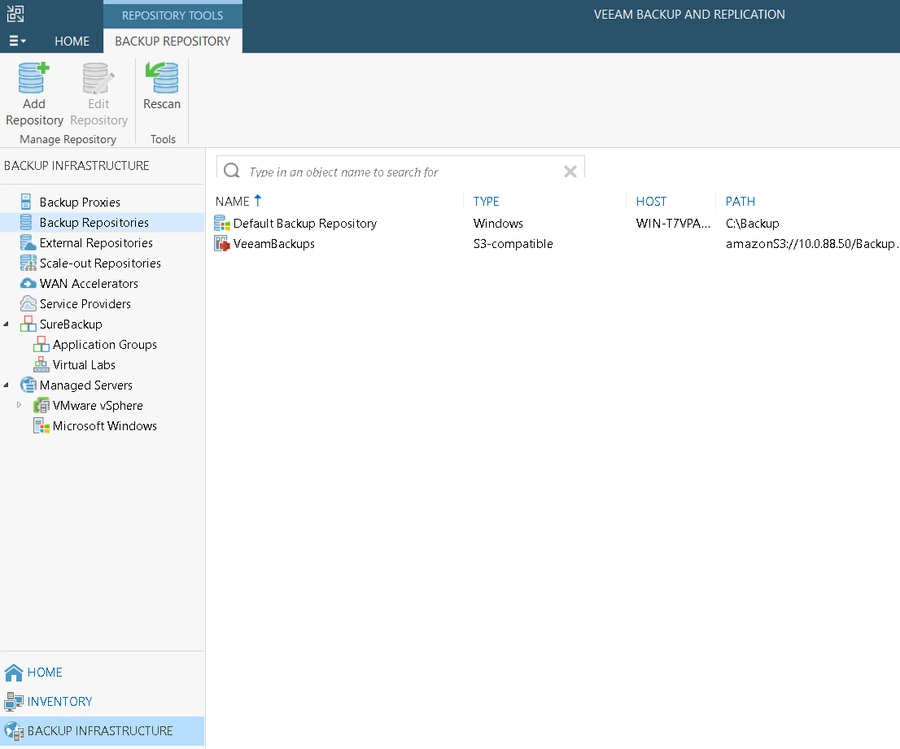
You should now see an additional S3 compatible repository for use with your backups. When creating a new backup job, be sure to select the new repository as the destination for backups for your capacity tier when creating a Scale-out Repository in Veeam.
Creating QuantaStor System Internals Backup
QuantaStor systems store their internal database under /var/opt/osnexus and if the system has encrypted pools will also contain the AES key wrapped keys (KEK) for any Storage Pools associated with the system under /etc/cryptconf.
Using the Veeam Linux Agent one can install the agent directly into a QuantaStor system and then use the agent to backup these important directories. Follow the Veeam Linux Agent installation instructions for Ubuntu or CentOS depending on the underlying OS used for your QuantaStor systems. QuantaStor systems are accessible via SSH by default using the sudo user account ‘qadmin’ with default password ‘qadmin’.
IMPORTANT: Be sure to change the qadmin console user password for your system if it still has the default by running ‘passwd’ after login.
The following directories should be backed up within your QuantaStor server:
/etc/cryptconf/ /var/opt/osnexus/ /var/log/qs/ /etc/network/interfaces /etc/samba/
Note that QuantaStor does do an internal backup of it’s database every hour to every Storage Pool managed by the system. This makes it easy to recover in the event a QuantaStor server needs to be replaced but is not helpful if the system has encrypted Storage Pools. For systems with encrypted storage pools it’s important to backup the contents of /etc/cryptconf and collectively the other directories noted above should ideally be included in the backup but are not mandatory.
