Template:SetupStep Grid: Difference between revisions
| (26 intermediate revisions by the same user not shown) | |||
| Line 8: | Line 8: | ||
=== Create the Grid on the First Node === | === Create the Grid on the First Node === | ||
[[File:Create | [[File:Create Grid - toolbar.jpg|1024px]] | ||
[[File:Create | [[File:Create Strg Sys Grid.jpg|thumb|412px|Create a storage Grid with a name and description.]] | ||
The node where the Grid is created initially will be elected as the initial primary/master node for the grid. The primary node has an additional role in that it acts as a conduit for intercommunication of grid state updates across all nodes in the grid. This additional role has minimal CPU and memory impact. | The node where the Grid is created initially will be elected as the initial primary/master node for the grid. The primary node has an additional role in that it acts as a conduit for intercommunication of grid state updates across all nodes in the grid. This additional role has minimal CPU and memory impact. | ||
* Select the ''Storage Management'' tab and click the '''Create Grid''' button under the ''Storage System Grid'' section, or right-click on the System under ''Storage System'' and select '''Create Management Grid''' | * Select the ''Storage Management'' tab and click the '''Create Grid''' button under the ''Storage System Grid'' section, or right-click on the System under ''Storage System'' and select '''Create Management Grid...''' | ||
* Name: The Grid name can be set to anything. | * Name: The Grid name can be set to anything. | ||
| Line 25: | Line 25: | ||
Now that the Grid is created and the Primary node is a member, proceed to add all the additional systems. Note that this should be done from the Primary node's WebUI. | Now that the Grid is created and the Primary node is a member, proceed to add all the additional systems. Note that this should be done from the Primary node's WebUI. | ||
[[File:Add System | [[File:Add Storage System - toolbar.jpg|1024px]] | ||
[[File:Add System to | [[File:Add System to Stor Grid.jpg|thumb|350px|Add a Storage System to the grid.]] | ||
* Click on the '''Add System''' button in the ''Storage Management'' ribbon bar or right click on the Grid and select '''Add System to Grid...''' | * Click on the '''Add System''' button in the ''Storage Management'' ribbon bar or right click on the Grid and select '''Add System to Grid...''' | ||
| Line 37: | Line 37: | ||
==== Preferred Grid IP ==== | ==== Preferred Grid IP ==== | ||
[[File: | [[File:Stor Sys Modify - Net Settings.jpg|1024px]] | ||
System to System communication typically works itself out automatically but it is recommended that you specify the network to be used for system inter-node communication for management operations. This is done by selecting the "Preferred Grid Port IP" from the in the "Network Settings" tab of the '''Storage System Modify''' dialog by right-clicking on each system in the grid and select 'Modify Storage System...'. | System to System communication typically works itself out automatically but it is recommended that you specify the network to be used for system inter-node communication for management operations. This is done by selecting the "Use Preferred Grid Port IP" from the in the "Network Settings" tab of the '''Storage System Modify''' dialog by right-clicking on each system in the grid and select 'Modify Storage System...'. | ||
==== Note regarding User Access Security ==== | ==== Note regarding User Access Security ==== | ||
Be aware that the management user accounts across the systems will be merged as part of joining the Grid. This includes the ''admin'' user account. In the event that there are duplicate user accounts, the user accounts in the currently elected primary/master node takes precedence. | Be aware that the management user accounts across the systems will be merged as part of joining the Grid. This includes the ''admin'' user account. In the event that there are duplicate user accounts, the user accounts in the currently elected primary/master node takes precedence. | ||
Latest revision as of 17:46, 18 January 2024
Create QuantaStor Grid
A QuantaStor Grid enables the administration and management of multiple Systems as a unit (single pane of glass). By joining Systems together in a Grid, the WebUI will display and allow access to resources and functionality on all Systems that are members of the Grid. Grid membership is also a prerequisite for the High-Availability and Scale-out configurations offered by QuantaStor.
Networking between the nodes must be configured before proceeding with Grid setup. Once network is configured and confirmed on a per-System basis, proceed to creating the QuantaStor grid using the following instructions.
Create the Grid on the First Node

The node where the Grid is created initially will be elected as the initial primary/master node for the grid. The primary node has an additional role in that it acts as a conduit for intercommunication of grid state updates across all nodes in the grid. This additional role has minimal CPU and memory impact.
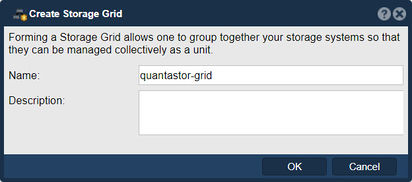
- Select the Storage Management tab and click the Create Grid button under the Storage System Grid section, or right-click on the System under Storage System and select Create Management Grid...
- Name: The Grid name can be set to anything.
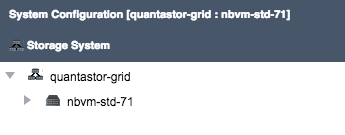
After pressing OK, QuantaStor will reconfigure the node to create a single-node Grid.
Add Remaining Nodes to the Grid
Now that the Grid is created and the Primary node is a member, proceed to add all the additional systems. Note that this should be done from the Primary node's WebUI.

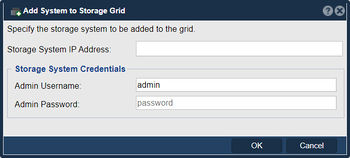
- Click on the Add System button in the Storage Management ribbon bar or right click on the Grid and select Add System to Grid...
- IP or hostname for the node to add
- Username for an Administrative user (default is admin)
- Password to authenticate
Repeat this process for each node to be added to the QuantaStor Grid. The Grid and member Systems can be managed by connecting to the WebUI of any of the members. It is not necessary to connect to the master node.
Preferred Grid IP
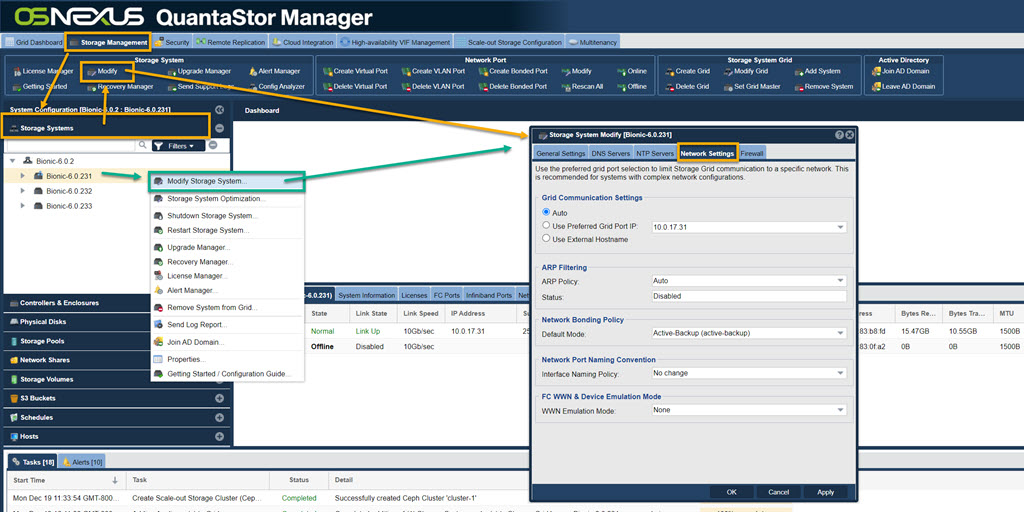
System to System communication typically works itself out automatically but it is recommended that you specify the network to be used for system inter-node communication for management operations. This is done by selecting the "Use Preferred Grid Port IP" from the in the "Network Settings" tab of the Storage System Modify dialog by right-clicking on each system in the grid and select 'Modify Storage System...'.
Note regarding User Access Security
Be aware that the management user accounts across the systems will be merged as part of joining the Grid. This includes the admin user account. In the event that there are duplicate user accounts, the user accounts in the currently elected primary/master node takes precedence.


