Bare-metal Install
This section covers the bare-metal install process for putting QuantaStor on a physical server (rather than on a virtual machine). QuantaStor is delivered as an operating system, and thus no additional software is required on a given system. QuantaStor is Linux based, and has an extensive HCL (see HCL in order to support server models from all major manufacturers.
BIOS Configuration Checks
Proper configuration of the BIOS settings is very important to successful installation and continuous operation of the system. Settings like power save options, which could cause the system to inadvertently go to sleep or hibernate, are important to disable by putting the system into a 'Performance' power save profile.

Boot Order
Before installing QuantaStor from the ISO, two changes must be made to the BIOS. First the USB or CD/DVD device with the QuantaStor ISO media must be selected as the primary boot device so that the install media loads at the initial install time. Second, the system disk, (the SSD the system will boot to after installation has completed) should be the selected device to boot from and assigned to the second position in the BIOS boot order. After the installation, you should disconnect the ISO installation media.
Power Save Settings
Make sure that your storage system server is set to the 'Performance' setting. Stability problems can occur if power saving is enabled. QuantaStor is not designed for systems to hibernate or sleep like a desktop.
IPMI/iDRAC Settings
Be sure to apply an IP address to the server's IPMI port, so that you can remotely access the console. This is important for triaging connectivity and network issues.
Boot/System Disk Configuration

Hardware RAID1
It is highly recommended that QuantaStor is installed to a mirrored (RAID1) pair of SSDs, so that service is not interrupted in the event of a drive failure. The underlying Linux operating system for QuantaStor has support for software RAID, which could be used, but is more complex. Both hardware RAID1 and software RAID1 for boot is supported. Currently you must set aside two unpartitioned disks for QuantaStor in order to create a RAID1 device to install to. QuantaStor has a small footprint, and two small capacity 250GB SSD or NVMe drives will be adequate for the boot/system drive (any type will work HDD/SSD and SATA/SAS/NVMe). For deployment as a virtual appliance, OSNEXUS recommends 30GB for the boot device, plus the amount of GB in RAM of disk space. 50-100GB or more is recommended for larger configurations.
SSD Boot Media Required
For production deployments the boot media must be mirrored SSD or mirrored NVMe media. QuantaStor uses the boot media to run the operating system, databases for metrics, the grid configuration database, and more. HDDs have very low IOPS which under load can easily be at or below 100 IOPS. If individual I/O operations are small like 4K that equates to 400K/sec which is insufficient. For SSDs we recommend any good quality SSD mediathat is datacenter or enterprise grade SATA SSDs, SAS SSDs, or NVMe SSDs. For bare-metal installs we recommend 480GB SSDs but 240GB SSDs will do.
Creating Hardware RAID1 Mirrored System Disk
Use the BIOS based configuration on the RAID controller to create a RAID1 mirror using a pair of SSDs. Please refer to the HBA/RAID controller vendor's documentation for complete details on how to create a RAID1 mirror using a pair of SSDs. For LSI/Broadcom controllers and OEM variants this involves creating a Disk Group 0 with both disks, a single span, and a single virtual drive.
Software RAID1 for Boot/System Disk Configuration
Software RAID1 for the boot media is supported but is a bit more complex to setup. The following links have instructions on how to setup the software RAID1 mirrors.
QuantaStor 6 - Software RAID1 Install Procedure (Legacy Boot BIOS mode)
Ubuntu Software RAID1 (UEFI)
QuantaStor will identify the boot media setup in a software RAID1 mirror as a special [system/boot] pool. These are automatically excluded from the web management interface (WUI) but they can be viewed using the command line utility using 'qs pool-list'. If the RAID1 mirror becomes degraded then it will appear in the WUI to make it easier to identify the bad media so it may be replaced.
Installation Options
QuantaStor is available on both RHEL and Ubuntu LTS as a base Linux operating system under the storage platform.
- The standard OSNEXUS QuantaStor ISO media is derivative of Ubuntu LTS releases and is a single step install process
- Download & Install QuantaStor ISO media from the OSNEXUS web site (osnexus.com/downloads)
- To install QuantaStor with a RHEL base operating system it is a two step process
- Download & Instal RHEL 8.4 Install media from Redhat.com.
- Download and run the QuantaStor installation script.
Irrespective of the base OS, once the installation is done simply login via the QuantaStor web interface to manage the system. Storage Grids may be comprised of a hybrid mix of servers using Ubuntu and/or RHEL as the base OS.
OSNEXUS Videos
Starting the Installation from RHEL Media
QuantaStor 5.x releases can be installed on RHEL 8.5 and higher versions of Linux.
Step 1: ISO "Minimal Install"
After booting your server or VM to the RHEL installation ISO media choose the "Minimal Installation" option as the rest of the packages will be installed later via the QuantaStor installation script.
Step 2: Select Boot/System Device
In the RHEL installation screen choose the drive onto which you'll be installing QuantaStor. We require installing onto SSD media (100GB or larger) in a hardware RAID1 layout. If that is not available in your server you may install to a single SSD device or use software RAID1.
- NOTE: The Linux based software RAID1 option will require some additional configuration steps later on so it's not recommended without assistance from OSNEXUS Customer Support
For partitioning, chose the non-lvm option that creates the simple os layout without the /home directory and most disk space devoted to the '/' root disk directory.
Step 3: Set Host Name & Enable DHCP
Set the system host name to "quantastor" or something suitable for your environment. Next, enable at least one network port so that when the system boots it can get an initial IP address via DHCP.
- NOTE: We recommend changing all ports to static IPs after these installation steps are completed. Ports may be easily configured via the QuantaStor web management interface.
Step 4: Set "root" Password
Press "Begin Installation" to get the the next installation page where you'll be able to set the "root" user password. Set the root password to a strong password and be sure to save it in a safe place. The root user password may be needed in the future if there are network connectivity or other maintenance issues that require login via SSH or via the IPMI/iDRAC/iLO base board controller console interface. Besides special case maintenance steps (such as this install procedure) one will generally not need to login to the console/SSH. The default "admin" QuantaStor management account for managing the system is separate from the "root" user low level Linux account.
Step 5: Login as "root"
After the OS installation completes the system will reboot and you'll be presented with the login prompt. Login as the "root" user so that you can License your RHEL install with the redhat repoository servers and run the QuantaStor installation script.
Typically you will add a RHEL subscription using 'subscription-manager register' and 'subscription-manager attach' from the command line.
Full Instructions for registering the RHEL install from the command line are available here: https://access.redhat.com/documentation/en-us/red_hat_subscription_management/1/html/quick_registration_for_rhel/registering-cmd
Note, that you will need a Full RHEL Server License and HA Addon License. The reduced Self-service Server license is not supported.
Step 6 (Optional): Install The Mellanox OFED for RDMA/NVMEoF and best Mellanox Performance
For customers with Mellanox Network Cards. The latest Mellanox Driver stack is required for advanced features such as connecting to NVMEoF devices over RDMA or to get the best performance out of 100GbE/200GbE network devices.
This can be installed using the below script:
curl -o ./mellanox-ofed-install.sh http://packages.osnexus.com/packages-redhat/mellanox-ofed-install.sh
chmod 755 mellanox-ofed-install.sh
./mellanox-ofed-install.sh
Step 7: Install QuantaStor via Script
Now that RHEL is installed and Licensed the QuantaStor installation script can be downloaded an run:
curl -o ./qs_upgrade_redhat8.sh http://packages.osnexus.com/packages-redhat/qs_upgrade_redhat8.sh
chmod 755 qs_upgrade_redhat8.sh
./qs_upgrade_redhat8.sh installall
Step 8: Login via Web UI
Once all the stages of the installation script have completed you'll be able to login to the QuantaStor web management interface as "admin" using the default password which is "password". The QuantaStor web management interface is accessible via HTTPS using any browser. Simply input the IP address of the QuantaStor server that it acquired via DHCP.
Note: Run this command to get the IP address of the system if you don't have it and are logged in via a console:
ip addr
Step 9: Basic Installation Complete
At this point installation is complete but we recommend rebooting/power cycling the system to make sure everything is correct from a boot media and BIOS configuration perspective.
- NOTE: If you have external JBODs we recommend running the above installation steps without those attached to make it faster and easier. Once the above steps are complete, simply shutdown the system, attach the JBODs, and boot.
Step 10: Apply QuantaStor License Key
After logging in to the QuantaStor web user interface (WUI) for the first time be sure to add your license key. If you don't have a commercial use license key you can get temporary Trial Edition licenses via the Try Now page. OSNEXUS non-commercial use Community Edition licenses are available via the same page.
Starting the Installation from QuantaStor ISO/USB media
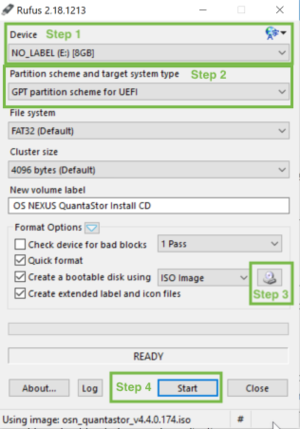
Step 1: Preparing the ISO/USB media
For bare-metal installation we recommend using a 8GB or larger USB stick. Once you've downloaded the ISO file from the OSNEXUS web site you can put it onto your USB device using software like usbwriter. Another option is to burn a DVD and use a portable USB DVD device to install from. Detailed instructions on how to put QuantaStor on to USB media is provided here for both Windows and Linux.
Step 2: Insert and Boot from the QuantaStor USB Install Media
After connecting your QuantaStor Install USB stick to the server you will see the QuantaStor screen appear and it will automatically select 'English' as the default language and begin the installation process.
Step 3: Selecting a hostname
The first question you will be asked as part of the installation process is what do you want to name the host. By default the name 'quantastor' is given, but you can give the system any valid host name. If you're setting up multiple systems you should give them each unique names. You can also change the name later through the web management interface using the Storage System Modify dialog.
Step 4: Selecting a network port
The second step in the console level installation process is the selection of which port to use for network communication during the install process. If the new QuantaStor system has a single network interface then it will automatically attempt to configure the using DHCP; if DHCP is not available then standard details will need to be provided (Static IP Address, Subnetmask, and gateway if applicable). If multiple ports are detected a menu will be provided allowing you to choose which interface to use for the management port. The installation process will use the network to try to get more recent versions of packages than those that are on the CD.
Step 5: Selecting the device to install the QuantaStor OS
Finally, the configuration wizard will ask which partitioning scheme to use. We recommend 'Guided installation, use entire disk'. If you are planning to mirror your boot drive (highly recommended) then you'll want to use the Hardware RAID controller's configuration BIOS to create a RAID1 logical drive first. The next screen will ask you which disk you want to use as the system boot disk, at that point you'll select your RAID1 mirrored system/boot drive.
WARNING, this disk will be reformatted as part of the installation process so be
careful to choose a disk that does not have data on it you need.
Step 6: Bare-metal Installation is Complete
That's all the key questions you will be asked as part of the installation process. After the installation completes the system will reboot and will start-up the QuantaStor system. At this point you can login using the 'qadmin' user account and 'qadmin' password so that you can get the IP address of the system. To get the IP address just type 'ifconfig' at the command prompt after you have logged in. You'll see an entry for 'eth0' with an IP address assigned to it. Enter that IP address into your web browser to connect to your QuantaStor storage system via your favorite web browser so that you can start to configure the rest of the system.
A video of the installation process is available on the main web site in the Videos section.