Storage Volumes
Storage Volume (SAN) Management
Each storage volume is a unique block device/target (a.k.a a 'LUN' as it is often referred to in the storage industry) which can be accessed via iSCSI, Fibre Channel, or Infiniband/SRP. A storage volume is essentially a virtual disk drive on the network (the SAN) that you can assign to any host in your environment. Storage volumes are provisioned from a storage pool so you must first create a storage pool before you can start provisioning volumes.
Creating Storage Volumes
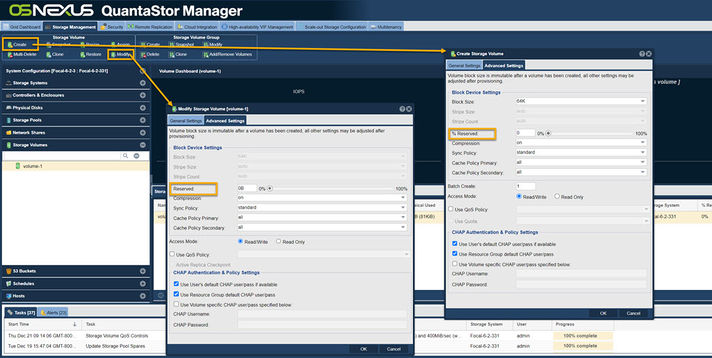
Storage volumes may be provisioned with a % Reserved which indicates the amount of pre-reserved storage assigned to the volume. Since % Reserved provisioning is simply a reservation it can be adjusted at any time using the Modify Storage Volume dialog via the right-click pop-up menu after selecting a given volume. Choosing % Reserved provisioning has very little to no impact on the overall performance of the storage volume so the default mode and recommended mode is to use less provisioning.
Advanced Volume Settings
Volumes may be customized via the Create and Modify Volume dialogs to set a number of advanced settings including CHAP settings, and access mode settings.
Batch Create
To create a large number of volumes all at once select a batch count greater than one. Batch created volumes will be named with a numbered suffix increasing from ".000", ".001", ".002" and so on. If a given suffix number is taken it will automatically be skipped.
Volume Access Mode
By default volumes are all read-write including storage volume snapshots. Read-only mode is useful for volumes that will be used as a template for cloning to produce new volumes from a common image to ensure that the template is not changed.
Volume Block Size
The block size selection is only available at the time the volume is created and cannot be adjusted afterwards. In the Advanced Settings...' section one will see that the Block Size is set to Auto by default. In the Auto mode the block size for the storage volume will be set to 64K by default which is optimal for most hypervisors including VMware.
Delete & Multi-Delete Storage Volumes
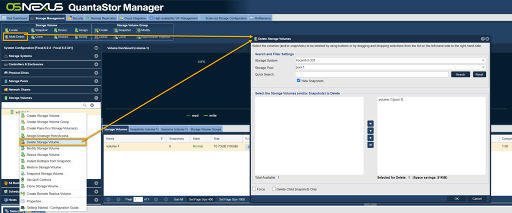
There are two dialogs for deleting storage volumes, one for deleting individual volumes and one for deleting volumes in bulk which is especially useful for deleting snapshots. Pressing the "Delete Volumes" button in the ribbon bar will be presented the multiple Delete Storage Volumes dialog whereas right-clicking on a specific volume in the tree view will present one with the Delete Volume... option from the pop-up menu for single volume deletion. The multi-volume delete dialog also has a Search button so that volumes can be selected based on a partial name match. WARNING: Once a storage volume is deleted all the data is destroyed so use caution when deleting storage volumes.
Quality of Service (QoS) Controls
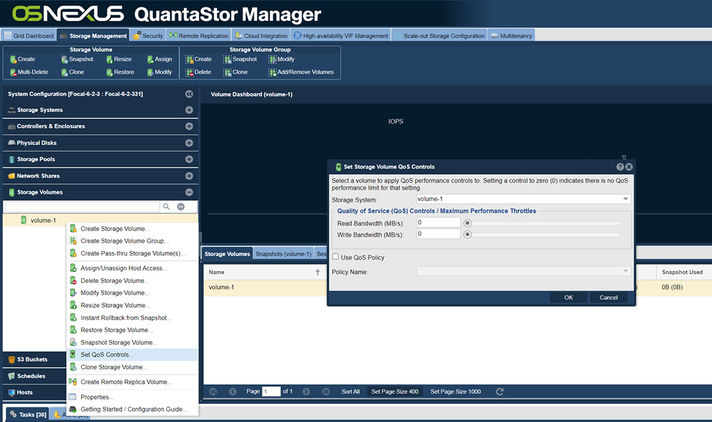
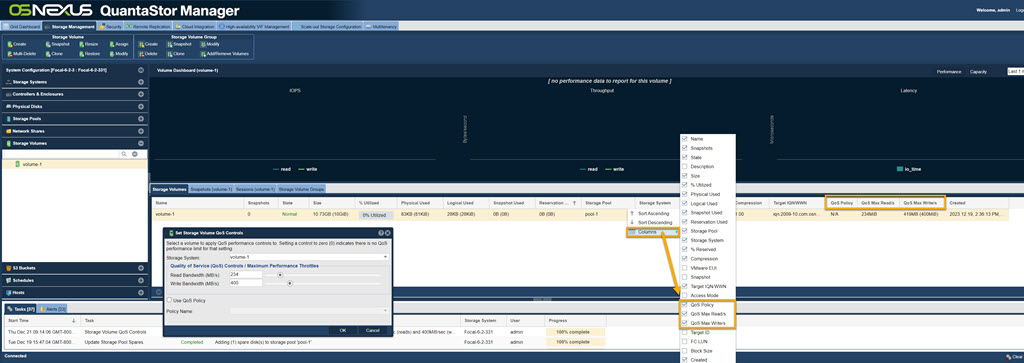
When QuantaStor systems are in a shared or multi-tenancy environment it is important to be able to limit the maximum read and write bandwidth allowed for specific storage volumes so that a given user or application cannot unfairly consume an excessive amount of the storage system's available bandwidth. This bandwidth limiting feature is often referred to as Quality of Service (QoS) controls which limit the maximum throughput for reads and writes to ensure a reliable and predictable QoS for all applications and users of a given system . Once you've setup QoS controls on a given Storage Volume settings will be visible in the main center table.
To see the columns for Quality of Service, left mouse click on the column arrow as in the image below. Mouse over the Columns to see the possible columns for display. Check "QoS Policy", "QoS Max Read/'s", and "QoS Max Write/'s" to see the Quality of Service columns.
QoS Support Requirements
- System must be running QuantaStor v3.16 or newer
- QoS controls can only be applied to Storage Volumes (not Network Shares)
- Storage Volume must be in a ZFS or Ceph based Storage Pool in order to adjust QoS controls for it
QoS Policies
QoS levels may also be set by policy. QoS Policies makes it easy to adjust QoS settings for a given group of Storage Volumes across the storage grid in a single operation. To create a QoS Policy using the QuantaStor CLI run the following command with the MB/sec settings adjusted as required.
qs qos-policy-create high-performance --bw-read=300MB --bw-write=300MB
Policies may be adjusted at any time and the changes will be immediately applied to all Storage Volumes associated with the given QoS policy.
qs qos-policy-create high-performance --bw-read=400MB --bw-write=400MB
QoS Policies may also be used to dynamically increase or decrease the maximum throughput for Storage Volumes at certain hours of the day where storage I/O loads are expected to be lower or higher.
Note: QoS settings applied to a specific Storage Volume clear any QoS policy setting associated with the Storage Volume. The reverse is also true, if you have a specific QoS setting for a Storage Volume (eg: 200MB/sec reads, 100MB/sec writes) and then you apply a QoS policy to the volume, the limits set in the policy will clear the Storage Volume specific settings.
Resizing Storage Volumes
QuantaStor supports increasing the size of storage volumes but due to the high probability of data-loss that would come from truncation of the end of a disk QuantaStor does not support shrink. To resize a volume simply right-click on it then choose Resize Volume... from the pop-up menu. After the resize is complete a signal is sent to the connected iSCSI and FC initiator sessions to let the client hosts know that the block device has been resized. Some operating systems will detect the new size automatically, others will require a device rescan to detect the new expanded size. In most cases additional steps are required in the host OS to expand partitions or other volume settings adjusted to make use of the additional space.
Creating Storage Volume Snapshots (Snap-Clones)
QuantaStor supports creation of snapshots and even snapshots of snapshots. Snapshots are R/W by default and read-only snapshots are also supported. QuantaStor uses what we call a lazy cloning technique where the underlying clone to make a snapshot writable is not done until the snapshot has been assigned to a host. Most snapshots are created by a schedule and then deleted without ever being accessed, so the lazy cloning technique boosts the performance and scalability of the Snapshot Schedules and Remote Replication system.
All Storage Volume snapshots are 'thin provisioned', that is they are a copy of the meta-data associated with the original volume and not a full copy of all the data blocks. To create a snapshot or a batch of snapshots you'll want to select the Storage Volume that you which to snap, right-click on it and choose 'Snapshot Storage Volume...' from the menu. If you do not supply a name then QuantaStor will automatically choose a name for you by appending the suffix "_snap" to the end of the original's volume name. So if you have a storage volume named 'vol1' and you create a snapshot of it, you'll have a snapshot named 'vol1_snap000'. If you create many snapshots then the system will increment the number at the end so that each snapshot has a unique name.
We recommend setting up a Snapshot Schedule so as to have rollback capabilities and some protection against ransomware. Snapshot Schedules have 'Long Term Retention Rules' to preserve snapshots for multiple months and/or quarters providing rollback and data recovery that is ideally prior to an attack in such a scenario.
Creating Storage Volume Clones
Clones represent complete copies of the data blocks in the original storage volume, and a clone can be created in any storage pool in your storage system whereas a snapshot can only be created within the same storage pool as the original. You can create a clone at any time and while the source volume is in use because QuantaStor creates a temporary snapshot in the background to facilitate the clone process. The temporary snapshot is automatically deleted once the clone operation completes. Note also that you cannot use a cloned storage volume until the data copy completes. You can monitor the progress of the cloning by looking at the Task bar at the bottom of the QuantaStor Manager screen. (Note: In contrast to clones (complete copies), snapshots are created near instantly and do not involve data movement so you can use them immediately. Named snapshots are read/write by default.)
Restoring from Snapshots
If you've accidentally lost some data by inadvertently deleting files in one of your storage volumes, you can recover your data quickly and easily using the 'Restore Storage Volume' operation. To restore your original storage volume to a previous point in time, first select the original, the right-click on it and choose "Restore Storage Volume..." from the pop-up menu. When the dialog appears you will be presented with all the snapshots of that original from which you can recover from. Just select the snapshot that you want to restore to and press "Ok". Note that you cannot have any active sessions to the original or the snapshot storage volume when you restore, if you do you'll get an error. This is to prevent the restore from taking place while the OS has the volume in use or mounted as this will lead to data corruption.
WARNING: When you restore, the data in the original is replaced with the data in
the snapshot.  As such, there's a possibility of loosing data as everything that
was written to the original since the time the snapshot was created will be lost.
Remember, you can always create a snapshot of the original before you restore it
to a previous point-in-time snapshot.
Managing Host Initiators
Hosts represent the client computers that one may assign Storage Volumes to. In FC/SCSI terminology the host systems are initiate the communication with your storage volumes (target devices) and so they are called initiators. Each Host entry may have one or more initiators associated with it. These can be one or more NVMeoF, iSCSI and/or FC initiators per Host.
Managing Host Initiator Groups
When multiple Host entries comprise a cluster (eg VMware, HyperV) we recommend making a Host Group to combine them. This way Storage Volumes may be assigned to the Host Group and that will provide access to the Storage Volume to all Hosts in the Host Group. When additional Hosts are added to a Host Group they'll automatically be assigned access to all Storage Volumes in the Host Group. This greatly simplifies Storage Volume assignment and management.
Disk Migration / LUN Copy to Storage Volume
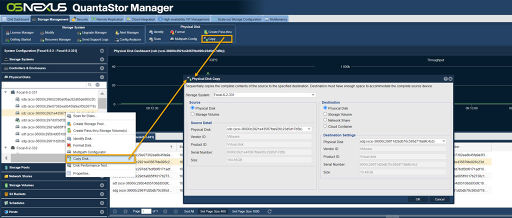
Navigation: Storage Management --> Physical Disks --> Physical Disk --> Copy (toolbar)
Migrating LUNs (iSCSI and FC block storage) from legacy systems can be time consuming and potentially error prone as it generally involves mapping the new storage and the old storage to a host, ensuring the the newly allocated LUN is equal to or larger than the old LUN and then the data makes two hops from Legacy SAN -> host -> New SAN so it uses more network bandwidth and can take more time.
QuantaStor has a built-in data migration feature to help make this process easier and faster. If your legacy SAN is FC based then you'll need to put a Emulex or Qlogic FC adapter into your QuantaStor system and will need to make sure that it is in initiator mode. Using the WWPN of this FC initiator you'll then setup the zoning in the switch and the storage access in the legacy SAN so that the QuantaStor system can connect directly to the storage in the legacy SAN with no host in-between. Once you've assign some storage from the legacy SAN to the QuantaStor system's initiator WWPN you'll need to do a 'Scan for Disks' in the QuantaStor system and you will then see your LUNs appear from the legacy SAN (they will appear with devices names like sdd, sde, sdf, sdg, etc). To copy a LUN to the QuantaStor system right-click on the disk device and choose 'Copy Disk...' from the pop-up menu.
You will see a dialog like the one above and it will show the details of the source device to be copied on the left. On the right it shows the destination information which will be one of the storage pools on the system where the LUN is connected. Enter the name for the new storage volume to be allocated which will be the destination for the copy. A new storage volume will be allocated with that name which is exactly the same size as the source volume. It will then copy all the blocks of the source LUN to the new destination Storage Volume.
3rd Party Volume Data Migration via iSCSI
QuantaStor includes iSCSI Software Adapter support so that one can directly connect to and access iSCSI LUNs from a SAN without having to use the CLI commands outlined below. The option to create a new iSCSI Software Adapter is in the Hardware Enclosures & Controllers section within the web management interface.
The process for copying a LUN via iSCSI is similar to that for FC except that iSCSI requires an initiator login from QuantaStor system to the remote iSCSI SAN to initially establish access to the remote LUN(s). This can be done via the QuantaStor console/SSH using the qs-util iscsiinstall', 'qs-util iscsiiqn', and 'qs-util iscsilogin' commands. Here's the step-by-step process:
sudo qs-util iscsiinstall
This command will install the iSCSI initiator software (open-iscsi).
sudo qs-util iscsiiqn
This command will show you the iSCSI IQN for the QuantaStor system . You'll need to assign the LUNs in the legacy SAN that you want to copy over to your QuantaStor system to this IQN. If your legacy SAN supports snapshots it's a good idea to assign a snapshot LUN to the QuantaStor system so that the data isn't changing during the copy.
sudo qs-util iscsilogin 10.10.10.10
In the command above, replace the example 10.10.10.10 IP address with the IP address of the legacy SAN which has the LUNs you're going to migrate over. Alternatively, you can use the iscsiadm command line utility directly to do this step. There are several of these iscsi helper commands, type 'qs-util' for a full listing. Once you've logged into the devices you'll see information about the devices by running the 'cat /proc/scsi/scsi' command or just go back to the QuantaStor web management interface and use the 'Scan for Disks' command to make the disks appear. Once they appear in the 'Physical Disks' section you can right-click on them and to do a 'Migrate Disk...' operation.
3rd Party Volume Data Migration via Fibre Channel
Note that for FC data migration one may use either a Qlogic or a Emulex FC HBA in initiator mode but QuantaStor only supports Qlogic QLE24xx/25xx/26xx series cards in FC Target mode. One may also use OEM versions of the Qlogic QLE series cards. It is best to use Qlogic cards as they may be used in both initiator and target mode. FC mode is switched in the Fibre Channel section by right-clicking on a given port and then selecting FC Port Enable (Target Mode).. or FC Port Disable (Initiator Mode)...
Managing FC/iSCSI Sessions
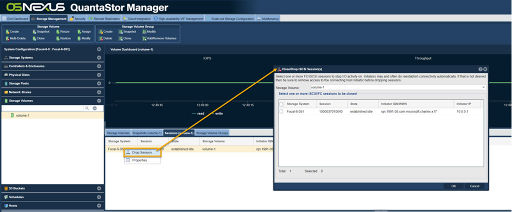
A list of active FC and iSCSI sessions for a given volume can be found by selecting the Storage Volume in the tree section and then select the 'Sessions' tab. The Sessions tab shows both active FC and iSCSI session information. To drop an iSCSI session simply right-click on a session in the table and choose Drop Session... from the pop-up menu.
Note: Some initiators will automatically re-establish a new iSCSI session if one is dropped by the storage system. To prevent this, unassign the Storage Volume from assigned Host or Host Group so that the host may not automatically re-login.
