NFS Configuration
This section outlines how to setup your servers/hosts to access QuantaStor Network Shares via the NFS protocol.
Access Control / Permissions Configuration
Unlike CIFS, access control via NFS is managed by providing access to a specific set of IP addresses. The default permissions for new Network Shares is to provide public access from all IP addresses which is shown in the QuantaStor web UI as a [public] network share client entry. The default access control configuration is also to "squash" rights from remote "root" user accounts to the "nobody" user ID as a security precaution. This may cause problems with some applications, and in those cases you can apply the 'no_root_squash' custom option to your network share. Also, if you've changed it to NFS v4 then the 'no_root_squash' option may also be required unless you've manually configured the system to use Kerberos user authentication.
no_root_squash Configuration
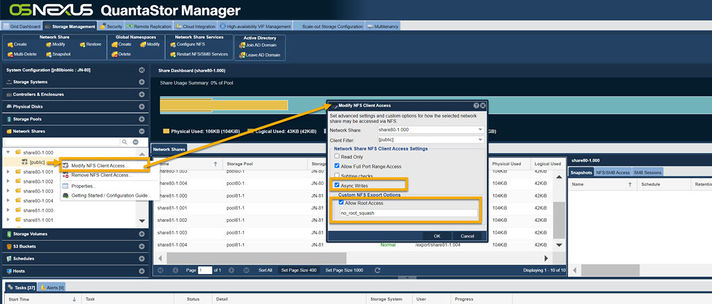
To configure the 'no_root_squash' option first go the the QuantaStor web management interface and expand the tree where you see Network Shares. In this example, 'share1' and under there you'll see a host access entry called \[public\]. Right-click on that and choose 'Modify NFS Client Access...'. In this screen input no_root_squash into the Custom NFS Export Options section. This will allow you to modify files in the share. Second you'll probably want to enable 'Async Writes' which will boost performance a bit. Once you're done click 'OK'.
NFSv4 Mount Procedure
Continuing the above example, if you've switched from NFSv3 mode to NFSv4 you'll need to unmount the share if you already have it mounted then re-mount the share:
umount /media001
Now to mount the share with nfs4 mode, mount it like so:
mount -t nfs4 192.168.0.103:/media001 /media001
Note that we've added the -t nfs4 option, and second we have excluded the /export prefix to the mount path. That's important, do not try mounting a nfs4 network share with the /export prefix. It may work for awhile but you will inevitably have problems with this.
Resolving Stale File Handle issue on older RedHat / CentOS 5.x systems
We've seen some problems with the NFS client that comes with Centos 5.5 which leads to the NFS connection dropping. After which you'll see 'Stale File Handle' errors when you try to mount the share. The quick fix for this is to login to your QuantaStor system then run this command:
sudo /opt/osnexus/quantastor/bin/nfskeepalive --cron
This generates a small amount of periodic activity on the active shares so that the connections do not get dropped and you don't get stale file handles. CentOS 5.5 has the 2.6.18 kernel which is several years old now and we don't see this problem with the newer kernels used in CentOS 6.x.
RedHat / CentOS 6.x NFS Configuration
To setup your system to communicate with QuantaStor over NFS you'll first need to login as root and install a couple of packages like so:
yum install nfs-utils nfs-utils-lib
Once NFS is installed you can now mount the Network Shares that you've created in your QuantaStor system. To do this first create a directory to mount the share to. In this example our share name is 'media001'.
mkdir /media001
Now we can mount the share to that directory by providing the IP address of the Quantastor system (192.168.0.103 in this example) and the name of the share with the /export prefix like so:
mount 192.168.0.103:/export/media001 /media001
Ubuntu / Debian NFS Configuration
The process for configuring NFS with Ubuntu and Debian is the same as above only the package installation is different. To install the NFS client packages issue these commands at the console to get started then follow the same instructions given above for mounting shares for CentOS:
sudo -i
apt-get update
apt-get install nfs-common
