Block Storage Provisioning
Block Storage Provisioning (iSCSI/FC)
This section will cover the creation of storage volumes and user groups, and allocation of these storage volumes to these groups.
OSNEXUS Videos
Create Storage Pool
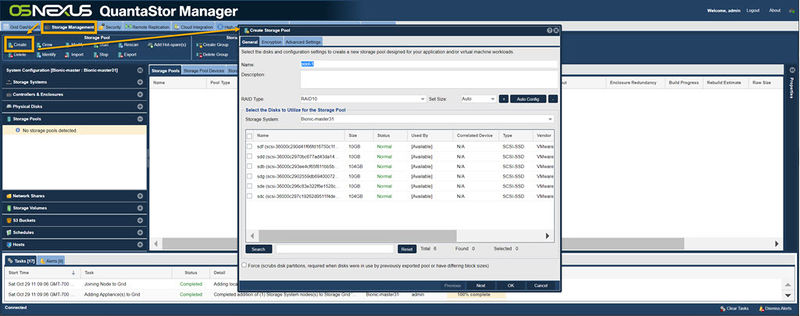
To create your first storage pool; select from, Storage Management-->Storage Pools-->Storage Pool --> Create, the Create Storage Pool dialog. If you select RAID0 for raid type, then the pool will be ready immediately but won't be fault tolerant. Most likely, you will want to replace it with a RAID6 or RAID10 storage pool before you start writing important data to the storage system.
Once you have created a storage pool it will take some time to 'rebuild'. Once the 'rebuild' process has reached 1% you will see the storage pool appear in QuantaStor Manager and you can begin to create new storage volumes.
WARNING: Although you can begin using the pool at 1% rebuild completion, your storage pool is not fault-tolerant until the rebuild process has completed.
For more information on storage pools, RAID levels and storage pool options refer to the Create Storage Pool page and the Administrators Guide.
Create Volume
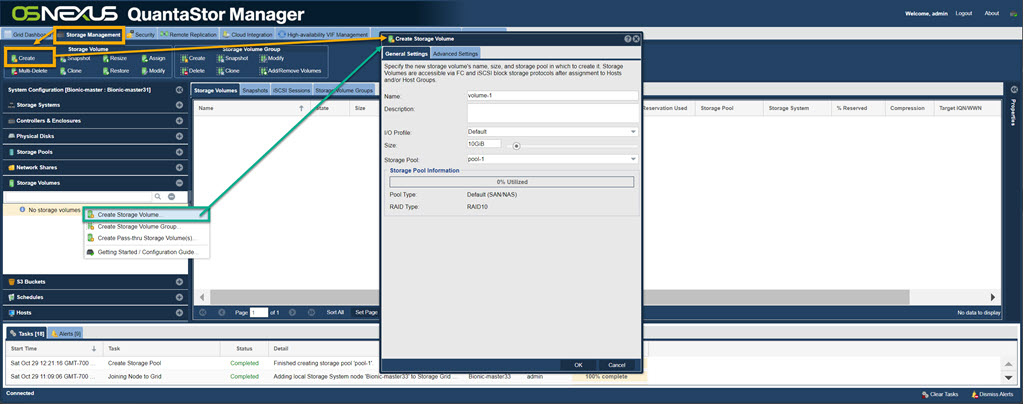
Navigation: Storage Management --> Storage Volumes --> Storage Volume --> Create (toolbar)
After you have created one or more storage pools you can begin creating storage volumes in them. Storage volumes are the iSCSI disks that you present to your hosts. Sometimes they're called LUNs or virtual disks, but storage volume is the generally accepted term used by the broader storage industry, and so will be used within this wiki.
You may have to wait until your storage pool is 1% complete with its synchronization before you can start to create storage volumes.
To create your storage volumes, click Storage Management --> Storage Volumes --> Storage Volume --> Create. When the dialog appears, give your storage volume a name, select the size of the volume you want to create using the slider bar, and press OK.
For more information, refer to the Storage Volume Create page and the Administrators Guide.
Add Host
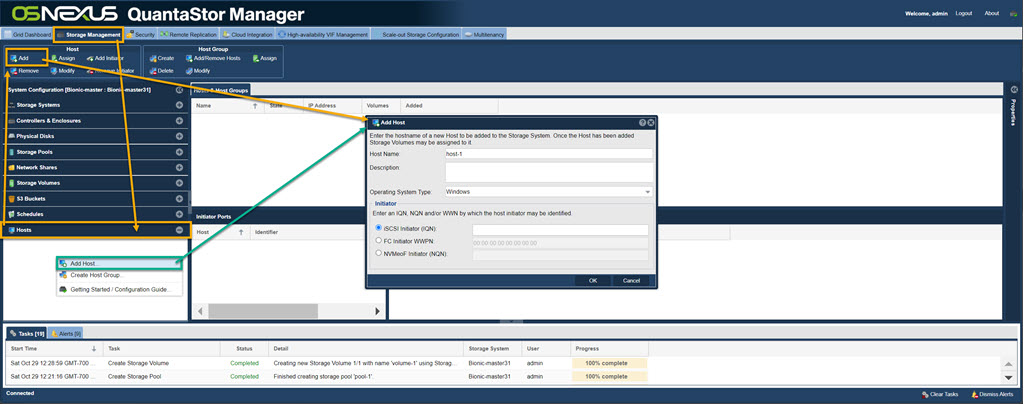
To add a Host select Storage Management --> Hosts --> Host --> Add.
Add Host Initiator
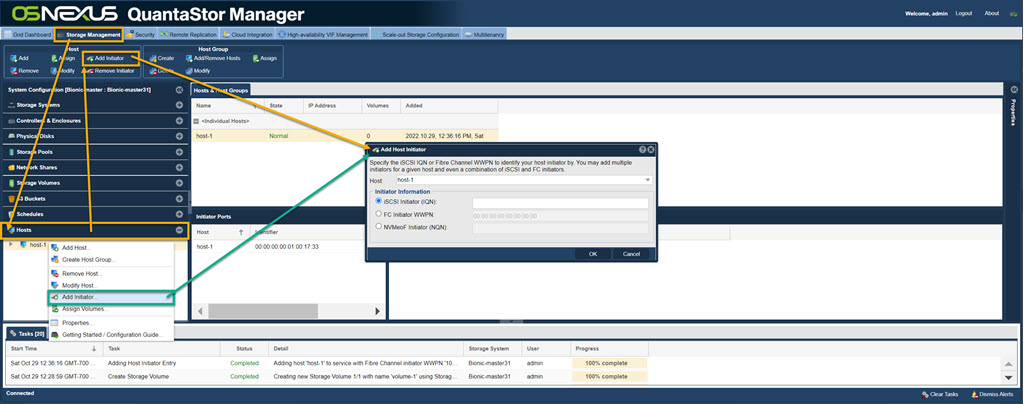
The host object represents a server, desktop, virtual machine or any other entity that you want to provide storage to. Each host is only allowed to see the storage volumes that you have assigned to them. The industry term for this is called "LUN Masking" but in for this wiki we will refer to it simply as "storage assignment".
To add a host to the system, click the button from from the toolbar at Storage Management --> Hosts --> Host --> Add Initiator. You will be asked to enter a name, IP address and/or IQN for your new host. We highly recommend that you always identify your hosts by IQN as it makes it easier to manage your hosts. Once you've entered a host name and its IQN press OK to have the host created.
For more information, refer to the Host Add page.
Assign Volume
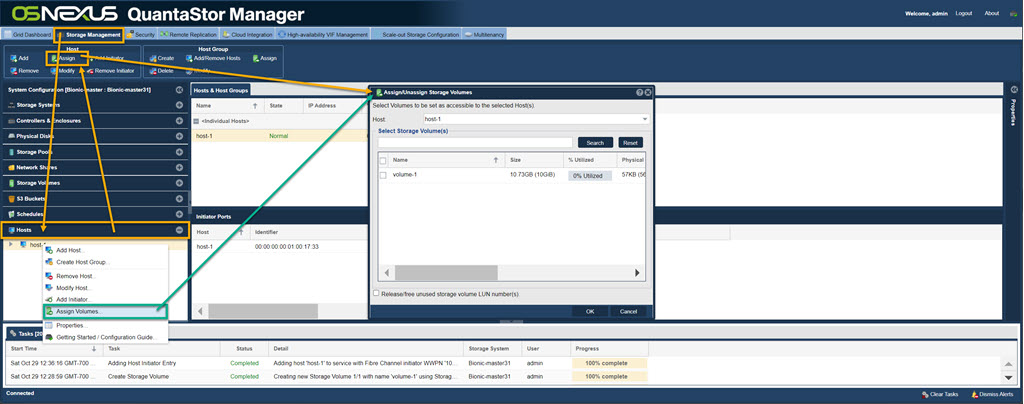
Now you're ready to assign the volumes you created to your hosts. From the toolbar press the Storage Management --> Hosts --> Host Group--> Assign button. You can also assign them by using the "Assign" tool, under the "Storage Volumes" and the "Hosts" tab.
Note: A given volume can be assigned to more than one host at the same time, but keep in mind that you need to have software or a file-system than can handle the concurrent access such as a cluster file system or similar cluster aware application.
Once you've selected your host and volume, press OK. Under the "Hosts" tab, you should now see your selected volumes in a dropdown menu below the host.
For more information, refer to the Storage Volume Assign page.
