Security Configuration
OSNEXUS Videos
Security Settings Management
Many industries require compliance with government security standards which require products to enforce rules ranging from audit logging to password policies. These include Health and Human Services (HSS) security standards (HIPAA), federal law enforcement security standards (CJIS) and general security standards outlined by NIST for Controlled Unclassified Information (CUI) in Non-Federal Information Systems and Organizations which are covered in NIST 800-53 and 800-171.
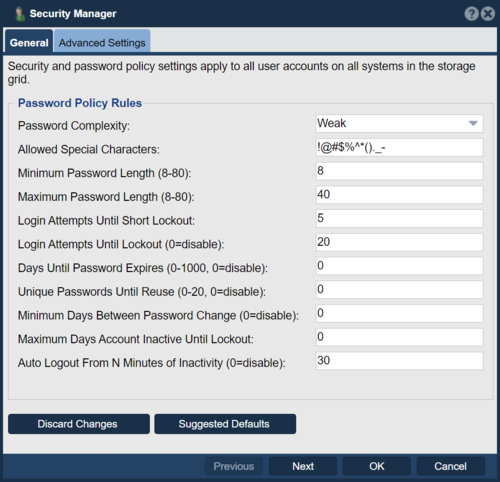
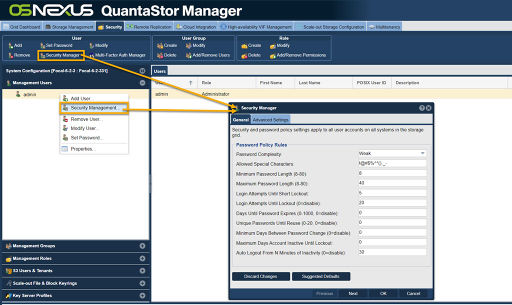
To configure a QuantaStor Storage Grid to meet compliance rules for these various standards navigate to the Security Manager section in the web management interface.
Navigation: Security --> Management User --> User --> Security Manager (toolbar) [Security Manager]
Choosing the Suggested Defaults option will automatically setup the password and other policies to meet the various standards mentioned above. Further tuning of these settings can then be done to meet the specific requirements for a given deployment and environment.
LDAP Single-Sign-On Authentication
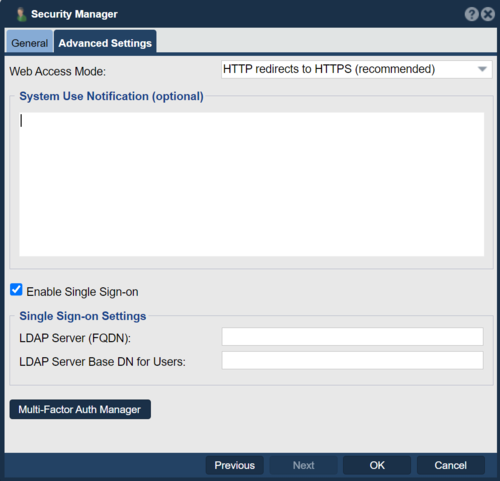
In the Advanced Settings page there are some options for connecting your QuantaStor Storage Grid to your LDAP/AD domain for management user authentication. To configure this you'll need to add one or more LDAP groups to your LDAP environment such as "QS-Administrator" and "QS-Monitor" and then associate one or more of your LDAP users with those groups. Next, within QuantaStor one will use the Modify Role dialog to edit an existing Role to associated it with the LDAP groups. For example, the "Administrator" role could be modified to associate it with the LDAP group "QS-Administrator" and similarly, the role for "System Monitor" may be associated with the LDAP group "QS-Monitor".
After that you'll enable Single-Sign-On and provide the LDAP domain information for your LDAP environment. Note also that your DNS and NTP settings should be configured to point to your AD server for both local DNS and NTP. This can be configured in the Storage System Modify dialog and should be setup before enabling Single-Sign-On.
- LDAP Server (FQDN): EXAMPLE
- LDAP Server Base DN for Users: dc=ldapserver,dc=example,dc=com
Note, this integration with LDAP is for SSO access to the storage grid for administrative access via the QuantaStor WUI, CLI, and APIs. It does not provide integration with Active Directory for Network Shares and SMB protocol access. For that you'll need to join each system to your AD domain using the dialog under Storage Management --> Storage Systems --> Active Directory [toolbar] --> Join AD Domain.
Audit Logging
Audit logging of management operations is on by default on all QuantaStor systems and cannot be disabled. The audit log information is available on QuantaStor systems at /var/log/qs/qs_audit.log and is stored in a NIST compliant CEE JSON format for easy parsing.
GDPR Compliant Secure Log Send
QuantaStor systems have a Send Logs feature which will send the system logs for the selected systems to OSNEXUS Support. The log collection collects the syslog as well as system hardware configuration information and much of the log information found under /var/log/ on the system. To ensure no personally-identifiable-information (PII) is sent to OSNEXUS the log collection system built into QuantaStor scrubs the logs of usernames and other security related information before the logs are sent to OSNEXUS to ensure GDPR compliance. QuantaStor log collection never collects data files from Storage Pools only system log and configuration files.
Role Based Access Controls (RBAC)
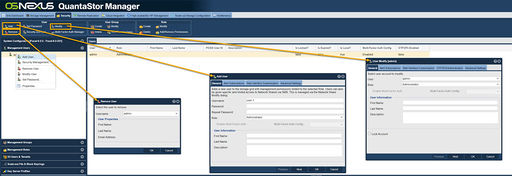
QuantaStor's Role Based Access Control (RBAC) system makes it possible for IT administrators and security admins to setup access to QuantaStor systems which is limited to job functions following the principal of least privilege security practices. QuantaStor's RBAC system is highly granular so that one can control access to specific operations such as provisioning Network Shares or snapshot Network Shares. Each permission in the RBAC system has three parts, a object type (eg: Network Share, Storage Volume, Storage Pool), an operations (eg: create, delete, modify, view), and a scope (eg: system, resource-group, user, or none). This enables one to control at a very granular level what a given Role allows and is especially useful in automation as a user accounts can be created for scripts with have a role which limits the given script to just it's assigned task such as creating and deleting a nightly snapshot of a Network Share.
Role Management
To create a new Role in the RBAC system navigate to this section of the web management interface. Each user can be assigned to a single Role and once assigned to a given Role it becomes active immediately. For example, if a user is logged in as an Administrator and their Role is changed to System Monitor which only has view permissions their new permissions are in effect for the next action they take. Tasks that are already running such as a Storage Volume create would complete given the authorization level a given user is at at the time the task starts.
Navigation: Security --> Management Users --> Role --> Create (toolbar)
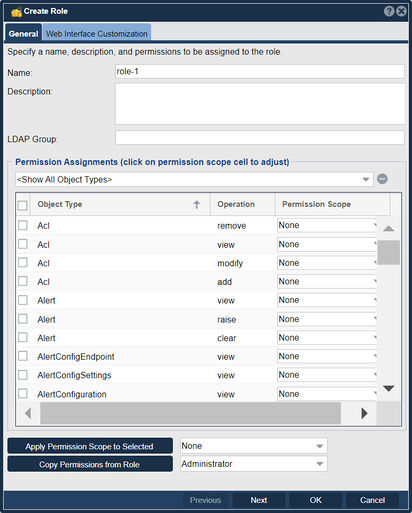
Role Permissions - Object Types
Every QuantaStor API/CLI/WUI command in QuantaStor goes through the same core QuantaStor service and every call goes through an authentication and a authorization check. When creating a new Role one can copy the permissions from another Role to help save time as there are over 100 different object types and over 600 permissions that can be set including the most common types such as Storage Volumes, Network Shares, and S3 Buckets.
Role Permissions - Operation Types
Every permission is a combination of a Object Type (eg: Storage Volume) and an operation that can be done on that object type such as create and delete. This per-operation level of granularity is important so that one can create Roles that fit job functions. For example, a Role such as "Provisioning Administrator" could be created with the ability to do create operations but not delete operations so that the common task of provisioning storage can be delegated without the risk of that leading to data deletion or other configuration changes.
Note that all objects have a view permission associated with them as well and this permission is important for some parts of the QuantaStor web management interface to function. Removing view permissions from a Role can be useful when a given Role should not have any visibility to a given type of object. For example, an administrator role that's setup to manage only Network Shares could have the view permission for StorageVolume object type set to None so that that admin cannot see any of the Storage Volumes. Because of the SOA architecture of the QuantaStor storage grid these security settings are applied universally irrespective of how that user account is accessing the system be it by QS CLI, web management interface or the QuantaStor REST API.
Role Permissions - Operation Scope
When a Role is assigned an operation it is generally given a scope of either Global/System which provides grid-wide access to the given operation on all systems or it is set to a scope of None which universally blocks access to the given operation.
There are two other scopes, specifically User scope and Resource Group scope. The User scope limits management access to those objects which the User is the assigned owner.
For example, Role can be created with the permission Storage Volume + delete + User. Any user assigned this Role would only be able to delete Storage Volumes for which they are the owner.
Resource Group level scope is how QuantaStor implements Multi-tenancy. In the Multi-tenancy tab one can create Resource Groups which are a collection of objects such as Storage Volumes and Network Shares. If a user is assigned to a Resource Group then all of their permissions at the scope of Resource Group become active for the set of objects in that Resource Group.
User Management
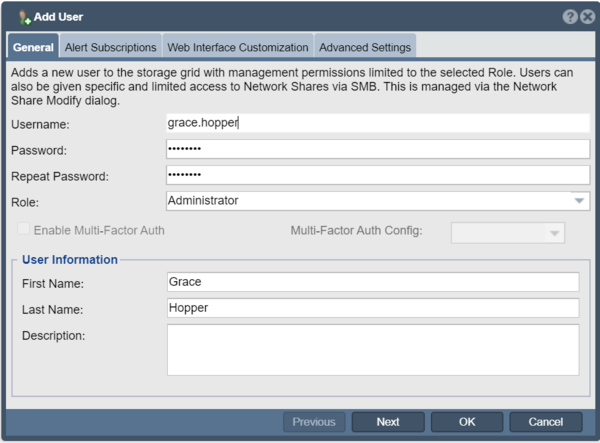
Users in QuantaStor are management users which are given access to the QuantaStor web management interface with specific permissions. These user accounts are also created as local (Linux/Unix) users within each Storage System the Storage Grid. This is done to enable use of management accounts for SMB file access, especially for environments where AD/LDAP is not configured or where special direct non-AD user access is needed. Note that for security reasons the local Linux user accounts created to enable SMB access do not allow login access to the system via SSH or the console. That can be overridden by using Linux user management commands which edit the /etc/passwd file to allow a login shell. By default the only SSH and console accounts that allow login should be the qadmin console user account and/or the root user account and these accounts should only be used for special maintenance activities.
Adding New Users
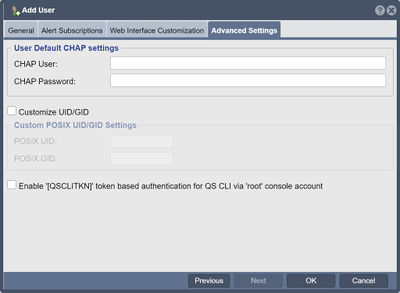
To add a new user to the Storage Grid with management permissions limited to the selected Role simply bring up the Add User dialog from the web management interface. [Add Users]
Each user associated with a Role that grants them permissions. The Administrator role enables access to all management functions on all systems in a given Storage Grid. The default admin user account can be modified but cannot be deleted and cannot be set to any role except the Administrator role. When adding a new user that should only have access to monitor systems assign them to the System Monitor role rather than the Administrator role. The other default roles such as Cloud Administrator and Cloud User are useful for multi-tenancy applications.
When assigning a password to a new user note that the password must be compliant to the security profile configured for the Storage Grid. The default policy is very flexible but it is generally recommended to increase security compliance level for your storage grid using the Security Manager and the Suggested Defaults option.
User Alert Subscriptions
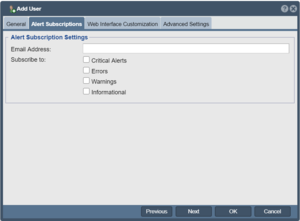
By inputting a given user's email address and selecting alert levels to subscribe to one can route email based system alerts to multiple administrators. Once configured here use the Alert Manager to send one or more test alerts to ensure they're being received by the user.
Customizing Web Management User Experience
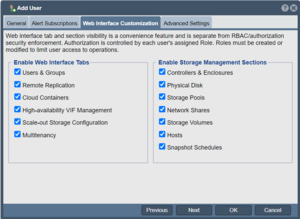
In larger configurations with many administrators or for QuantaStor systems setup for narrow use cases it can be helpful to turn off the tab panels in the QuantaStor web management interface for features that a given user need not see. This reduces complexity and makes the user experience better for admin users with narrow roles or systems deployed for a specific narrow use case. Simply un-check the panels and sections to hide them and then re-login as that user to get the customized web management interface experience.
User Account Advanced Settings
The Advanced Settings section enables one to customize the posix UID/GID of the user which is helpful for user accounts that are used for SMB and NFS access. Another key feature in this section is the option to Enable Console CLI Authentication. This enables one to run qs CLI commands when logged into a QuantaStor system as root without having to input the password each time.
When logged in as root on a given QuantaStor system run this command to save the auto-authentication credentials after enabling Enable Console CLI Authentication and replace the admin username with whichever account you've enabled this feature for if not the admin user.
# echo "localhost,admin,[QSCLITKN]" > ~/.qs.cnf
Modifing Users
The User Modify dialog provides the ability to change all the same settings provided in the Create User dialog, more information is available here.
Removing Users
User accounts can be removed from a Storage Grid at any time and come into effect immediately. A user that is logged into the QuantaStor web manager interface that has their user account removed will lose all access from all systems in the grid immediately. For more information on Removing Users see this section on Removing Users.
User Group Management
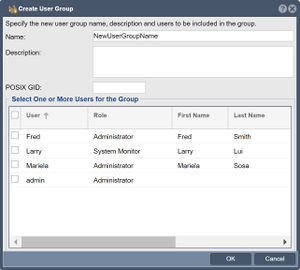
Just as one can create User accounts one can also create User Groups. User Groups are helpful for grouping users under a common GID which is helpful when assigning multiple users as owners of a given Network Share. To Create and Modify User Groups navigate to the Users & Groups main tab, then choose the Management Groups section.
Next add, modify or remove a given User Group.
Navigation: Users & Groups --> Management Users --> User Group --> Create (toolbar)
Multitenancy / Resource Group Management
Resource Groups are multi-tenant containers for grouping users with resources such as storage volumes, network shares, and provisioning quotas for self-service provisioning from storage pools. Users that are assigned to a storage cloud should be assigned the Cloud User or the Cloud Administrator role so that their view of the available resources in the grid is limited to just those that have been added to their assigned Resource Group. See the Multitenancy tab to Create, Modify and Delete Resource Groups. Further information is available here under Create a Resource Group...
System Setup Security Checks
Change Passwords
Change SSH Console Administrator Account 'qadmin' Password
One of the most important steps in the configuration of a new QuantaStor system is to change the qadmin console user password for each Storage System to something other than the default password qadmin. One can login to the console using the 'qadmin' account or access the system via SSD to login as 'qadmin'. Next type 'passwd' and change the password from qadmin to a strong password which includes letters and numbers.
Change Management Administrator Account 'admin' Password
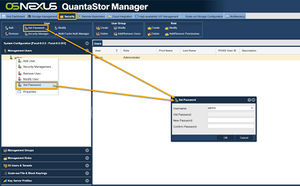
Login to the web management interface as the 'admin' user and then change the default password which is password to something else that is at least 10 characters in length and includes upper and lower cases letters and numbers. Navigate to the Users & Groups tab and select "Set Password" from the "User" section of the ribbon/toolbar.
Firewall Configuration
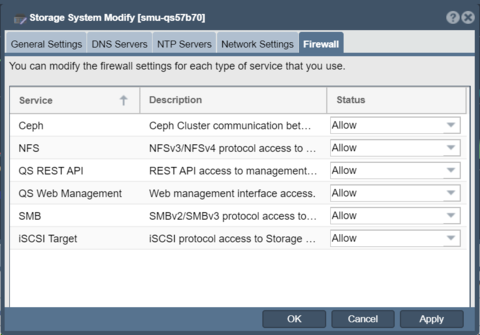
QuantaStor v5 and newer versions have an integrated firewall management system that provides the ability to customize protocol access at a system level as well as at a per port level. For high-security environments it is recommended to block all protocols that will not be used.
Firewall configuration for a given Storage System is accessible in the Storage System Modify dialog in the Firewall tab. Similarly, for modifying firewall settings on a port level select the network port and choose Modify Network Port... via right-click or via the toolbar to change the firewall settings via the Firewall tab.
SSL/TLS 1.2 Key Management
QuantaStor grid communication and web access is limited to SSL TLS 1.2 and newer. The supported ciphers are controlled via a configuration file at:
/opt/osnexus/common/lib/qsciphers
Cipher options may be customized but note that the customized version should be placed at this directory to ensure it is not automatically overwritten when the system is upgraded.
/var/opt/osnexus/quantastor/ssl/qsciphers
Changing the SSL Key for QuantaStor Web Management Interface
The SSL key provided with QuantaStor is a common self-signed SSL key that is pre-generated and included with all deployments. This is generally OK for most deployments on private networks but for increased security it is recommended to generate a new SSL keystore for the Apache Tomcat server used to serve the QuantaStor web management interface.
Keystore Password Selection
IMPORTANT NOTE You must set the password for the keystore to 'changeit' (without the quotes) as this is the default password that Tomcat uses to unlock the keystore. If you do not want to use the default password ('changeit') you can select a password of your choice but you will also need to manually edit the connector section of the /opt/osnexus/quantastor/tomcat/conf/server.xml file to add a line containing the keystore password (example: keystorePass="YOURPASSWORD"). Here's an example of what that will look like if you select the password "YOURPASSWORD".
<Connector port="8443" protocol="HTTP/1.1" SSLEnabled="true"
               maxThreads="150" scheme="https" secure="true"
               keystoreFile="/opt/osnexus/quantastor/tomcat/conf/keystore"
               keystorePass="YOURPASSWORD"
               clientAuth="false" sslProtocol="TLS" />
New Keystore Generation
To generate a new keystore you'll need to do the following steps.
- Login to QuantaStor via the console or via SSH then generate a keystore using the keytool utility. It will prompt you to enter a bunch of data including name, company, location, etc. This will produce a new .keystore file in the current directory. Remember to use the default Tomcat 'changeit' password for the keystore unless you plan to edit the /opt/osnexus/quantastor/tomcat/conf/server.xml file to add your custom keystore password.
keytool -genkey -alias tomcat -keyalg RSA -validity 365
- Next, backup the original keystore file and then overwrite the original with your newly generated keystore file:
cp /opt/osnexus/quantastor/tomcat/conf/keystore ./keystore.qs.conf
cp .keystore /opt/osnexus/quantastor/tomcat/conf/keystore
mv .keystore keystore.custom
- Finally, restart tomcat services so that the new key is loaded.
service tomcat restart
IMPORTANT NOTE If you are using Firefox as your browser, you must clear the browser history in order to clear the old cached key information. If you don't clear the history you'll see that the "Confirm Security Exception" button will be greyed out and you won't be able to login to your QuantaStor system via https. IE and Chrome do not have this issue.
That's the whole process. Here's an example of what we enter into these fields as OSNEXUS Engineering, you'll want to put your own company name and other details here:
keytool -genkey -alias qs-tomcat -keyalg RSA -validity 365

Enter keystore password:
Re-enter new password:
What is your first and last name?
  [Unknown]:  OSNEXUS
What is the name of your organizational unit?
  [Unknown]:  OSNEXUS Engineering
What is the name of your organization?
  [Unknown]:  OSNEXUS, Inc.
What is the name of your City or Locality?
  [Unknown]:  Bellevue
What is the name of your State or Province?
  [Unknown]:  Washington
What is the two-letter country code for this unit?
  [Unknown]:  US
Is CN=OSNEXUS, OU=OSNEXUS Engineering, O="OSNEXUS, Inc.", L=Bellevue, ST=Washington, C=US correct?
  [no]:  yes
Custom SSL Certificates and TLS Security
- Information on how to Generate and Install Custom SSL Certificates and set Custom TLS security settings.
Custom SSH Ciphers and Key Exchange Algorithms
- Information on how to customize the ssh service to enforce strong Cipher and Key Exchange Algorithms for SSH communication.
Custom S3 SSl/TLS Certificate
Multi-factor Authentication
QuantaStor supports Cisco Duo Multi-Factor Authentication as the primary multi-factor authentication method. Additional methods are being added, please contact OSNEXUS at info@osnexus.com for more information on MFA options.
Security Updates
QuantaStor v5 and newer supports automatic security updates via the Upgrade Manager which is accessible via the web management interface. Older QuantaStor v3 & v4 systems required running security updates via the console/ssh as the root user. More information on the old method of upgrading system security patches for QuantaStor v4 systems is available here: QS v4 Security Updates
Encrypting NFS/SMB/iSCSI via IPsec
Protocols such as NFSv3 require one to setup an encrypted tunnel between a client and the QuantaStor system in order to ensure traffic is encrypted on the wire. More information on how to setup IPsec in QuantaStor systems is available here.
