VMware Configuration
Storage Volume Block Size Selection
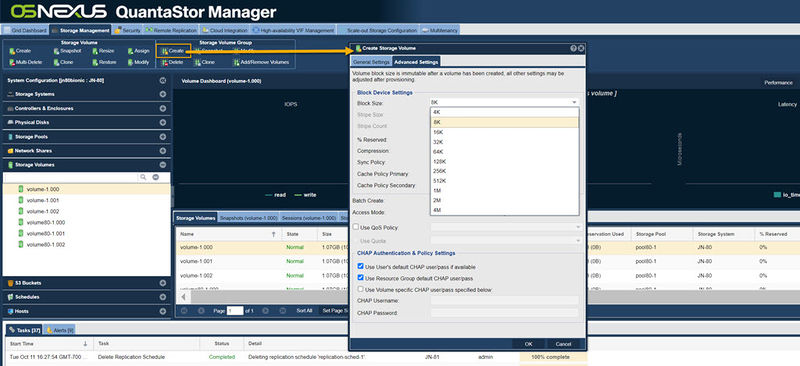
With VMware VMFS v6 changes have been introduced which limit the valid block sizes for VMware DataStores to QuantaStor Storage Volumes to a range between 8K and 64K block size. As such all Storage Volumes allocated for use as VMware Datastores should be allocated with a 8K, 16K, 32K, or 64K block size. This range of block sizes is also compatible with newer and older versions of VMware including VMFS 5.
Maximizing IOPS
Our general recommendation for VMware Datastores has traditionally been 8K so as to maximize IOPS for databases but this has been shown to have a higher level of overhead/padding which can reduce overall usable capacity. For this reason and due to solid performance in field with the larger 64K block size we recommend the larger 64K block size for general server and desktop virtualization workloads. That said, for databases one may be better served with sticking with an 8K block size or having the iSCSI/FC storage accessed directly from database server guest VMs rather than virtualized at the Datastore layer.
Maximizing Throughput
For maximum throughput we recommend using the largest supported block size which is 64K. This will also give solid IOPS performance for most VM workloads and aligns well with VMware's SFB layout.
Selecting Storage Volume Block Size
As noted above, we recommend selecting the 64K block size for your VMware Datastores though 8K, 16K and 32K are also viable options which could yield some improvement in IOPS for your workload at the cost of throughput and additional space overhead. NOTE: The block size cannot be changed after the Storage Volume has been created. Be sure to select the correct block size up-front else one will need to allocate a new Storage Volume with the correct size and may need to then VMware Live Migrate VMs from one Storage Volume to another to switch over.
Creating VMware Datastore
Using iSCSI
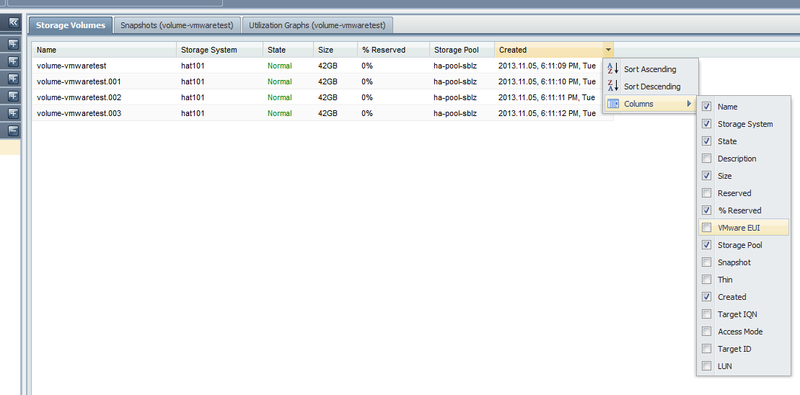
The VMware EUI unique identifier for any given volume can be found in the properties page for the Storage Volume in the QuantaStor web management interface. There is also a column you can activate as shown in this screenshot.
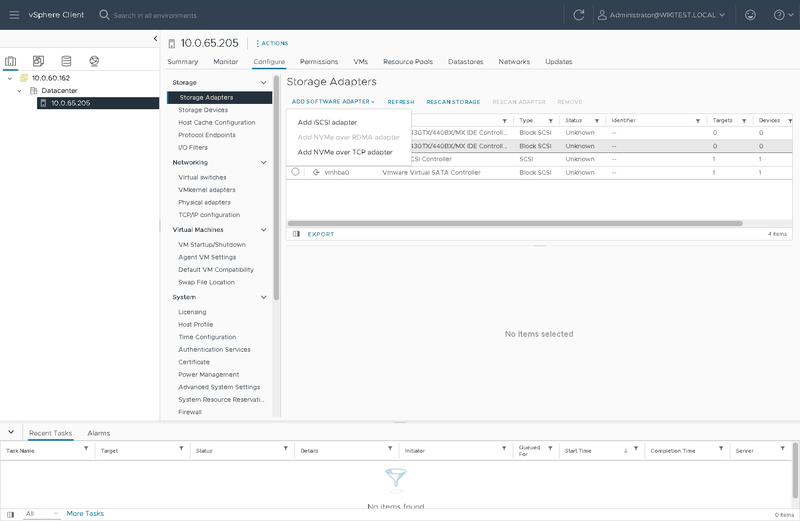
If you don't already have an iSCSI adapter on your ESXi host, start in vSphere by going under your datacenter object and selecting the host you wish to add an iSCSI volume to. Once there, select the "Storage Adapters" item and the "Configure" tab along the top. Once there, select the "Add Software Adapter" item and select "Add iSCSI adapter".
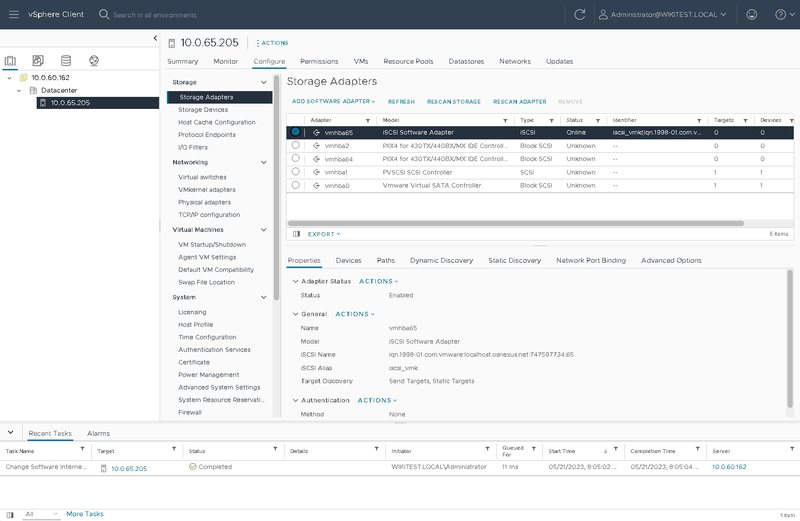
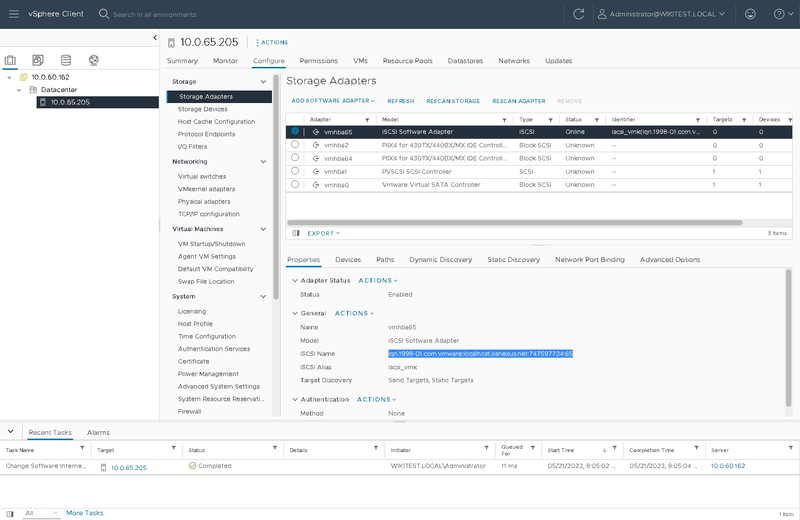
Once you are done, you will see a new software iSCSI adapter. Select it and take a look at the IQN field below.
Select the IQN field value and copy it to your clipboard.
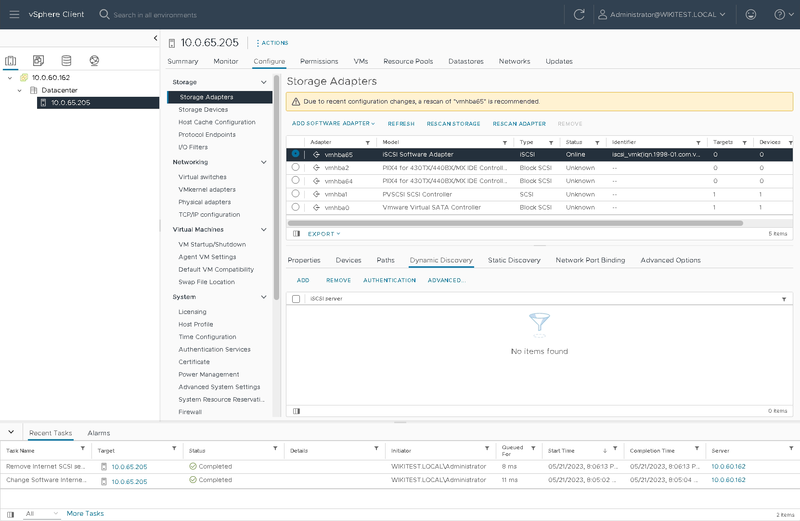
Next, click on the Dynamic Discovery tab near the bottom.
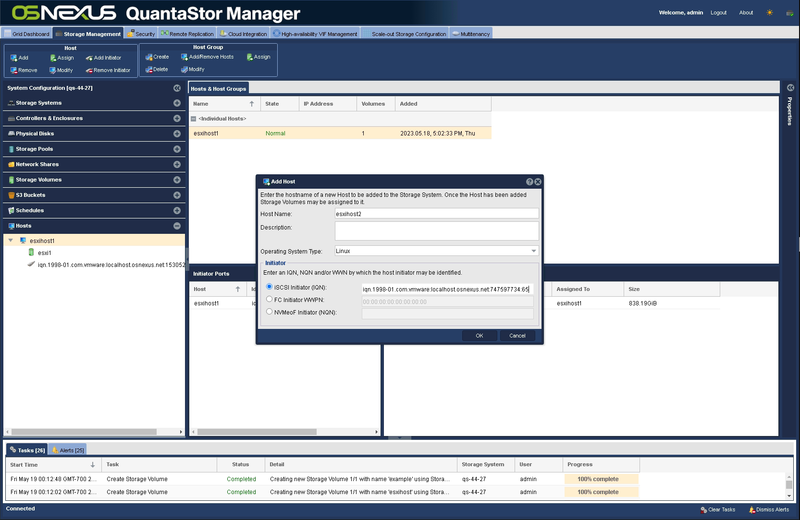
Switch over to your QuantaStor web view. Go to the "Hosts" section on the left bar and either select the "Add" button at the top or right-click in the white space of the Hosts selection and select "Add Host". In the window that pops up, enter a description that is helpful to you if desired and select Linux as the OS Type. Then paste the IQN you copied to your clipboard in to the appropriate iSCSI Initiator field and press OK.
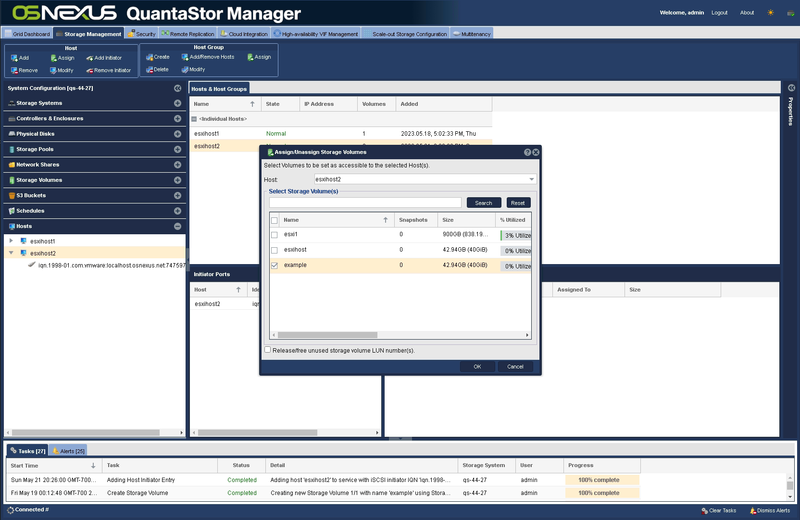
Once your host is created in QuantaStor, right-click on the host icon and select "Assign Volumes" and add your intended storage volume in the window that pops up.
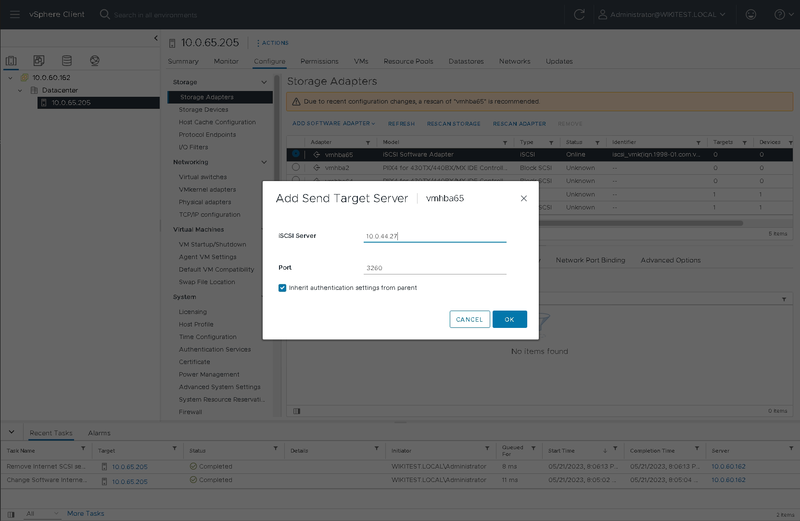
Go back to vSphere and select "Add" in the Dynamic Discovery tab. Enter the IP address you intend to use to access the storage volume over. In the case of a highly available cluster, this will likely be the Virtual Interface created when setting up your cluster. Press OK.
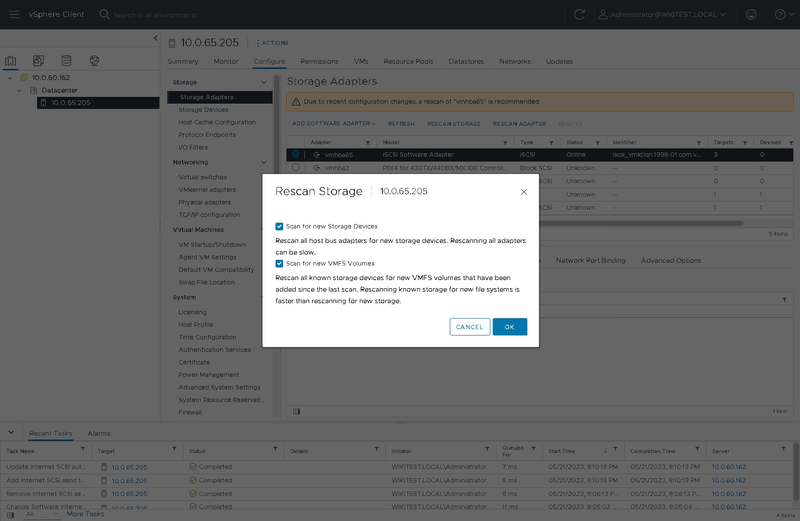
Next, select "Rescan Storage", leave both boxes checked, and press OK. This should allow the ESXi host to see the newly-available volume.
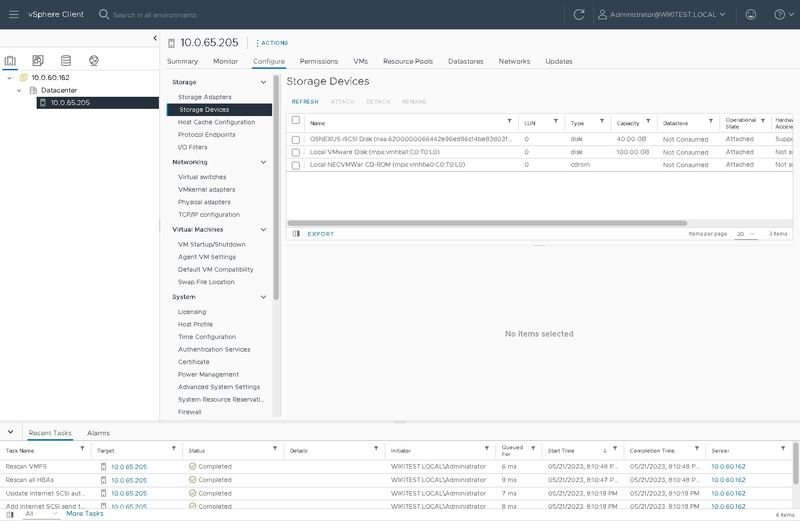
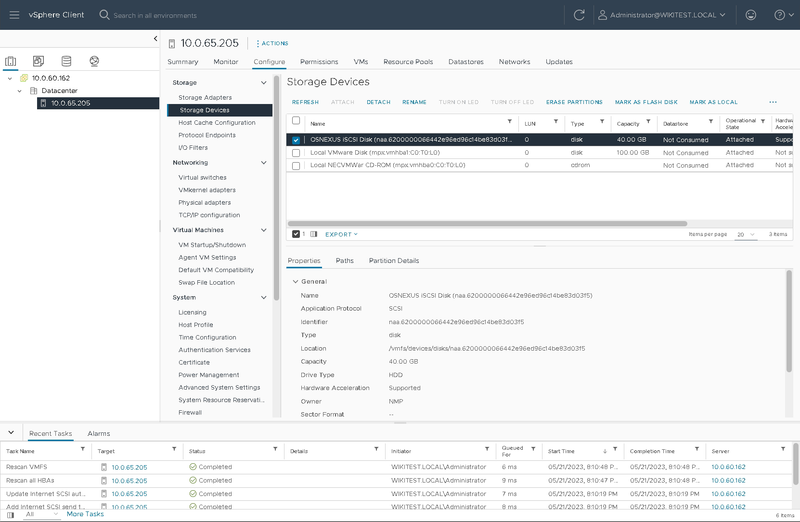
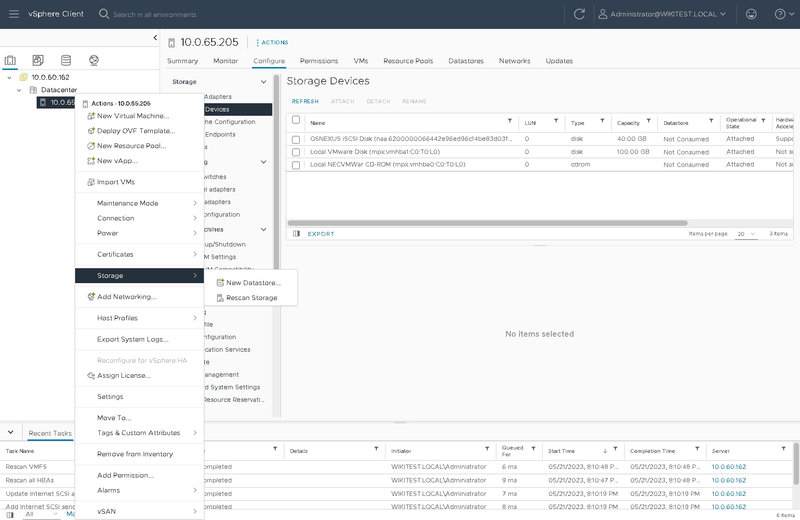
To the left, select the "Storage Devices" section under "Storage Adapters". You should see your volume starting with "OSNEXUS iSCSI Disk" in the Name column.
Above is a highlight view or the new Storage Volume.
Next, right-click the ESXi host in your datacenter object in vSphere and under the Storage section, select "New Datastore"
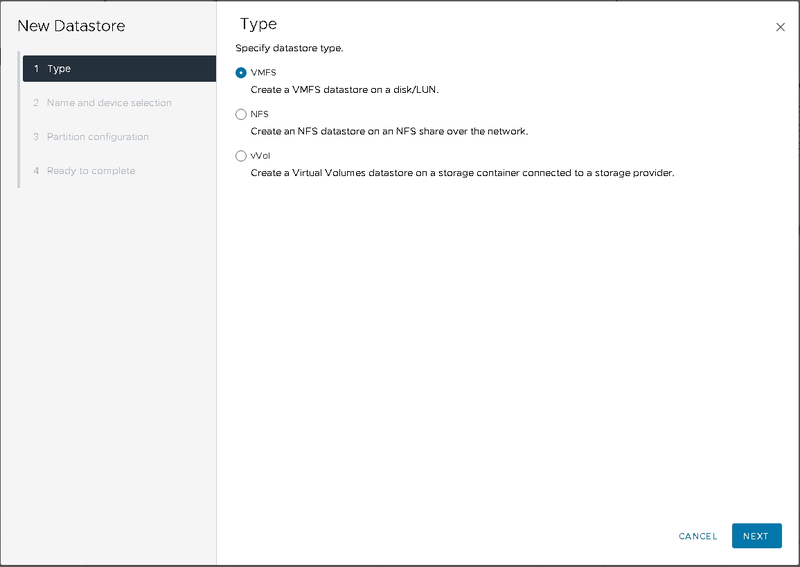
You will see a new window pop up that will ask you what you would like to create. Leave VMFS selected and press Next.
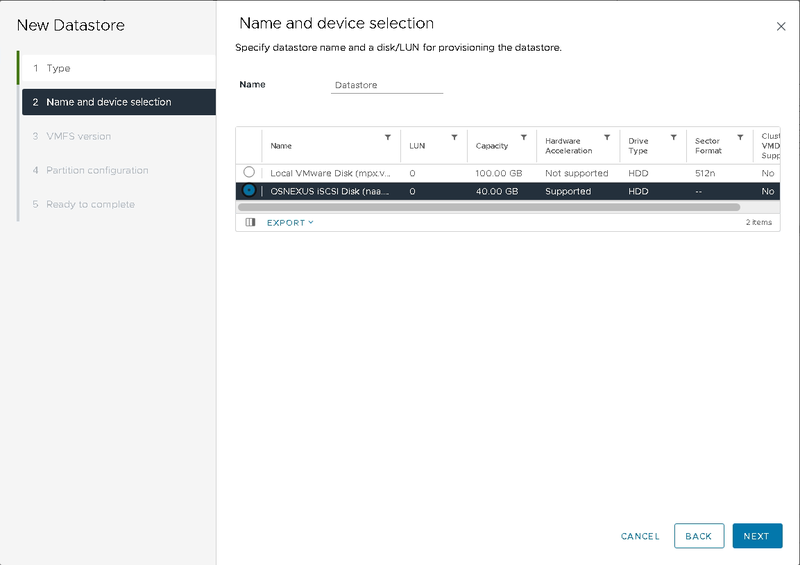
On the next screen, select your new QuantaStor volume and press Next again.
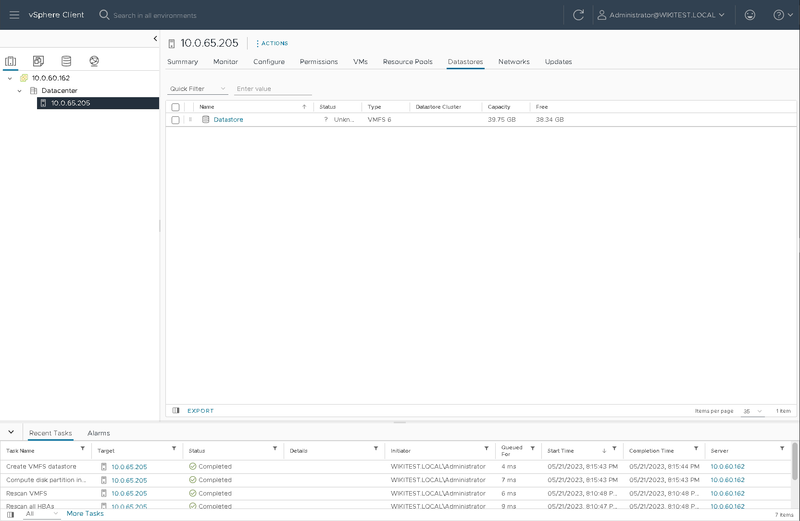
Continue through the rest of the steps and when you are done, you can select the "DataStores" tab in the ESXi object and you should see your new datastore available for use.
Using NFS
Here is a video explaining the steps on how to setup a datastore using NFS. Creating a VMware datastore using an NFS share on QuantaStor Storage
Performance Tuning
Performance tuning is important and a number of factors contribute to performance and collectively they can provide huge improvements vs an untuned system.
Network Tuning - LACP vs Round-Robin Bonding
Network Tuning - Multiple Subnets
Network Tuning - Jumbo Frames / MTU 9000
In ethernet transmissions the default maximum transmissible unit (MTU) size is 1.5KB (1500 bytes) which is not a lot of data. Jumbo Frames implies a MTU size of 9000 which means 6x more data is sent per frame (1500 x 6 = 9000) which minimizes the back and forth between the hosts and the system thereby reducing latency and improving throughput. When data is transmitted in small chunks (1500 MTU) it requires more transmit and acknowledgment operations to send the same amount of data event with the benefits of modern TCP Offload Engines (TOE). With this adjustment one can expect anywhere from a 15% to 40% improvement in overall throughput.
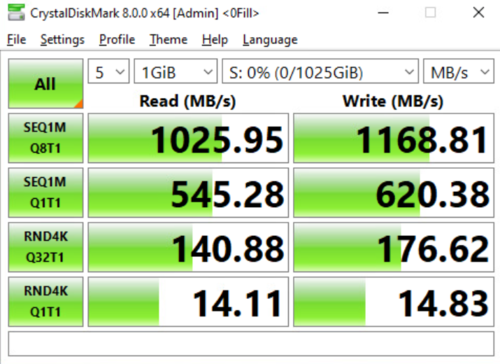
Before tuning, using 1500 MTU:
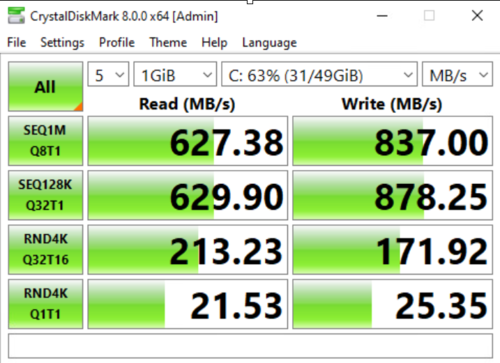
In the above results one can see about a 39% improvement in overall throughput but very little change in terms of IOPS as the IOPS test is inherently using a small 4K block size that is not going to see much improvement from the larger network frame size.
image credit: C. Selfridge
Special Frame Sizes
There are special cases where it can be helpful with specific models of network cards (NICs) to set the Jumbo Frames MTU to something other than 9000. If you're not seeing any improvement with a Jumbo Frame size of 9000 you might try some alternate sizes (eg 9128, 8500, 4800, 4200) that may be a better match for your switches and NIC but in general one should start with MTU 9000 which is the standard for Jumbo Frames.
Configuring QuantaStor Network Ports for Jumbo Frames
To set Jumbo Frames (MTU 9000) on a network port in QuantaStor, login to web user interface, then select the network port to be adjusted in the Storage Systems section under the system to be modified. Once a port is selected, right-lick then choose Modify Network Port. Within the Modify Network Port dialog press the "Jumbo Frames" button, then verify it is set to 9000 and press OK.
Verifying Jumbo Frames
In order for Jumbo Frames to take effect you must have the MTU 9000 setting applied on your network switch and on the host side network ports so that the larger MTU 9000 size packets are allowed end-to-end. To verify this one should ping to/from the QuantaStor system to verify the configuration. Here's an example of what you'll see if it's not configured correctly and the network is limited to the standard MTU of 1500.
root@qs-42-23:~# ping -M do -s 9000 10.0.42.24
PING 10.0.42.24 (10.0.42.24) 9000(9028) bytes of data.
ping: local error: message too long, mtu=1500
Hardware Tuning - Firmware Updates
Sometimes old firmware can cause network issues so it is almost always a good idea to install the latest firmware on your motherboard BIOS and your network cards. Firmware is available from the website of the hardware manufacturer and generally speaking is fairly easy to apply but generally will also require a cold boot power cycle. Do not underestimate the importance of having current firmware, this is an important step in tuning any system.
Hardware Tuning - BIOS Power Management Mode
Modern systems are designed with many power management features which is great for reducing costs and improving the environmental impact of datacenters but in the case of storage systems, it is very important that the system is tuned to use the Performance power management mode. There are no cases where your QuantaStor storage system should be set in any mode other than Performance. Other modes can lead to the system going offline unexpectedly via sleep, hibernate modes, or may significantly impact system performance.
image credit: C. Selfridge
VMware Tuning - RX/TX Frame Size
These configuration options are workload dependent and may not yield improvements.
Here one can see that vmnic2 has a max RX/TX size of 1024:
esxcli network nic ring preset get -n vmnic2
   RX: 1024
   RX Mini: 0
   RX Jumbo: 0
   TX: 1024
This may be increased to 2048 using the following commands for RX and TX respectively:
esxcli network nic ring current set -n vmnic2 -r 2048
esxcli network nic ring current set -n vmnic2 -t 2048
Then verify the configuration changes after the adjustments:
esxcli network nic ring preset get -n vmnic2
   RX: 2048
   RX Mini: 0
   RX Jumbo: 0
   TX: 2048
Repeat these steps for each of the vmnic ports.
VMware Tuning - iSCSI MaxIoSizeKB
Adjusting the MaxIoSizeKB from 128 to 512 may or may not be helpful, this adjustment is also workload dependent.
esxcli system settings advanced list -o /ISCSI/MaxIoSizeKB
   Path: /ISCSI/MaxIoSizeKB
   Type: integer
   Int Value: 128
   Default Int Value: 128
   Min Value: 128
   Max Value: 512
   String Value:
   Default String Value:
   Valid Characters:
   Description: Maximum Software iSCSI I/O size (in KB) (REQUIRES REBOOT!)

esxcli system settings advanced set -o /ISCSI/MaxIoSizeKB -i 512

   Path: /ISCSI/MaxIoSizeKB
   Type: integer
   Int Value: 512
   Default Int Value: 128
   Min Value: 128
   Max Value: 512
   String Value:
   Default String Value:
   Valid Characters:
   Description: Maximum Software iSCSI I/O size (in KB) (REQUIRES REBOOT!)
Credits
Special thank you to C. Selfridge for his expert input and shared expertise on tuning VMware that directly helped produce this article.
