License Management
Overview
QuantaStor storage servers require a license before the software can be used. Each individual server requires its own unique license so a 3x system cluster will require 3x license keys.
QuantaStor has several license types, but the three most important types are Enterprise, Trial, and Community. When systems are combined to create a storage grid, all the licenses should be of the same type.
Retrieving the license key(s) and different types
If you are a new customer, who has just installed QuantaStor, or an existing customer who is renewing their license, you will need to add and activate your license keys. It is important to activate your key as soon as possible.
Once a license key (or keys) has been generated, OSNEXUS will send it to you over email.
The license key types include:
- Enterprise Edition
Commercial licenses are used for paid QuantaStor subscriptions, all features are enabled. Each system requires a system and support license. - Trial Edition
Time-limited (45-day) and capacity-limited (256TB) Enterprise Edition license, all features are enabled. Custom Trial Edition licenses with larger capacities are available from OSNEXUS Sales for PoC activities (sales@osnexus.com). - Community Edition
2-year (60TB) license with all Enterprise Edition features, including scale-up for block and file storage and scale-out for file, block, and object storage) enabled. Limited to 4 nodes. Non-commercial / Home use only.
Before adding and activating the license key, please double-check that you have the right type. If you think you have the wrong license key please reach out to support@osnexus.com
Adding and activating the license key(s) online
Once QuantaStor has been installed, the first step is to add the license key if it hasn't already been loaded by your OSNEXUS VAR or CSP solution provider.
Here are two ways to add and activate your license keys online. Please ensure that your systems have a valid gateway and DNS is configured:
Getting Started/Configuration Guide
The Getting Started/Configuration Guide button is located in the top right corner.
After selecting it, you will be presented with this window.
To start the process of adding and activating your license begin with Step 1 and select “Add License” in System Setup.
A pop-up window will then appear displaying the End User License Agreement. After reading the agreement select “Accept” to continue. If you decline, this will end the process of adding the license keys.
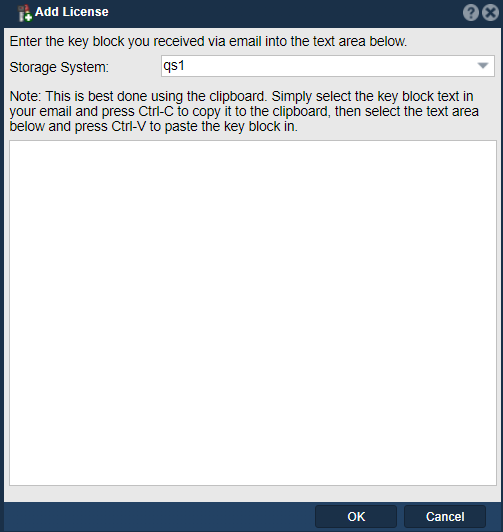
After accepting the End User License Agreement you will need to copy and paste the license key into the Add License window and then select “OK”.
When copying and pasting the license key, please ensure you have selected all of it. If you have partly copied and pasted the license key it will not activate. Here is an example of what a license key should look like.
--------START KEY BLOCK--------
1234567890abcdef1234567890abcdef12345678
90abcdef1234567890abcdef1234567890abcdef
1234567890abcdef1234567890abcdef12345678
90abcdef1234567890abcdef1234567890abcdef
1234567890abcdef1234567890abcdef12345678
90abcdef1234567890abcdef1234567890abcdef
1234567890abcdef1234567890abcdef12345678
90abcdef1234567890abcdef1234567890abcdef
1234567890abcdef1234567890abcdef12345678
90abcdef1234567890abcdef1234567890abcdef
1234567890abcdef1234567890abcdef12345678
90abcdef1234567890abcdef1234567890abcdef
1234567890abcdef1234567890abcdef12345678
90abcdef1234567890abcdef1234567890abcdef
1234567890abcdef1234567890abcdef12345678
90abcdef1234567890abcdef1234567890abcdef
1234567890abcdef1234567890abcdef12345678
90abcdef1234567890abcdef1234567890abcdef
1234567890abcdef1234567890abcdef12345678
90abcdef1234567890abcdef1234567890abcdef
12345678
---------END KEY BLOCK---------
Once the license has been added, select “Activate License”, this button is located in “Step 2”.
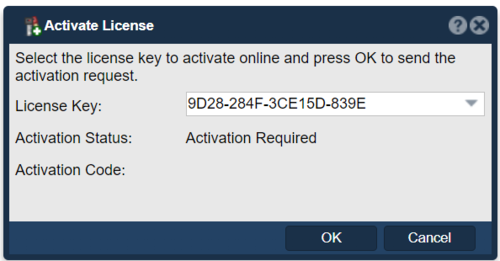
Afterward, you will see an Activate License window displaying the Activation Status as Activation Required. Select “OK” to activate the license.
The key should now be activated.
Navigation: Getting Started/Configuration Guide --> System Setup
License Manager
The “License Manager” button is located in the ribbon bar of the Storage Management tab.
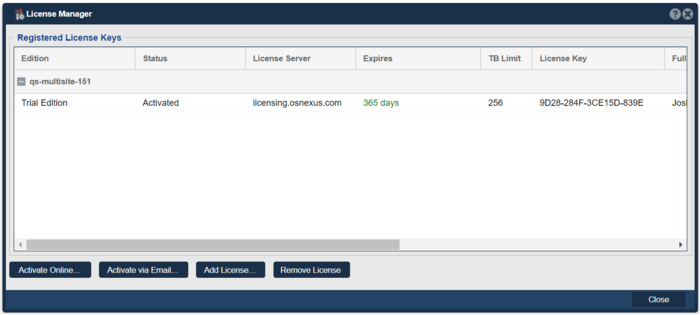
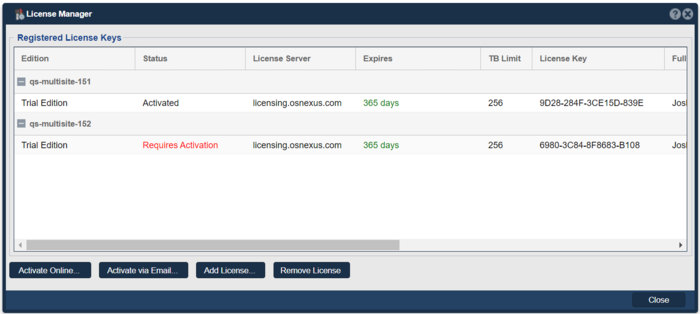
After selecting it, the License Manager window will open showing you all the systems with registered license keys.
To add a license key select the “Add License…” button, which is at the bottom of the window.
A pop-up window will then appear displaying the End User License Agreement. After reading the agreement select “Accept” to continue. If you decline, this will end the process of adding the license keys.
After accepting the End User License Agreement you will need to copy and paste the license key into the Add License window and then select “OK”.
When copying and pasting the license key, please ensure you have selected all of it. If you have partly copied and pasted the license key it will not activate. Here is an example of what a license key should look like.
--------START KEY BLOCK--------
1234567890abcdef1234567890abcdef12345678
90abcdef1234567890abcdef1234567890abcdef
1234567890abcdef1234567890abcdef12345678
90abcdef1234567890abcdef1234567890abcdef
1234567890abcdef1234567890abcdef12345678
90abcdef1234567890abcdef1234567890abcdef
1234567890abcdef1234567890abcdef12345678
90abcdef1234567890abcdef1234567890abcdef
1234567890abcdef1234567890abcdef12345678
90abcdef1234567890abcdef1234567890abcdef
1234567890abcdef1234567890abcdef12345678
90abcdef1234567890abcdef1234567890abcdef
1234567890abcdef1234567890abcdef12345678
90abcdef1234567890abcdef1234567890abcdef
1234567890abcdef1234567890abcdef12345678
90abcdef1234567890abcdef1234567890abcdef
1234567890abcdef1234567890abcdef12345678
90abcdef1234567890abcdef1234567890abcdef
1234567890abcdef1234567890abcdef12345678
90abcdef1234567890abcdef1234567890abcdef
12345678
---------END KEY BLOCK---------
Once the license has been added, select “Activate Online…”, this button is located at the bottom of the window.
Afterward, you will see an Activate License window displaying the Activation Status as Activation Required. Select “OK” to activate the license.
The key should now be activated.
Navigation: Storage Management --> Storage Systems --> Storage System --> License Manager --> Activate Online...
Adding and activating the license key(s) offline
Here, we explain how to activate your license keys offline by using the “License manager”.
License Manager
The “License Manager” button is located in the ribbon bar of the Storage Management tab.
After selecting it, the License Manager window will open showing you all the systems with registered license keys.
To add a license key select the “Add License…” button, which is at the bottom of the window.
A pop-up window will then appear displaying the End User License Agreement. After reading the agreement select “Accept” to continue. If you decline, this will end the process of adding the license keys.
After accepting the End User License Agreement you will need to copy and paste the license key into the Add License window and then select “OK”.
When copying and pasting the license key, please ensure you have selected all of it. If you have partly copied and pasted the license key it will not activate. Here is an example of what a license key should look like.
--------START KEY BLOCK--------
1234567890abcdef1234567890abcdef12345678
90abcdef1234567890abcdef1234567890abcdef
1234567890abcdef1234567890abcdef12345678
90abcdef1234567890abcdef1234567890abcdef
1234567890abcdef1234567890abcdef12345678
90abcdef1234567890abcdef1234567890abcdef
1234567890abcdef1234567890abcdef12345678
90abcdef1234567890abcdef1234567890abcdef
1234567890abcdef1234567890abcdef12345678
90abcdef1234567890abcdef1234567890abcdef
1234567890abcdef1234567890abcdef12345678
90abcdef1234567890abcdef1234567890abcdef
1234567890abcdef1234567890abcdef12345678
90abcdef1234567890abcdef1234567890abcdef
1234567890abcdef1234567890abcdef12345678
90abcdef1234567890abcdef1234567890abcdef
1234567890abcdef1234567890abcdef12345678
90abcdef1234567890abcdef1234567890abcdef
1234567890abcdef1234567890abcdef12345678
90abcdef1234567890abcdef1234567890abcdef
12345678
---------END KEY BLOCK---------
Once the license has been added, select “Activate via Email…”, this button is located at the bottom of the window.
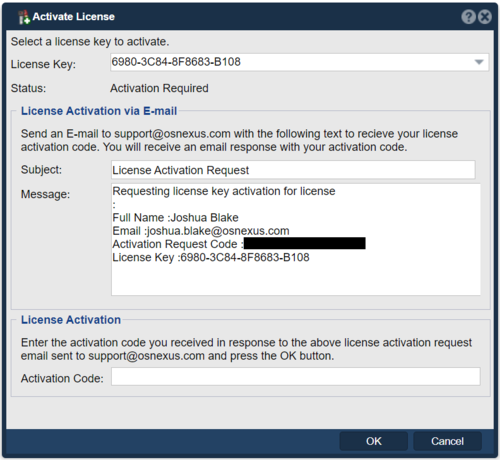
Afterward, you will see the Activate License window.
In this window you will need to copy and paste the subject and message into an email and send it to support@osnexus.com.
You will then receive an Activation Code via email. This code will need to be entered into the “Activation Code” text box at the bottom of the window. Select “OK”.
The key should now be activated.
Note: If you do not activate the license within 7 days, the storage system will no longer allow any additional configuration changes until an activation key is supplied.
Navigation: Storage Management --> Storage Systems --> Storage System --> License Manager --> Activate via Email...
Removing a license key
To remove a license key navigate to License Manager
The “License Manager” button is located in the ribbon bar of the Storage Management tab.
After selecting it, the License Manager window will open showing you all the systems with registered license keys.
To remove a license key select the “Remove License…” button, which is at the bottom of the window.
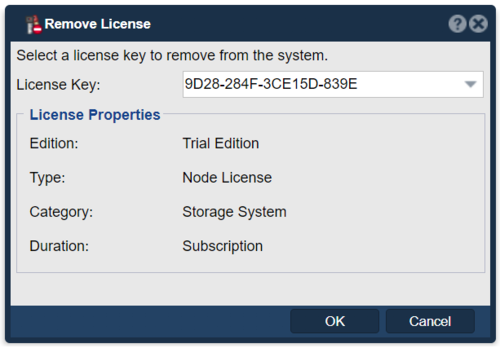
The Remove License window will then appear. Using the License Key dropdown, you can select the license you need to remove. Once the license key has been chosen, Select “OK”.
The license key is now removed.
Navigation: Storage Management --> Storage Systems --> Storage System --> License Manager --> Removce License...


