Performance Tuning
Storage Pool IO Tuning Overview
Storage pools in QuantaStor have associated IO profiles which control parameters like read-ahead, request queue depth, and the IO scheduler. QuantaStor comes with a number of IO profiles to match common workloads but it is possible to create your own IO profiles to tune for a specific application. In general, we recommend going with one of the defaults but for performance tuning purposes you can add additional profiles to the /etc/qs_io_profiles.conf file. Here are the IO profiles for the default and default SSD configurations.
[default]
name=Default
description=Optimizes for general purpose server system workloads
nr_requests=2048
read_ahead_kb=256
fifo_batch=16
chunk_size_kb=128
scheduler=deadline

[default-ssd]
name=Default SSD
description=Optimizes for pure SSD based storage pools for all workloads
nr_requests=2048
read_ahead_kb=4
fifo_batch=16
chunk_size_kb=128
scheduler=noop
If you create a new profile, make sure that you put a unique name/ID for your profile in the square brackets, and that you set a friendly name and description for your profile. For example, your new profile might look like this:
[acme-db-profile]
name=SQL DB Performance
description=Optimizes for Acme Corp relational databases.
nr_requests=2048
read_ahead_kb=64
fifo_batch=16
chunk_size_kb=128
scheduler=deadline
Profile Name & Description
The name and description fields will show up in the QuantaStor web interface so be sure to make these unique.
Profile Disk I/O Queue Depth (nr_requests)
The nr_requests represents the IO queue size. This is an important variable to change on the host/initiator side as well if you're connecting to your QuantaStor system via iSCSI from a Linux based server. In QuantaStor when you set the nr_requests the core service applies this setting to all disks in the pool by adjusting parameters in /sys/block/ part of the sys filesystem.
Profile Read-Ahead
The read_ahead_kb represents the amount of additional data that should be read after fulfilling a given read request. For example, if there's a read-request for 4KB and the read_ahead_kb is set to 64, then an additional 64KB will be read into the cache after the base 4KB request has been met. Why read this additional data? It counteracts the rotational latency problems inherent in spinning disk / hard disk drives. A 7200 RPM hard drive rotates 120 times per second, or roughly once every 8ms. That may sound fast, but take an example where you're reading records from a database and only gathering 4KB with each IO read request (one read per rotation). Done serially that would produce a throughput of a mere 480K/sec. This is why read-ahead and request queue depth are so important to getting good performance with spinning disk. With SSD, there are no mechanical rotational latency issues so the SSD profile uses a small 4k read-ahead.
Profile IO Scheduler
The IO scheduler represents the elevator algorithm used for scheduling I/O operations. For storage systems the two best schedulers are the 'deadline' and the 'noop' scheduler. We find that deadline is best for HDDs and that the noop scheduler is best for SSDs. The fifo_batch setting is related to the use of the 'deadline' scheduler. More information can be found here.
SSD Tuning
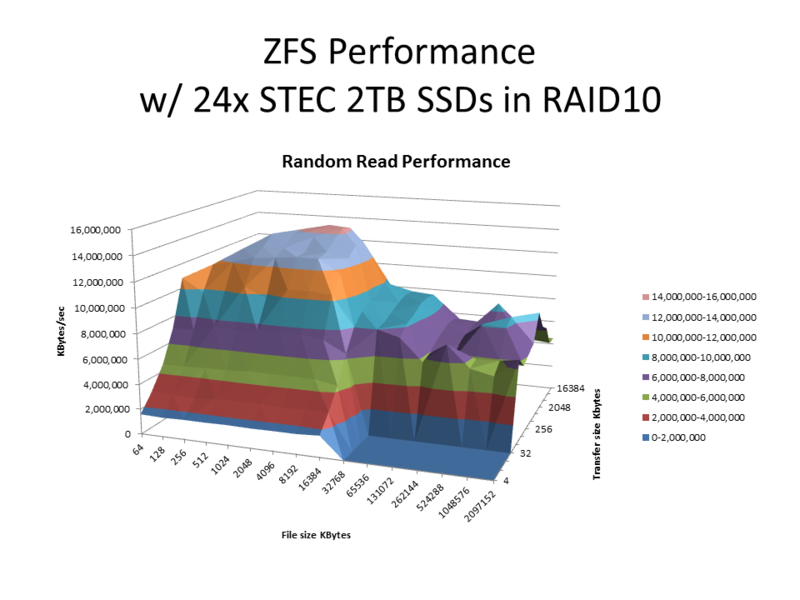
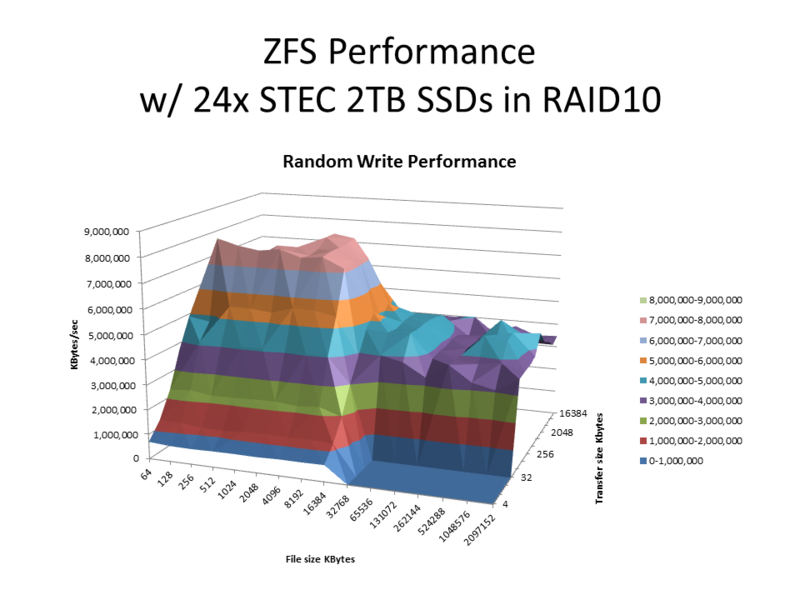
The Default SSD tuning profile was produced after extensive testing with enterprise STEC 2TB SAS SSD drives connected to an LSI HBA. Here is some of the detail from the performance testing using iozone. Note that the Default SSD storage pool IO profile uses a small read-ahead of just 4k. This was the most important factor in the tuning for SSD drives. A 0KB read-ahead and larger read-ahead values seemed to create performance holes for small 4k and 8k block sizes which were eliminated with the 4KB read-ahead. Note that the flat area in the graphs on the front-right side are set to zero because that's a section where tests were not run either due to the transfer size being larger than the file size or the transfer size being so small vs the file size that it would not produce additional valuable numbers. Testing was done using standard iozone parameters with an increased 2G file size (iozone -a -g 2g -b output.xls), numbers with a 8GB file size were very similar.
iSCSI Performance Tuning Overview
Getting the network configuration setup right is an important factor in getting good performance from your system. Improper LACP configuration, multi-pathing and many other components must be properly configured for optimal performance. The following guide goes over a simple setup with Windows Server 2008 R2 but is great at illustrating the large differences small configuration changes can make in boosting IO performance. In the following sections I'll be going over three major topics:
- Multi-path IO configuration and performance results
- LACP configuration and performance results
- Jumbo frames configuration and performance results
Test Setup
This testing was done with the following setup:
Windows 2008 R2 host
- four 10GbE ports
QuantaStor Storage System
- four 10GbE ports
- LSI 9750-8i Controller
- 24x 360GB 2.5" drives
- RAID0
Within QuantaStor I also created a storage pool and a volume (thick provisioned). I then assigned it to the Windows host.
Microsoft MPIO
MPIO (multi-path IO) is when there are multiple paths (iSCSI sessions) between the devices which are combined into one. MPIO increases performance and fault-tolerance as paths can be lost without interrupting access to the storage. Performance is increased by using a the basic round-robin technique so that the sessions evenly share the IO load.
Our setup was tested first with a direct connection from the Windows host to the QuantaStor system, and then was tested again with a 10GbE switch in between (Interface Masters Niagara).
QuantaStor System Network Setup
To setup QuantaStor for use with MPIO we first need to assign each network port to its own subnet. To do this navigate to the Storage System section within QuantaStor Manager. Next, select the "Network Ports" tab, then right-click on one of the ports you will be using for iSCSI connectivity to the Windows host. Select "Modify Network Port", and configure the port to use a static IP address on its own network. Make sure to do this for every network port, putting them all on the different networks. (Ex: 192.168.10.10/255.255.255.0, 192.168.11.10/255.255.255.0, etc). Having the ports on separate networks is important. When ports are on the same network any port can respond to a request on any other port and this will cause performance issues.
Windows MPIO Setup
Now we can begin to setup Windows to use MPIO. The first step is to navigate to MPIO properties. The easiest way to do this is to type MPIO in the start menu search bar. It can also be found in the control panel under "MPIO". In the "MPIO Devices" tab click the "Add" button. The string you will want to add for QuantaStor is "OSNEXUS QUANTASTOR "
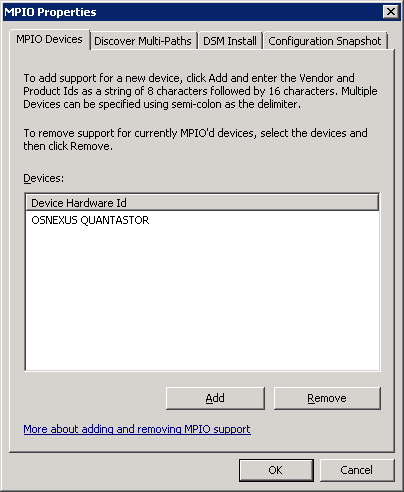
This is all capital letters, with one space between the words, and six trailing spaces after QuantaStor. If you don't have exactly (6) trailing spaces then the MPIO driver won't recognize the QuantaStor devices and you'll end up with multiple instances of the same disk in Windows Disk Manager. Now that MPIO is enabled for Quantastor we have to configure the network connections. Navigate to Control Panel --> Network and Internet --> Network Connections. For each connection that will connect to Quantastor assign it a static IP address, on a matching network as one from the Quantastor box. For our setup we did as follows:
Windows Network Port Configuration
- 192.168.10.5 / 255.255.255.0
- 192.168.11.5 / 255.255.255.0
- 192.168.12.5 / 255.255.255.0
- 192.168.13.5 / 255.255.255.0
QuantaStor Network Port (Target Port) Configuration
- 192.168.10.10 / 255.255.255.0
- 192.168.11.10 / 255.255.255.0
- 192.168.12.10 / 255.255.255.0
- 192.168.13.10 / 255.255.255.0
There is no need to set the gateway for these ports as they are not going over the internet. We had a separate network that was used for that with iSCSI disabled.
If the boxes are directly connected you have to make sure that the paired ports are setup using the same network (you should be able to ping all Quantastor ports from Windows).
Configuring the Windows iSCSI Initiator
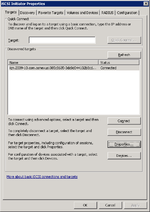
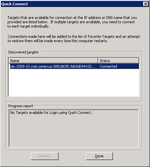
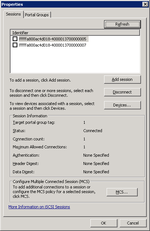
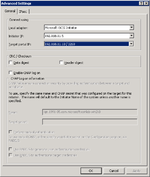
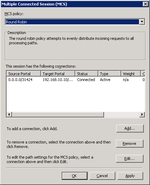
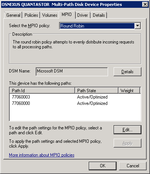
Now that all the network connections are configured, select "iSCSI Initiator" in the control panel, you can also access it by typing iSCSI into the Windows search bar in the Start menu. Once you have the iSCSI Initiator configuration tool loaded select the Targets tab and type in the IP address of one of the network ports on the QuantaStor system. After it is connected, select the connection and click on properties. From here we can add all the additional sessions by clicking on "Add Session" and then linking the other network ports on the Windows host to their matching network ports on the same subnet on the QuantaStor System. After clicking on add session, check the box that enables multi-path, and click on the "Advanced" button. We now want to set the local adapter to "Microsoft iSCSI Initiator", the initiator ip as the ip of the Windows port that is to be added, and the target portal ip as the matching network port on the Quantastor box. Click "Ok" on both windows. We will want to add a session for every other port on the Windows box that will be used. In the properties window we should now see multiple sessions. The last step is to click "MCS" at the bottom the the properties window. Make sure the MCS policy is set to "Round Robin" and click "Ok" on all the open windows. Everything should now be setup for MPIO. If you really want to make sure all the sessions are connected to the disk you can open "Disk Management", right click on the disk section (to the left of the blue bar) and view its properties. Under the MPIO tab there should be a session for every iSCSI session you added. For example, if you have 4 network ports on your Windows host then you should have 4 iSCSI sessions which will produce 4 paths, hence MPIO should show 4 paths in the properties page for your QuantaStor disk.
iSCSI Session Creation for MPIO
Below are some screenshots during the process of setting up LACP in Windows.
Click on the images to enlarge
Results
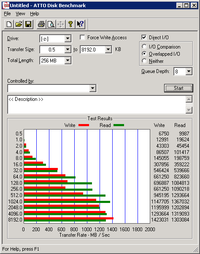
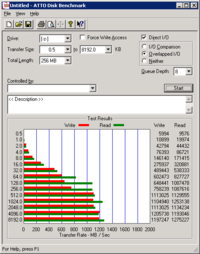
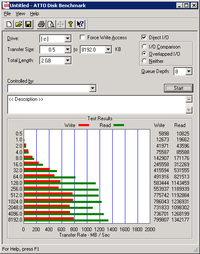
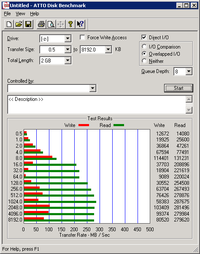
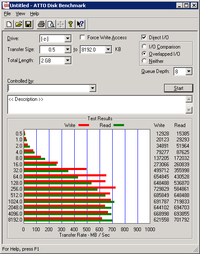
Below are some of the IO performance results. The first two images are when the Windows box was directly connected to the Quantastor box, where as the next two images are when a switch was used between the boxes.
Click on the images to enlarge
Link Aggregation Control Protocol (LACP)
LACP (link aggregation control protocol) involves bonding ports to act as a single network connection via a shared MAC address. Instead of having to split the traffic across multiple networks, setting up LACP allows for the ports to be viewed as one large port. This also means that if one of the connects fails, the LACP will still be able to function (just at reduced performance). It is an alternative approach which doesn't depend on MPIO but you can bond groups of ports together and use both technologies if you wish.
For our setup the four network connections on the Windows side were all bonded together, and the four network connections on the Quantastor side were all bonded together. They were then connected to each other through our switch. In this configuration MPIO sees only one path as there is only one iSCSI session.
Setup
Setting up LACP on the Quantastor side is very simple. First create a bonded group of Ethernet ports. This can be done by first navigating to the "Network Ports" tab under the "Storage System" section. Right click in the empty space under the network ports and select "Create Bonded Port". Assign the port the desired IP address and select the ports to be bonded. In our setup we bonded all four ports together. The last step is to right click on the storage system and select "Modify Storage System". At the very bottom under "Network Bonding Policy", select LACP. Everything is now setup for LACP on the Quantastor side.
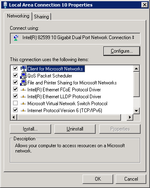
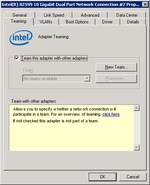
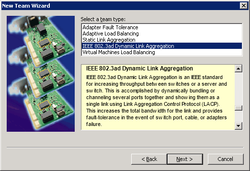
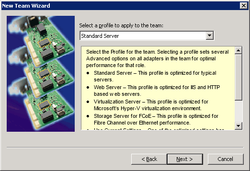
Setting up LACP on the Windows side requires a little bit more effort. Navigate to Control Panel --> Network and Internet --> Network Connections. On one of the network connections, right click and select "Properties". In the properties window select "Configure". In the "Teaming" tab check the box "Team this adapter with other adapters" and click "New Team". Provide a name for the team, and then select the network connections that are to be bonded together. For team type choose "IEEE 802.3ad Dynamic Link Aggregation". The next step is to choose the profile to apply to the team. My setup used the "Standard Server" option. Now that your team is configured select it from the list of network connections and assign an IP address.
The last step is to configure your switch to used LACP. Being that this will be different from switch to switch you will have to check your user manual on how to configure LACP.
Below are some screenshots during the process of setting up LACP in Windows.
Click on the images to enlarge
Cautions with LACP
Be careful if you decide to use LACP. I would highly recommend first trying the MPIO setup like talked about above. After doing a performance run of MPIO, setup LACP and run the performance tests again. Doing this will allow you to have a target IO performance mark to try and meet. With our testing LACP seemed to be very sensitive to different filtering techniques that were allowed by the switch. Turning LACP on while leaving all of the default settings resulted in a large drop in IO performance. This will be different from switch to switch but a drop in performance by 80% (roughly what we saw) was discomforting. After some tweaking of the settings in the switch the performance became closer to what was seen with MPIO.
Results
|
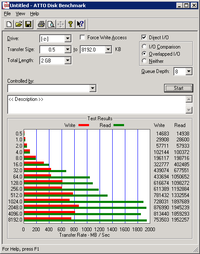
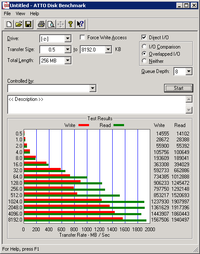
The picture on the left was when LACP was setup with the default settings in the switch we were using. As you can see the performance suffered greatly. On the right is what the results looked like after some tweaking of the settings in the switch. As you can see, with just some minor tweaking large performance differences can occur. Note the change in scale from the picture on the left to the picture on the right. |
|
Click on the images to enlarge |
Jumbo Frames
Jumbo frames depending on the setup can have a large impact on the IO performance. Jumbo frames sends larger sized packets, allowing for larger Ethernet payloads. This lets more data be sent with each packet and in most cases results in better performance.
For our setup I first configured everything as I did with MPIO using a direct connection between the Windows box and the Quantastor box. I then went and changed all the settings as specified below.
Setup
To setup Quantastor to use jumbo frames first navigate to the storage system section. Then under the "Network Ports" tab, right click on the port in which you would like to configure to use jumbo frames. Select "Modify Network Port" from the context menu. Now set the MTU as 9000. Complete this for every port you plan on using jumbo frames with.
To setup Windows to use jumbo frames first navigate to Control Panel --> Network and Internet --> Network Connections. On one of the network connections, right click and select "Properties". In the properties window select "Configure". From here under the advanced tab there should be an option for jumbo packets. Select this and change its value to 9000. Complete this for every port you plan on using jumbo frames with.
You may also have to go into your switch and enable jumbo frames as well. This will vary from switch to switch.
Cautions with Jumbo Frames
For jumbo frames to work the MTU must be set as the same for all devices (all the connected machines and switches). If the packet is not recognized by a device, the packet can be dropped. This is just one example of an issue with jumbo frames. When we tried configuring our setup to go through a switch we encountered issues such as this.
Results
As you can see below jumbo frames had the best results out of what we tested. The read IO speeds was the largest by far of all of our testing, and the write IO performed very strongly as well.
Click on the images to enlarge
ZFS Performance Tuning
One of the most common tuning tasks that is done for ZFS is to set the size of the ARC cache. If your system has less than 10GB of RAM you should just use the default but if you have 32GB or more then it is a good idea to increase the size of the ARC cache to make maximum use of the available RAM for your storage system. Before you set the tuning parameters you should run 'top' to verify how much RAM you have in the system. Next, run this command to set the amount of RAM to some percentage of the available RAM. For example to set the ARC cache to use a maximum of 80% of the available RAM, and a minimum of 50% of the available RAM in the system, run these, then reboot:
qs-util setzfsarcmax 80
qs-util setzfsarcmin 50
Example:
sudo -i
qs-util setzfsarcmax 80
INFO: Updating max ARC cache size to 80% of total RAM 1994 MB in /etc/modprobe.d/zfs.conf to: 1672478720 bytes (1595 MB)
qs-util setzfsarcmin 50
INFO: Updating min ARC cache size to 50% of total RAM 1994 MB in /etc/modprobe.d/zfs.conf to: 1045430272 bytes (997 MB)
To see how many cache hits you are getting you can monitor the ARC cache while the system is under load with the qs-iostat command:
qs-iostat -a

Name                              Data
---------------------------------------------
hits                              237841
misses                            1463
c_min                             4194304
c_max                             520984576
size                              16169912
l2_hits                           19839653
l2_misses                         74509
l2_read_bytes                     256980043
l2_write_bytes                    1056398
l2_cksum_bad                      0
l2_size                           9999875
l2_hdr_size                       233044
arc_meta_used                     4763064
arc_meta_limit                    390738432
arc_meta_max                      5713208


ZFS Intent Log (ZIL) / writeback cache statistics

Name                              Data
---------------------------------------------
zil_commit_count                  876
zil_commit_writer_count           495
zil_itx_count                     857
A description of the different metrics for ARC, L2ARC and ZIL are below.
hits = the number of client read requests that were found in the ARC
misses = the number of client read requests were not found in the ARC
c_min = the minimum size of the ARC allocated in the system memory.
c_max = the maximum size of the ARC that can be allocated in the system memory.
size = = the current ARC size
l2_hits = the number of client read requests that were found in the L2ARC
ls_misses = the number of client read requests were not found in the L2ARC
ls_read_bytes = The number of bytes read from the L2ARC ssd devices.
l2_write_bytes = The number of bytes written to the L2ARC ssd devices.
l2_chksum_bad = The number of checksums that failed the check on an SSD (a number of these occurring on the L2ARC usually indicates a fault for a SSD device that needs to be replaced)
l2_size = the current L2ARC size
l2_hdr_size = The size of the L2ARC reference headers that are present in ARC Metadata
arc_meta_used = The amount of ARC memory used for Metadata
arc_meta_limit =  The maximum limit for the ARC Metadata
arc_meta_max = The maximum value that the ARC Metadata has achieved on this system

zil_commit_count = How many ZIL commits have occurred since bootup
zil_commit_writer_count = How many ZIL writers were used since bootup
zil_itx_count  = the number of indirect transaction groups that have occurred sinc bootup
Pool Performance Profiles
Read-ahead and request queue size adjustments can help tune your storage pool for certain workloads. You can also create new storage pool IO profiles by editing the /etc/qs_io_profiles.conf file. The default profile looks like this and you can duplicate it and edit it to customize it.
[default]
name=Default
description=Optimizes for general purpose server application workloads
nr_requests=2048
read_ahead_kb=256
fifo_batch=16
chunk_size_kb=128
scheduler=deadline
If you edit the profiles configuration file be sure to restart the management service with 'service quantastor restart' so that your new profile is discovered and is available in the web interface.
Storage Pool Tuning Parameters
QuantaStor has a number of tunable parameters in the /etc/quantastor.conf file that can be adjusted to better match the needs of your application. That said, we've spent a considerable amount of time tuning the system to efficiently support a broad set of application types so we do not recommend adjusting these settings unless you are a highly skilled Linux administrator. The default contents of the /etc/quantastor.conf configuration file are as follows:
[device]
nr_requests=2048
scheduler=deadline
read_ahead_kb=512

[mdadm]
chunk_size_kb=256
parity_layout=left-symmetric
There are tunable settings for device parameters which are applied to the storage media (SSD/SATA/SAS), as well as settings like the MD device array chunk-size and parity configuration settings used with XFS based storage pools. These configuration settings are read from the configuration file dynamically each time one of the settings is needed so there's no need to restart the quantastor service. Simply edit the file and the changes will be applied to the next operation that utilizes them. For example, if you adjust the chunk_size_kb setting for mdadm then the next time a storage pool is created it will use the new chunk size. Other tunable settings like the device settings will automatically be applied within a minute or so of your changes because the system periodically checks the disk configuration and updates it to match the tunable settings. Also, you can delete the quantastor.conf file and it will automatically use the defaults that you see listed above.
