+ User Guide Overview
The QuantaStor Users Guide focuses on how to configure your hosts to access storage volumes (iSCSI targets) in your QuantaStor storage system. The first couple sections cover how to configure your iSCSI initiator to login and access your volumes. The second section goes over how to configure your multi-path driver.
Contents
- 1 iSCSI Initiator Configuration
- 2 Multipath Configuration
- 3 XenServer Configuration
- 4 VMware ESXi Configuration
- 5 Microsoft Hyper-V Configuration
- 6 Oracle VM VirtualBox Configuration
iSCSI Initiator Configuration
Microsoft iSCSI initiator configuration for Windows 7 & Windows 2008 Server
Connecting to your QuantaStor (QS) storage system via the Microsoft iSCSI initiator is very simple. Before connecting though you'll need to add a 'Host' entry for your initiator. To do so, login to QuantaStor Manager, select the 'Hosts' section and then choose 'Add Host' from the toolbar or right-click in the Hosts section and choose 'Add Host' from the pop-up menu. Next, enter the host name and the initiator IQN for your host. The initiator IQN (iSCSI Qualified Name) is an identifier that uniquely identifies your host to the storage system. By default this name is generated for you so you'll need to go to your Windows system and run the iSCSI Initiator application to get the IQN. The initiator name will look something like this: 'iqn.1991-05.com.microsoft:yourhostname'.
Note: The first part of the initiator name identifies the initiator vendor,
in this case "iqn.1991-05.com.microsoft", the second part is typically your
host name or the fully qualified domain name (FQDN) for the host
(ex: yourhostname.yourdomainname.com).  All IQNs start with 'iqn.' and IQNs have various restrictions on what characters you can use.  So if you modify the IQN try keeping your changes to the host name portion of the IQN and only use alpha-numeric characters.
A software iSCSI initiator comes with Windows and you will find it under the 'Administrative Tools' section under the Windows Start menu. Once you have the 'iSCSI Initiator Properties' dialog loaded, choose the 'Configuration' tab and in there you'll see the 'Initiator Name:'. Copy & paste that IQN into the 'Add Hosts' dialog in QuantaStor Manager using the clipboard (Ctrl-C & Ctrl-V). Note that you must enter the IQN into the 'Add Hosts' dialog exactly as it is written in 'iSCSI Initiator Properties', if you make a typo then the host will not successfully login to the storage system. Now that you have a host entry in QuantaStor for your Windows host, you can now assign storage to your Windows system and access it from your windows box. After you have assigned one or more storage volumes to the host, return to your Windows system and bring up the 'iSCSI Initiator' application again. On the first page under the 'Targets' tab, you can enter the IP address of your QuantaStor storage system in the box marked 'Target:' then press 'Quick Connect...'. After a moment you will see your storage volumes appear in the 'Discovered targets' section. When they appear simply select the storage volume you want to connect to, then press the 'Connect' button. Within a few seconds you'll be connected to the storage volume (iSCSI target). Unless this is a storage volume you've previously formatted and utilized, you'll need to use the Windows Disk Management screen to quick format the disk before you begin using it.
iSCSI initiator configuration for Apple Mac OS X
There are a couple of good commercial iSCSI initiator implementations out there for Mac OS X that we recommend. The first is from Studio Network Solutions and their initiator is called the globalSAN iSCSI initiator which they offer free for download here. Another option is the ATTO Xtend SAN iSCSI initiator and it's available here. Some people like the ATTO product better but we've seen good results with the globalSAN initiator as well.
If you use the globalSAN initiator you'll find the configuration screen for it in the 'System Preferences' section which you'll find in the Mac launch pad at the bottom of the screen. Look for the icon with the gears. Once you have the 'System Preferences' dialog up, look at the bottom of the dialog for 'Studio Network Solutions' and then select the 'globalSAN iSCSI initiator'. What you'll see next is a dialog with a bar at the top that says 'Initiator Name:'. Initially it's empty, but you'll need to give the system an initiator name (IQN) so that your QuantaStor system can identify it. We recommend using this IQN, but replace the 'yourhostname' part with the name of your iMac with no spaces.
iqn.2009-10.com.globalsan:yourhostname
Once you have the system named, you'll need to add a host entry to QuanatStor using the QuantaStor manager web UI. Just press the 'Add Host' button and then enter the name of your system, and enter the IQN in the box that says 'IQN'. Now that you have a host added, you can assign volumes to your Mac. After you've assigned some storage, go back to the globalSAN iSCSI initiator dialog and press the '+' button in the bottom left corner. That will allow you to enter the IP address of your QuantaStor system and you should immediately see all the storage volumes listed which you have assigned to the host. Note that you'll need to partition the disk after you connect to the iSCSI device / volume. We recommend that you use 'quick format' because a full format will end up reserving blocks in the storage system which defeats the purpose of using thin-provisioning which is the default when you 'Create Storage Volume'.
Microsoft iSCSI initiator configuration for Windows XP
Open iSCSI initiator configuration for Linux
Multipath Configuration
QuantaStor supports round-robin style active/active multipathing using Microsoft's MPIO and via Linux using the device-mapper multipath (dmmp) driver. Active/active multipath support not only boosts performance, it also gives you the benefit of automatic path failover when a network connection is lost to one of your NICs on the host (initiator side) or the storage system (target side).
For Microsoft MPIO configuration you'll need to add the QuantaStor vendor / model information so that Microsoft's default DSM (device specific module) can detect QuantaStor volumes and automatically enable multipathing for them thereby combining multiple paths to your QuantaStor Storage System in a single device as seen in the Windows Disk Manager.
For Linux, you'll need to first install dmmp for your Linux distribution, and then modify the /etc/multipath.conf file to include an additional stanza so that the system properly identifies the QuantaStor devices and uses the correct multi-path device identification and path management rules.
Note: QuantaStor does not yet support SCSI-3 Persistent Reservations so there are some solutions such as Microsoft's Failover Clustering that are not yet supported. Cluster solutions that can use SCSI-2 reservations will work fine.
Configuring Microsoft MPIO
Configuring Linux Device-Mapper Multipath (DMMP)
After you have device mapper installed on your Linux distribution, you'll need to login to your system as root and then add this section to your /etc/multipath.conf file:
        device {
                vendor                  "OSNEXUS"
                product                 "QUANTASTOR"
                getuid_callout          "/sbin/scsi_id -g -u -s /block/%n"
                path_grouping_policy    multibus
                failback                immediate
                path_selector           "round-robin 0"
                rr_weight               uniform
                rr_min_io               100
                path_checker            tur
        }
Once the file is updated you'll want to restart the multipath service like so:
service multipathd restart
Once you have it all configured and you're logging into the iSCSI target / storage volume with your iSCSI initiator you'll want to run 'multipath -l' to list the paths and you should see something like this:
14f534e455855530038323061623737393365306365643738dm-2 OSNEXUS,QUANTASTOR
[size=512M][features=0][hwhandler=0]
\_ round-robin 0 [prio=0][active]
 \_ 120:0:0:0 sdg 8:96  [active][undef]
 \_ 119:0:0:0 sdf 8:80  [active][undef]
14f534e455855530038323061623737393735393231656332dm-1 OSNEXUS,QUANTASTOR
[size=4.0G][features=0][hwhandler=0]
\_ round-robin 0 [prio=0][active]
 \_ 118:0:0:0 sde 8:64  [active][undef]
 \_ 117:0:0:0 sdc 8:32  [active][undef]
Remember, you'll need to make sure that you mount your filesystems using the correct unique device ID under /dev/mapper/ so that the multipath driver is utilized. If you mount your filesystem from /dev/sdXX you'll have completely bypassed the multi-path driver and will not get the performance an fail-over capabilities.
XenServer Configuration
Installing the QuantaStor Adapter for Citrix StorageLink
If you're going to use Citrix StorageLink with XenServer (recommended) then you'll need to first install the StorageLink adapter for QuantaStor. The next release of XenServer & Citrix Essentials for Hyper-V will include built-in support for QuantaStor but until then you can add support to your XenServer 5.5/5.6 instances by following a few steps. If you're only going to use the XenServer Software iSCSI SR then skip to the section on Creating a XenServer Software iSCSI SR.
Step 1: Installing the QuantaStor StorageLink Adapter
After you have StorageLink installed and licensed you can add the QuantaStor adapter by downloading and running the StorageLink adapter installer available from our downloads page. Before installing the QuantaStor StorageLink adapter you'll need to first stop the StorageLink service by typing this command at an Administrator command prompt or by stopping the StorageLink service using the Windows Services panel.
c:\> net stop storagelink
After the service is stopped you can now install the QuantStor StorageLink Adapter using the installer executable: osn_quantastor_csladapter.exe
Additionally, you'll need to add this block of XML to the end of the StorageLink configuration file located here: C:\Program Files\Citrix\StorageLink\Server\scsi_device_id_config.xml
<ScsiDeviceIDProcessor>
  <InquiryMatch>
    <Vendor>OSNEXUS</Vendor>
    <Product>QUANTASTOR</Product>
  </InquiryMatch>
  <VendorID value="OSNEXUS" />
  <ProductID value="QUANTASTOR" />
  <EnclosureID page="131" offset="32" length="8" />
  <DeviceID page="131" offset="16" length="16" />
</ScsiDeviceIDProcessor>
Also, at the top of this file you'll find a version number that looks like this:
<version>2.0.0.4</version>
You'll want to increase that version number so that it is something like this:
<version>2.0.0.5</version>
That tells StorageLink that it needs to upgrade your XenServer systems with these new device identification rules.
Now you're ready to restart the Citrix StorageLink service:
c:\> net start storagelink
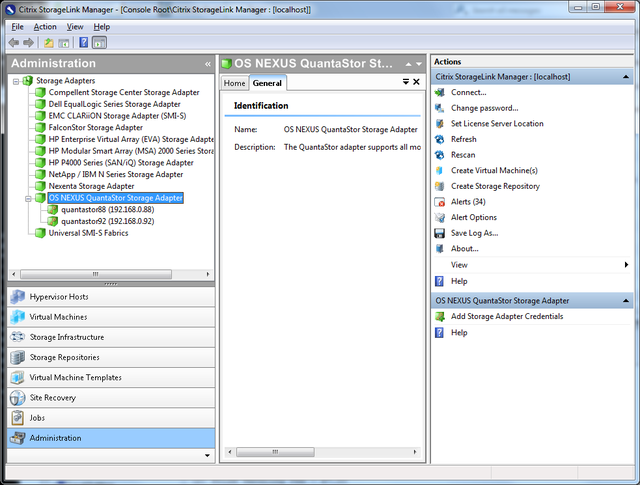
Now that you have the StorageLink adapter installed, you'll want to verify that the adapter was properly loaded, and then add your storage system credentials so that StorageLink can dynamically configure and allocate storage volumes for your QuantaStor storage system. Once you're logged in to Citrix StorageLink Manager, select the "Administration" tree on the left and side and look for OS NEXUS QuantaStor in the list. It should look like this:
Note in this picture it shows credentials for two QuantaStor storage systems have been added.
Citrix StorageLink Administration
Once you add your credentials you can verify that the storage system discovery was successful by choosing the Storage Infrastructure tree. It should look something like this after your storage system has been discovered.
Step 2: Installing the XenServer multipath configuration settings
XenServer utilizes the Linux device-mapper multipath driver (dmmp) to enable support for hardware multi-pathing. The dmmp driver has a configuration file called multipath.conf that contains the multipath mode and failover rules for each vendor. There are some special rules that need to be added to that file for QuantaStor as well. To that end, you'll need to edit the /etc/multipath-enabled.conf file located on each of your XenServer dom0 nodes. In that file, just find the last device { } section and add this additional one for QuantaStor:
        device {
                vendor                  "OSNEXUS"
                product                 "QUANTASTOR"
                getuid_callout          "/sbin/scsi_id -g -u -s /block/%n"
                path_selector           "round-robin 0"
                path_grouping_policy    multibus
                failback                immediate
                rr_weight               uniform
                rr_min_io               100
                path_checker            tur
        }
Again, apologies for the inconvenience here. We're working closely with Citrix to get this integrated so that everything is pre-installed with their next product release.
Creating XenServer Storage Repositories (SRs)
Generally speaking, there are two types of XenServer storage repositories (SRs) you can use with QuantaStor.
- iSCSI Software SR
- StorageLink SR
The 'iSCSI Software SR' which allows you to assign a single QuantaStor storage volume to XenServer and then XenServer will create multiple virtual disks (VDIs) within that one storage volume/LUN. This route is easy to setup but it has some drawbacks:
iSCSI Software SR
- Pros:
- Easy to setup
- Cons:
- The disk is formatted and laid out using LVM so the disk cannot be easily accessed outside of XenServer
- The custom LVM disk layout makes it so that you cannot easily migrate the VM to a physical machine or other hypervisors like Hyper-V & VMWare.
- No native XenServer support for hardware snapshots & cloning of VMs
- Potential for spindle contention problems which reduces performance when the system is under high load.
- Within QuantaStor manager you only see a single volume so you cannot setup custom snapshot schedules per VM and cannot roll-back a single VM from snapshot.
The second and most preferred route is to create your VMs using a Citrix StorageLink SR. With StorageLink there is a one-to-one mapping of a QuantaStor storage volume to each virtual disk (VDI) seen by each XenServer virtual machine.
Citrix StorageLink SR
- Pros:
- Each VM is on a separate LUN(s)/storage volume(s) so you can setup custom snapshot policies
- Leverage hardware snapshots and cloning to rapidly deploy large numbers of VMs
- Enables migration of VMs between XenServer and Hyper-V using Citrix StorageLink
- Enables one to setup custom off-host backup policies and scripts for each individual VM
- Easier migration of VMs between XenServer resource pools
- VM Disaster Recovery support via StorageLink (requires QuantaStor Platinum Edition)
- Cons:
- Requires a Windows host or VM to run StorageLink on.
- Some additional licensing costs to run Citrix Essentials depending on your configuration.
- (A free version exists which supports 1 storage system)
With the next version of Citrix StorageLink we'll be directly integrated so it will be just as easy to get going using the StorageLink SR if not easier as it will do all the array side configuration for you automatically.
Creating a XenServer Software iSCSI SR
Now that we've discussed the pros/cons, let's get down to creating a new SR. We'll start with the traditional "one big LUN" iSCSI Software SR. The name is perhaps a little misleading, but it's called a 'Software' SR because Citrix is trying to make clear that the iSCSI software initiator is utilized to connect to your storage hardware. Here's a summary of the steps you'll need to take within the QuantaStor Manager web interface before you create the SR.
- Login to QuantaStor Manager
- Create a storage volume that is large enough to fit all the VMs you're going to create.
- Note: If you use a large thin-provisioned volume that will give you the greatest flexibility.
- Add a host for each node in your XenServer resource pool
- Note: You'll want to identify each XenServer host by it's IQN. See the troubleshooting section for a picture of XenCenter showing a server's initiator IQN.
- (optional) Create a host group that combines all the Hosts
- Assign the storage volume to the host group
Alternatively you can assign the storage to each host individually but you'll save a lot of time by assigning it to a host group and it makes it easier to create more SRs down the road.
After you have the storage volume created and assigned to your XenServer hosts, you can now create the SR.
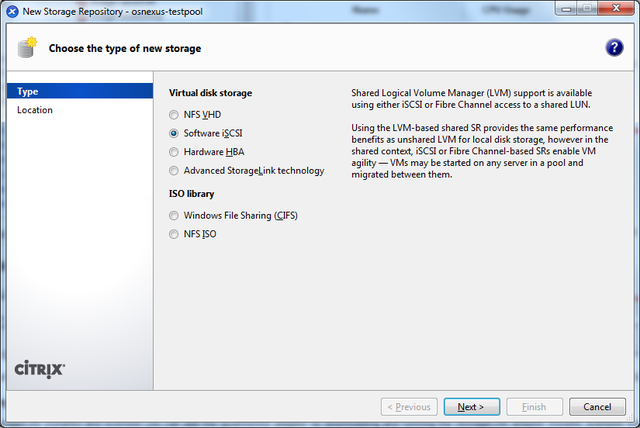
This picture shows the iSCSI Software SR type selected.
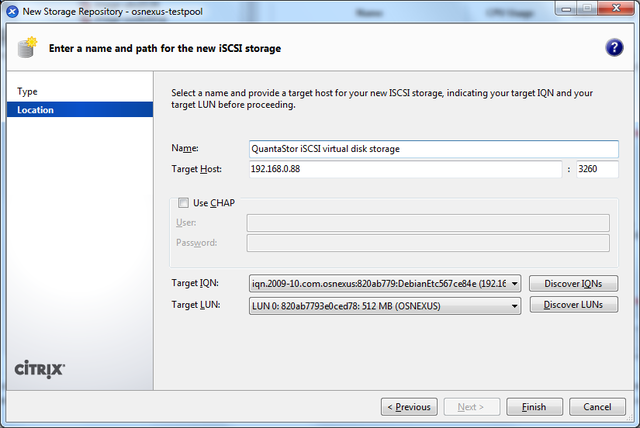
Here we're showing the main page of the wizard. Here you'll enter the IP address of your QuantaStor storage system and then press the Discover Targets and Discover LUNs button to find the device you created. Once you have it selected, just press OK and you're done.
Creating a XenServer StorageLink SR (LUN per VDI)
Once you have the StorageLink adapter software installed as outlined above, you can quickly create new SRs using the StorageLink Manager UI. StorageLink SRs map one-to-one with a QuantaStor Storage Pool. So when you create the SR you'll indicate which pool you want your storage volumes created in for that SR and as new VMs are created with that SR StorageLink will automatically provision the storage volumes for you and deploy them into your XenServer environment. To get started first you'll need to login to Citrix StorageLink Manager and tell it about your storage system. You'll do this by selecting the "Administration" section, then select "OS NEXUS QuantaStor" from the list vendor modules, then right-click and choose "Add Credentials". You'll see this dialog:
Citrix StorageLink Add Credentials
In here you need to tell StorageLink the IP address of your QuantaStor storage system and the username/password to login so that it can dynamically configure the storage system for you. If you have multiple teams using a common QuantaStor storage system, you might want to first setup some QuantaStor storage clouds so that you can securely separate the resources between the teams. That way each team will only see their devices within their StorageLink/XenServer deployment, and you can place quotas on them.
Next you'll want to look at the Storage Infrastructure tree inside Citrix StorageLink Manager to make sure your QuantaStor hardware has been properly detected. If you see it there, you're all set, just click the "Create Storage Repository" button in the Action pane on the right hand side of the Citrix StorageLink Manager window and follow the wizard.
Troubleshooting StorageLink
If you run into problems we recommend that you create a traditional iSCSI SR to verify connectivity to the array before you start allocating LUNs via a StorageLink SR. To do that, first you'll need to allocate a storage volume using the QuantaStor Manager, then you'll need to assign it to all the nodes in your XenServer resource pool. To summarize:
- Login to QuantaStor Manager
- Create a storage volume
- Add a host for each node in your XenServer resource pool
- (optional) Create a host group that combines all the Hosts
- Assign the storage volume to the host group
Note that when you add the hosts using the 'Add Host' dialog in QuantaStor Manager you'll want to enter the XenServer host's initiator IQN and that can be found using XenCenter as shown in this picture.
Citrix XenCenter IQN Configuration
At this point you can create the iSCSI SR by pointing it to the QuantaStor storage system and your storage volume will appear. The great thing about this method is that you can use it to verify that StorageLink is properly identifying your storage volumes using the device identification rules you added to the scsi_device_id_config.xml file.
Next we're going to verify that your iSCSI LUN is being properly identified by the internal StorageLink tools on your XenServer host. To do this, first you'll need to go to the console window of your XenServer dom0 and then issue the following commands
cd /opt/Citrix/StorageLink/bin
./csl_devscan --native
This is going to print out a list of all the SCSI devices that are visible to the system and their StorageLink identifiers. In that list that is printed you should see a StorageLink storage volume identifiers (SVIDs) for all your SCSI disks and you should see at least one that looks something like this:
OSNEXUS__QUANTASTOR__820ab779__b8b2c67f
This identifier shows the vendor and model of the hardware (OSNEXUS / QUANTASTOR) and the two hex numbers 820ab779 and b8b2c67f at the end uniquely identify the storage system and the storage volume respectively. If you don't see any OSNEXUS devices listed, then XenServer has not yet logged into the storage system. If you see a OSNEXUS QUANTASTOR device and it is followed by a very long number (typically starting with 0080 and 0083) then the XenServer host is not properly identifying the devices using the rules you added to the scsi_device_id_config.xml file. The way to fix this is to manually edit the local scsi_device_id_config.xml device configuration file at the dom0 console window:
nano /opt/Citrix/StorageLink/bin/scsi_device_id_config.xml
Once you're in the text editor you'll need to copy and paste in this XML block that was noted above which you added to the scsi_device_id_config.xml on Windows.
<ScsiDeviceIDProcessor>
  <InquiryMatch>
    <Vendor>OSNEXUS</Vendor>
    <Product>QUANTASTOR</Product>
  </InquiryMatch>
  <VendorID value="OSNEXUS" />
  <ProductID value="QUANTASTOR" />
  <EnclosureID page="131" offset="16" length="8" />
  <DeviceID page="131" offset="24" length="16" />
</ScsiDeviceIDProcessor>
Note that the enclosure ID / device ID settings above have changed. The old v1.4 and earlier versions of QuantaStor used these settings for the enclosure/device ID:
  <EnclosureID page="128" offset="4" length="8" />
  <DeviceID page="128" offset="12" length="8" />
StorageLink's auto-upgrade process generally updates this configuration file for you so you shouldn't have to do this step but there may be some corner cases where the auto-upgrade isn't triggered. Once you have the scsi_device_id_config.xml file updated you'll want to re run the csl_devscan command again you should now see the storage volume ID (SVID) properly identified as shown in the example above. (OSNEXUS__QUANTASTOR__820ab779__b8b2c67f).
At this point go ahead and create a StorageLink SR for XenServer using the Citrix StorageLink Manager GUI and try creating a new virtual machine to test it out.
VMware ESXi Configuration
Creating the virtual appliance
Using VMware with ESXi requires some specific setting to be chosen as part of the VM creation process. In this section we'll go step by step through each screen the VM creation wizard in the vSphere Client so the overall process is a snap.
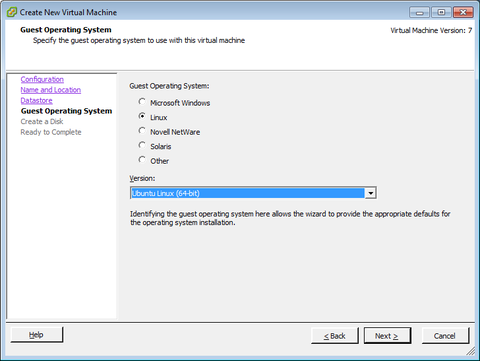
This first screen shows the available operating system selections, since QuantaStor is based on Ubuntu Server (64bit) we choose that from the drop down list of Linux OS types.
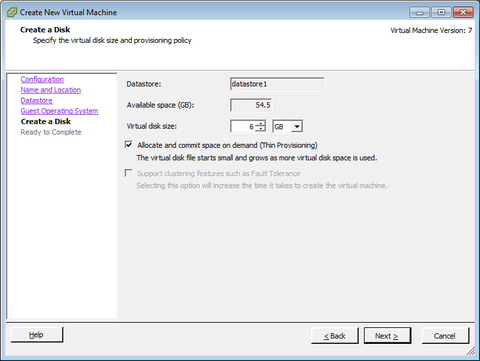
Next we're asked to make a boot/system disk for the new virtual appliance. We suggest 6GB or more for your virtual machine, but more than 32GB is unnecessary unless you plan to install custom applications on your virtual storage appliance.
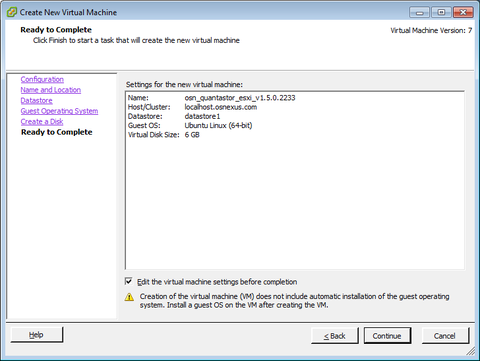
Next you'll want to check that box that says 'Edit the virtual machine settings before completion.' as we have a number of things to edit before you can boot the system to start the installation. Once you check the box, press the 'Continue' button and you'll then be able to edit the virtual machine settings.
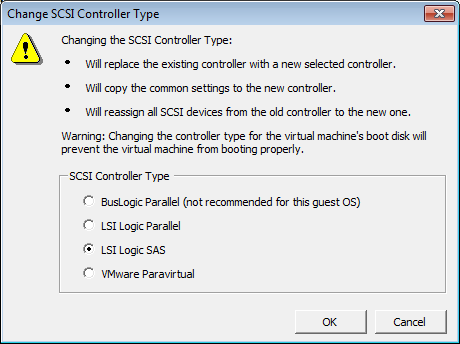
At this point you'll be presented with the 'Virtual Machine Properties' dialog. In here there are a few things that you need to make sure of. First, make sure that you change the SCSI controller from LSI Parallel to LSI Logic SAS.
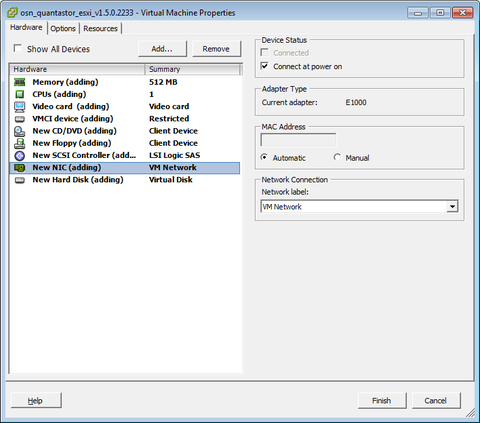
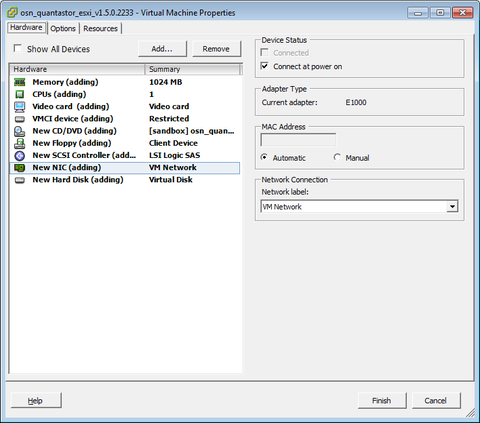
Next, select the network adapter and make sure 'Connect at power on' is checked. This will allow the installer to access the Ubuntu package servers during the installation and will also configure your network via DHCP. You'll want to change this to a static address later but it is very convenient to have the system use DHCP for the initial installation phases.
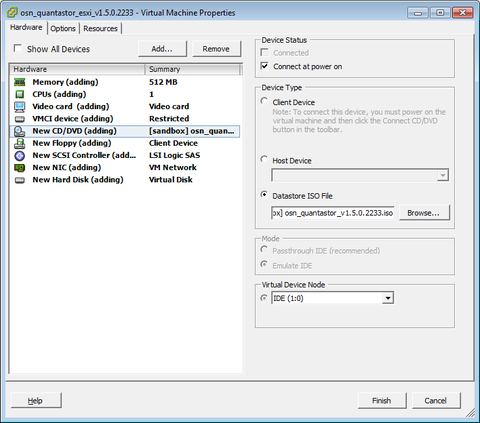
Next you'll need to select the ISO file for where you're keeping your osn_quantastor_vX.Y.Z.iso ISO file. This must also be 'Connected at power on' so that it can boot from the ISO to start the installation process.
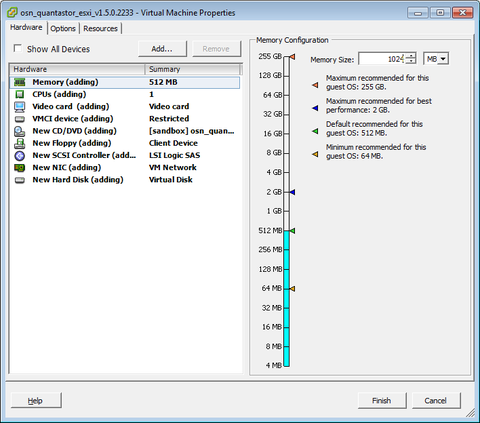
The default amount of memory given to the VM is only 512MB which is in sufficient. QuantaStor has an internal web server which uses a fair bit of memory and additional memory is used as a buffer cache to accelerate read performance. If you have it, set this to 2GB or more, else set it to at least 1GB of RAM.
This is what it should look like when you're all done. Go ahead and click finish and you can start your VM to start the installation process.
Microsoft Hyper-V Configuration
Running QuantaStor as a virtual storage appliance (VSA) can be done by installed from ISO, but there's one configuration change that you'll need to make after you create the virtual machine. That change is to add a Legacy Network Adapter as the installation process will not be able to access the network using the standard adapter. Besides that, you can install QuantaStor onto your virtual machine just as you would any other operating system. Note that you should allocate at least 1GB of RAM to your QuantaStor VM and you should allocate at least a 8GB virtual hard drive for use as your boot/system disk.
Oracle VM VirtualBox Configuration
Getting a QuantaStor storage system setup as a virtual appliance is one of the easiest ways to get started with QuantaStor to test out the features and get a feel for the product. To install QuantaStor as a VirtualBox virtual appliance you'll first need to download the virtual appliance from our downloads page, and you'll need to install the latest version of VirtualBox from their website http://www.virtualbox.com.
Once you have the quantastor_vsa_ovf.zip file downloaded you'll need to unzip the file. In there you will find a file with a .ovf extension and some associated files, that's what you'll be importing as a virtual appliance. Now you'll need to startup VirtualBox and select 'Import Appliance..' from the 'File' menu. Next you'll select the .ovf file that you unzipped from the quantastor_vsa_ovf.zip in the previous step. That's all there is to it. Note that by default QuantaStor is setup to use Bridged Networking so that your hosts can access the exported iSCSI targets exposed by the VM.
Adding disks to your QuantaStor Virtual Storage Appliance
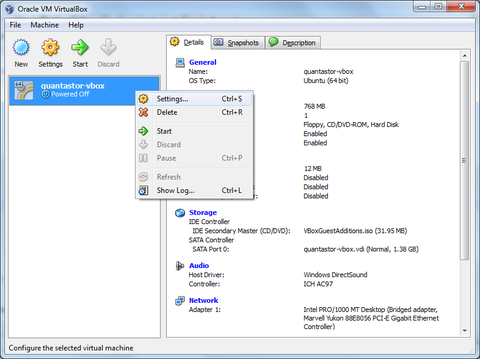
Before starting your QuantaStor VSA VM you'll want to first add some storage to it so that you have some storage with which to create storage pools. To do this, first you'll need to bring up the settings panel for your VM so that you can add more storage.
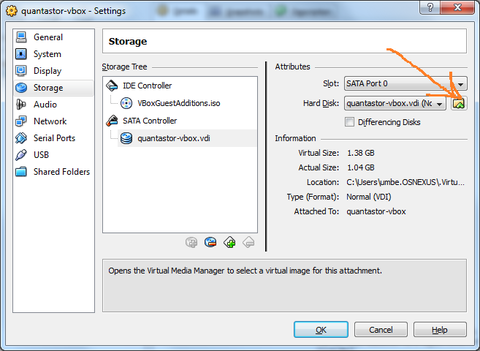
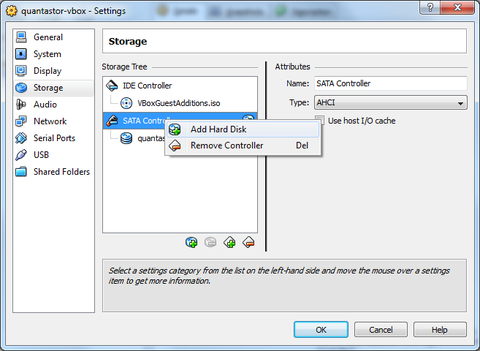
Next you'll need to add one or more existing hard disks or create a new one using the VMM screen. Here are some images showing where to click to access those screens:
We recommend that you attach at least a 40GB disk to the virtual appliance so that you have enough disk space to create a storage pool that's large enough to provision storage volumes that are 8GB in size to install Windows, Linux, and/or applications onto.
Configuring your QuantaStor VSA VirtualBox appliance
Now that you have one or more disks attached to your imported appliance, all you need to do now is to start it up and configure it as per the general Getting Started Guide.
