Difference between revisions of "Duo Multi-Factor Authentication"
m (→Duo Multi-Factor Authentication Login Process:) |
m (→Configuring MFA via QuantaStor Manager Web UI) |
||
| (35 intermediate revisions by the same user not shown) | |||
| Line 1: | Line 1: | ||
| − | ===Enabling Duo Multi-Factor Authentication Documentation | + | ===Enabling Duo Multi-Factor Authentication Documentation=== |
| − | + | ||
| − | + | ||
| − | + | ||
To enable multi-factor authentication using Duo, you must first create a Duo account. You can | To enable multi-factor authentication using Duo, you must first create a Duo account. You can | ||
| Line 9: | Line 6: | ||
Once you have a Duo account set up, log in to the Duo admin dashboard. Click the | Once you have a Duo account set up, log in to the Duo admin dashboard. Click the | ||
‘Applications’ tab and select ‘Protect an application’. In the search bar, search for Auth API and | ‘Applications’ tab and select ‘Protect an application’. In the search bar, search for Auth API and | ||
| − | select the ‘Protect this Application link. Now you will be shown your new API hostname, | + | select the ‘Protect this Application' link. Now you will be shown your new API hostname, |
integration key, and secret key. These will be used to create your multi-factor authentication | integration key, and secret key. These will be used to create your multi-factor authentication | ||
configuration. | configuration. | ||
| − | + | For more information on setting up your Duo Admin Panel, please refer to the Duo documentation at https://duo.com/docs/administration#admin-panel-overview | |
| + | ==Configuring MFA via QuantaStor Manager Web UI== | ||
| + | All that can be accomplished using the CLI tools can also be accomplished using the Web UI under the Security tab. The tools to Create, Modify, Delete, and Assign/Unassign MFA configs are accessed from the Multi-Factor Authentication Manager dialog. It can be found in the User toolbar. The dialog has "Create...", "Delete...", "Modify...", and "Assign/Unassign..." buttons. | ||
| − | To enable MFA for users, you | + | To enable MFA for users, you can use the User Modify dialogs. You can also create a new user and set these fields during creation. |
| − | + | ||
| + | '''1. Multi-Factor Authentication Manager dialog from the Security tab''' | ||
| − | : | + | [[File:Multi-Factor Authen Web.jpg]] |
| − | + | ||
| − | + | ||
| + | '''Navigation:''' Security --> Management Users --> User --> Multi-Factor Auth Manager (toolbar) | ||
| − | |||
| − | |||
| − | |||
| − | |||
| + | ::All multi-factor authentication configuration manipulation can be handled from the Multi-Factor Auth Config Manager. To delete multiple configurations at once, check the check boxes next to the configurations you would like to delete, then hit the "Delete..." button. | ||
| − | |||
| − | |||
| − | + | '''2. Multi-Factor Authentication Configuration Create''' | |
| − | + | ||
| − | + | ||
| − | + | ||
| − | + | ||
| − | + | ||
| − | + | ||
| + | '''Navigation:''' Security --> Management Users --> User --> Multi-Factor Auth Manager --> Create... ''(button)'' | ||
| − | + | [[File:Multi-Factor Authen - Create Web.jpg|512px]] | |
| − | + | ||
| + | ::Clicking the "Create..." button in the Multi-Factor Authentication Configuration dialog will open the Create Multi-Factor Authentication Configuration dialog. | ||
| − | |||
| − | + | '''3. Multi-Factor Authentication Configuration Modify''' | |
| − | + | ||
| − | + | '''Navigation:''' Security --> Management Users --> User --> Multi-Factor Auth Manager --> Modify... ''(button)'' | |
| + | [[File:Multi-Factor Authen - Modify.jpg|512px]] | ||
| − | + | ::Clicking the ‘Modify...’ button in the ribbon bar in the multi-factor authentication configuration panel will open the multi-factor auth config modify dialog. You can choose to modify any of the existing MFA configs from the drop down menu. You may only modify the name, description, or secret key. | |
| − | + | ||
| − | + | ||
| − | + | ||
| − | + | ||
| − | + | ||
| − | + | ||
| − | + | '''4. Multi-Factor Authentication Configuration Delete''' | |
| − | + | '''Navigation:''' Security --> Management Users --> User --> Multi-Factor Auth Manager --> Delete... ''(button)'' | |
| − | + | ||
| − | + | ||
| + | [[File:MFA Delete Confirmation.jpg|512px]] | ||
| − | + | ::Clicking the ‘Delete...’ button in the Multi-Factor Authentication Configuration dialog opens the Delete Confirmation dialog. You can choose to delete any of the existing MFA configs from the Multi-Factor Authentication Manager dialog. | |
| − | + | ||
| − | + | ||
| − | + | ||
| − | + | ||
| − | |||
| − | |||
| − | |||
| + | '''5. Multi-Factor Authentication Configuration Assign/Unassign''' | ||
| − | + | '''Navigation:''' Security --> Management Users --> User --> Multi-Factor Auth Manager --> Assign/Unassign... ''(button)'' | |
| − | + | ||
| − | + | ||
| − | + | ||
| − | + | [[File:assignunassigndialog.png]] | |
| − | + | ||
| − | + | ||
| − | + | ||
| + | ::Clicking the ‘Assign/Unassign’ icon from the ribbon bar in the multi-factor authentication configuration panel or from the Multi-Factor Auth Manager dialog will open the multi-factor auth config assign/unassign dialog. Here you can choose a configuration for each of the users in the system. To change a configuration for a given user, select the desired config from the drop down under the Multi-Factor Auth Config column in the specific users row. If you would like to disable MFA for a given user, select the ‘Disabled’ option from the drop down. | ||
| − | |||
| − | + | '''7. User Add''' | |
| − | + | ||
| − | + | ||
| − | + | ||
| − | + | '''Navigation:''' Security --> Management Users --> User --> Add ''(toolbar)'' | |
| − | + | ||
| − | + | [[File:user add enable mfa checkbox.png]] | |
| − | + | ||
| − | + | ||
| − | + | ||
| − | + | ||
| − | + | [[File:user add enable mfa tooltip.png]] | |
| − | + | [[File:user add select config.png]] | |
| − | + | ||
| − | + | ||
| − | + | ||
| − | + | ||
| − | + | ::When creating a new user, the ‘Enable Multi-Factor Auth’ checkbox will be left unchecked by default. To enable MFA for this new user, check the checkbox next to ‘Enable Multi-Factor Auth’. After checking the checkbox, select the MFA config you would like to assign to this user from the list of existing MFA configs in the MFA config drop down. | |
| − | + | ||
| − | + | ||
| − | |||
| − | |||
| − | |||
| − | |||
| − | |||
| − | |||
| − | + | '''8. User Modify''' | |
| − | + | ||
| − | '''( | + | '''Navigation:''' Security --> Management Users --> User --> Modify ''(toolbar)'' |
| − | + | [[File:user modify enable mfa checkbox.png]] | |
| − | + | ||
| − | + | ||
| − | + | ||
| − | + | ||
| − | + | ||
| − | + | [[File:user modify enable mfa tooltip.png]] | |
| − | + | ||
| − | + | ||
| − | + | ||
| − | + | ||
| − | + | ||
| − | + | [[File:user modify select config.png]] | |
| − | + | ||
| − | + | ||
| − | + | ::When modifying an existing user, the MFA mode drop down will auto select which mode the user is currently set to. To change this, select the desired mode form the MFA Mode drop down. If a mode other than Disabled is selected, you will need to select the MFA config which you would like to assign to this user as well. You may select any of the existing MFA configs from the MFA config drop down. | |
| − | + | ||
| − | + | ||
| − | would like | + | |
| − | + | ||
| − | + | ==Configuring MFA via QuantaStor CLI== | |
| − | + | ||
| − | + | ||
| − | + | ===Creating an MFA configuration=== | |
| − | + | ||
| − | + | ||
| − | + | To enable MFA for users, you must first create a multi-factor authentication configuration. Use the following CLI commands to setup a MFA configuration: | |
| − | + | ||
| − | |||
| − | === | + | ::'''qs multi-factor-auth-config-create --api-host=<API Hostname> --integration-key=<IntegrationKey> --secret-key=<Secret Key> --name=<Name>''' |
| − | ''' | + | '''OR''' |
| + | ::'''qs mfa-config-create --api-host=<API Hostname> --integration-key=<Integration Key> --secret-key=<Secret Key> --name=<Name>''' | ||
| − | |||
| − | + | The API Hostname, Integration Key, and Secret Key are from your Duo Admin Dashboard. You must also supply a unique name for your configuration. Optionally, you may also supply a description. If you supply configuration keys which are not valid, the MFA config creation task will fail and an error will be returned. | |
| + | ===Viewing MFA configurations=== | ||
| − | + | You can view your multi-factor authentication configurations using the following CLI | |
| + | tools: | ||
| − | + | ::'''qs multi-factor-auth-config-list''' | |
| + | '''OR''' | ||
| + | ::'''qs mfa-config-list''' | ||
| + | '''OR''' | ||
| + | ::'''qs multi-factor-auth-config-get --mfa-config=<Name or ID>''' | ||
| + | '''OR''' | ||
| + | ::'''qs mfa-config-get=<Name or ID>''' | ||
| − | + | ===Applying MFA to a group QuantaStor User accounts=== | |
| + | With these last two, you may specify a specific multi-factor authentication configuration by supplying either its name or ID. Assign/Unassign multi-factor authentication configuration to specific users using these commands: | ||
| − | ''' | + | ::'''qs multi-factor-auth-set-user --mfa-config-user-mapping=<list of users:config mappings>''' |
| + | '''OR''' | ||
| + | ::'''qs mfa-set-user --mfa-config-user-mapping=<list of users:config mappings>''' | ||
| − | |||
| − | :: | + | The MFA-config mappings which are supplied as a comma delimited list should have the form “user1:config1,user2:config2,~user3,...” where a tilde (~) before the username signals the removal of a multi-factor authentication configuration from the specified user. In this case, the users MFA configuration will be set to an empty string and MFA will be disabled on the user account. Otherwise, the given MFA configuration will be assigned to the specified user and MFA will be enabled on the user account. If a user from the list already has the specified configuration, the user will not be modified. |
| + | ===Modifying an MFA Configuration=== | ||
| − | + | You can change any multi-factor authentication configuration using the following commands: | |
| − | + | ::'''qs multi-factor-auth-config-modify --mfa-config=<Name or ID> --secret-key=<New Secret Key> --name=<New Name> --description=<New Description>''' | |
| + | '''OR''' | ||
| + | ::'''qs mfa-config-modify --mfa-config=<Name or ID> --secret-key=<New Secret Key> --name=<New Name> --description=<New Description>''' | ||
| − | |||
| + | Specify the MFA config you would like to change by supplying either its name or ID. You can also supply either a new secret key, new name, new description, or any combination of the three. You cannot change the API Host or the Integration Key, as that would essentially be making a completely new MFA config. | ||
| − | + | ===Deleting an MFA Configuration=== | |
| − | + | Delete a multi-factor authentication configuration with these commands: | |
| − | :: | + | ::'''qs multi-factor-auth-config-delete --mfa-config=<Name or ID>''' |
| + | '''OR''' | ||
| + | ::'''qs mfa-config-delete --mfa-config=<Name or ID>''' | ||
| − | + | Specify which MFA config you would like to be deleted by supplying either its name or ID. This operation cannot be undone. When a MFA config is deleted, all user who have an association with this config will have their MFA config id field set to an empty string and their MFA mode set to NONE. | |
| − | + | ===Enabling Multi-Factor Authentication for specific Users=== | |
| − | + | Now that you understand how to create MFA configs and assign/unassign them to users, you can enable mfa on you chosen user(s). | |
| + | ::'''qs user-modify --user=<Name or ID> --enable-mfa=<true or false> --mfa-config=<Name or ID>''' | ||
| + | To enable MFA on your chosen user(s), you must set the enable MFA flag to true. | ||
| − | + | Next you need to supply a MFA config to the user. You can do this in a couple different ways. One way is using the MFA-config-set-user CLI mentioned earlier. Another is to specify the name or id of the config while modifying the user. If the supplied name or ID does not relate to an existing MFA config, an error will be returned. | |
| − | + | If a enable-mfa is set to false and a MFA config is given, the MFA config will be ignored and MFA will be disabled for the given user. | |
| − | + | Now that you have a user (or users) with MFA enabled and have a MFA config associated with their account, next time that user logs in, it will be prompted to enroll with DUO. The user will follow the given URL to enroll. This is the last step in the MFA set up process. Now every time the user logs in, he/she will be given the choice between authenticating via push notification, SMS, phone call, or passcode. | |
| − | + | ==Multi-Factor Authentication Login Process (w/ Cisco Duo)== | |
| + | Once you have created at least one MFA config, assigned it to a user, and enabled MFA for that user, you are ready to login using the new MFA login process. To do so, proceed with logging in as normal by entering a username and password and clicking the ‘Login’ button. | ||
| − | + | ==== Enrollment ==== | |
| + | If this is your first time logging in with this specific MFA config, you will be prompted at login that enrollment with Duo is required. Follow the given URL to enroll. | ||
| − | + | [[File:getting devices.png]] | |
| − | + | After enrollment, you may attempt another login. You will need to click the ‘Cancel’ button in order to restart the login process. After entering username and password and clicking the ‘Login’ button, a new dialog will appear. After the users registered authentication devices are gathered, the user may choose to use any of the available devices for authentication. If the user would not like to use a device or if the user is using a passcode not associated with a device, the ‘N/A’ | |
| + | option may be chosen. | ||
| − | + | Once a device has been chosen, the user must choose a mode of authentication. The mode options which are appropriate for the chosen device will be listed in the dropdown. After making | |
| + | a selection, the user can click ‘Send Authentication Request’ to proceed. | ||
| − | + | ==== Authentication Mode - SMS ==== | |
| − | + | If SMS is the chosen authentication mode, the user will be sent a passcode via SMS to the chosen device. Once the user has received the passcode, they may enter it into the ‘Passcode’ | |
| + | field in the web UI and click ‘Enter Passcode’. If they did not receive the passcodes or if they would like new passcodes, they may click the ‘Resend Passcodes’ button to receive a new | ||
| + | passcode. | ||
| − | + | [[File:getting devices.png]][[File:cats phone choose auth mode.png]] | |
| − | + | ||
| − | [[File: | + | [[File:select sms auth mode.png]][[File:new sms passcodes sent.png]] |
| + | |||
| + | [[File:IMG_1538.PNG|300px]][[File:processing auth request via sms.png]] | ||
| + | ==== Authentication Mode - Phone Call ==== | ||
| − | + | If Phone Call is the chosen authentication mode, the user will receive a phone call on the chosen device. Once the user has received the phone call, they can follow the given instructions | |
| + | to either authenticate, which will log them into their quantastor account, or deny authentication. | ||
[[File:getting devices.png]][[File:cats phone choose auth mode.png]] | [[File:getting devices.png]][[File:cats phone choose auth mode.png]] | ||
| − | [[File: | + | [[File:select phone auth mode.png]][[File:auth via phonecall.png]] |
| − | + | ||
| − | + | ||
| + | ==== Authentication Mode - Push ==== | ||
| − | + | If Push is the chosen authentication mode, the user will receive a push notification on the chosen device. Once the user has received the push notification, they may choose to | |
| + | authenticate, which will log them into their quantastor account, or deny authentication. | ||
[[File:getting devices.png]][[File:cats phone choose auth mode.png]] | [[File:getting devices.png]][[File:cats phone choose auth mode.png]] | ||
| − | [[File: | + | [[File:selecting push auth mode.png]][[File:select push auth mode.png]] |
| + | |||
| + | [[File:IMG_1540.PNG|300px]] | ||
| + | ==== Authentication Mode - Passcode ==== | ||
| − | + | Finally, if Passcode is the chosen authentication mode, the user can enter their code into the ‘Passcode’ field in the Web UI before clicking the ‘Send Authentication Request’ button. | |
[[File:getting devices.png]][[File:cats phone choose auth mode.png]] | [[File:getting devices.png]][[File:cats phone choose auth mode.png]] | ||
| − | [[File: | + | [[File:IMG_1539.png|300px]][[File:auth processing via passcode.png]] |
| − | + | == Resetting / Disable Admin Multi-Factor Authentication == | |
| + | If the admin account gets locked out duo to multi-factor authentication failure, there is a way to disable MFA for only the admin account. This may occur when the admin has MFA enabled and the secret key is reset from the duo admin panel. This creates a scenario where the MFA config which is saved in Quantastor is out of date, but the admin can't login to change it because logging in is attempting to use the now invalid MFA config. | ||
| − | + | To disable MFA from the admin account, one must stop the quantastor service and run ‘./qs_service --disable-mfa’. After this has been run, the quantastor service may be restarted and the admin can log in, bypassing the MFA process. | |
| − | + | ||
| − | + | ||
| − | + | ||
| − | + | ||
Latest revision as of 10:30, 6 November 2023
Contents
Enabling Duo Multi-Factor Authentication Documentation
To enable multi-factor authentication using Duo, you must first create a Duo account. You can get a free trial for a Duo beyond account at Duo Security.
Once you have a Duo account set up, log in to the Duo admin dashboard. Click the ‘Applications’ tab and select ‘Protect an application’. In the search bar, search for Auth API and select the ‘Protect this Application' link. Now you will be shown your new API hostname, integration key, and secret key. These will be used to create your multi-factor authentication configuration.
For more information on setting up your Duo Admin Panel, please refer to the Duo documentation at https://duo.com/docs/administration#admin-panel-overview
Configuring MFA via QuantaStor Manager Web UI
All that can be accomplished using the CLI tools can also be accomplished using the Web UI under the Security tab. The tools to Create, Modify, Delete, and Assign/Unassign MFA configs are accessed from the Multi-Factor Authentication Manager dialog. It can be found in the User toolbar. The dialog has "Create...", "Delete...", "Modify...", and "Assign/Unassign..." buttons.
To enable MFA for users, you can use the User Modify dialogs. You can also create a new user and set these fields during creation.
1. Multi-Factor Authentication Manager dialog from the Security tab
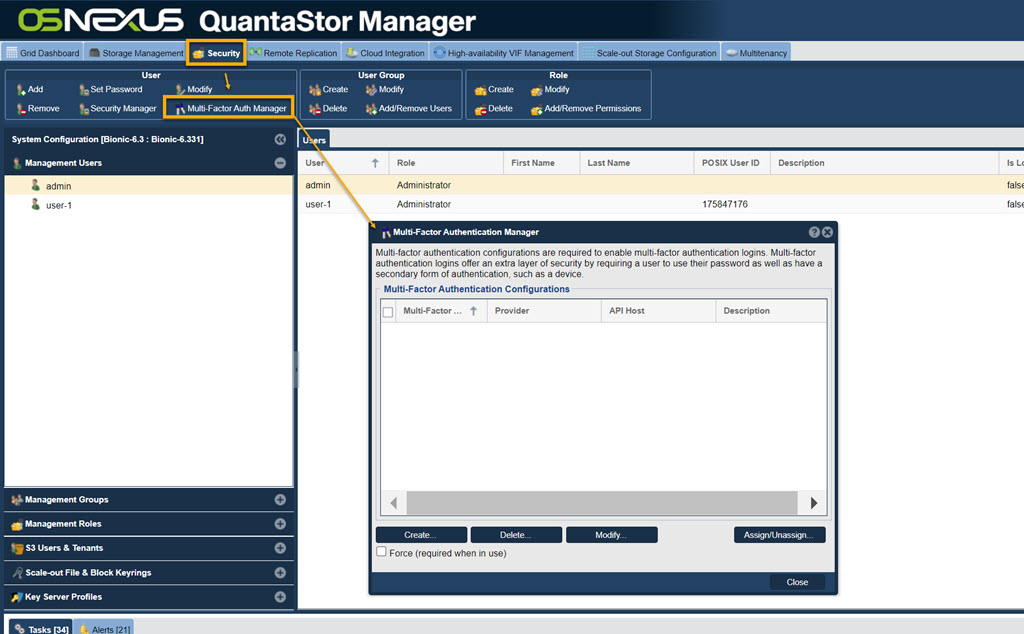

Navigation: Security --> Management Users --> User --> Multi-Factor Auth Manager (toolbar)
- All multi-factor authentication configuration manipulation can be handled from the Multi-Factor Auth Config Manager. To delete multiple configurations at once, check the check boxes next to the configurations you would like to delete, then hit the "Delete..." button.
2. Multi-Factor Authentication Configuration Create
Navigation: Security --> Management Users --> User --> Multi-Factor Auth Manager --> Create... (button)
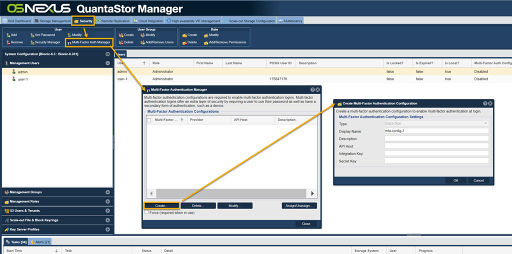

- Clicking the "Create..." button in the Multi-Factor Authentication Configuration dialog will open the Create Multi-Factor Authentication Configuration dialog.
3. Multi-Factor Authentication Configuration Modify
Navigation: Security --> Management Users --> User --> Multi-Factor Auth Manager --> Modify... (button)
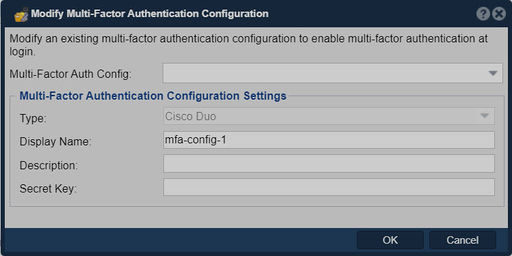

- Clicking the ‘Modify...’ button in the ribbon bar in the multi-factor authentication configuration panel will open the multi-factor auth config modify dialog. You can choose to modify any of the existing MFA configs from the drop down menu. You may only modify the name, description, or secret key.
4. Multi-Factor Authentication Configuration Delete
Navigation: Security --> Management Users --> User --> Multi-Factor Auth Manager --> Delete... (button)
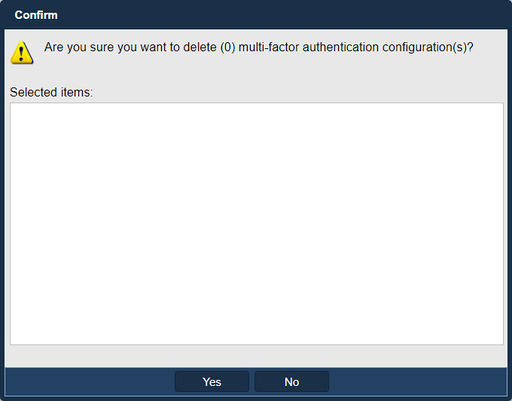

- Clicking the ‘Delete...’ button in the Multi-Factor Authentication Configuration dialog opens the Delete Confirmation dialog. You can choose to delete any of the existing MFA configs from the Multi-Factor Authentication Manager dialog.
5. Multi-Factor Authentication Configuration Assign/Unassign
Navigation: Security --> Management Users --> User --> Multi-Factor Auth Manager --> Assign/Unassign... (button)
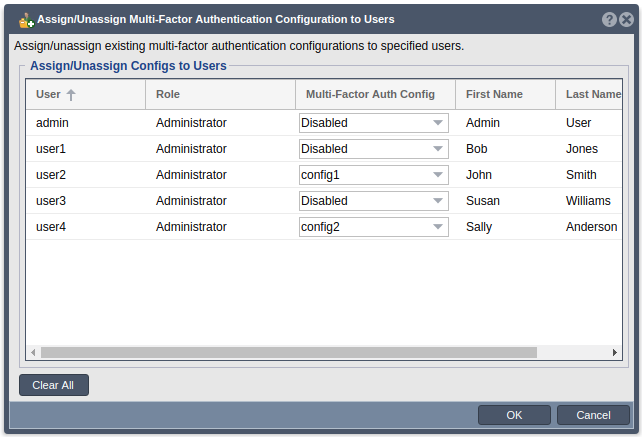

- Clicking the ‘Assign/Unassign’ icon from the ribbon bar in the multi-factor authentication configuration panel or from the Multi-Factor Auth Manager dialog will open the multi-factor auth config assign/unassign dialog. Here you can choose a configuration for each of the users in the system. To change a configuration for a given user, select the desired config from the drop down under the Multi-Factor Auth Config column in the specific users row. If you would like to disable MFA for a given user, select the ‘Disabled’ option from the drop down.
7. User Add
Navigation: Security --> Management Users --> User --> Add (toolbar)
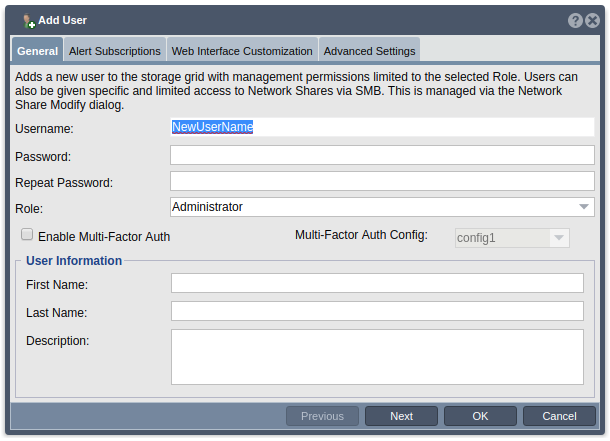

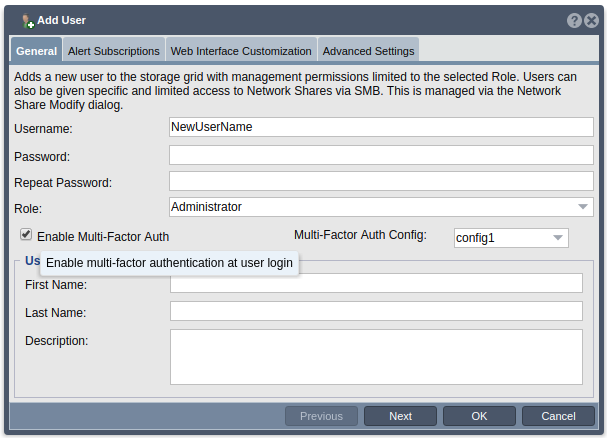

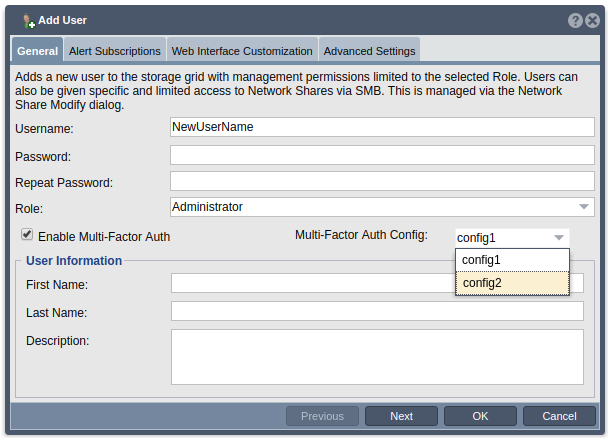

- When creating a new user, the ‘Enable Multi-Factor Auth’ checkbox will be left unchecked by default. To enable MFA for this new user, check the checkbox next to ‘Enable Multi-Factor Auth’. After checking the checkbox, select the MFA config you would like to assign to this user from the list of existing MFA configs in the MFA config drop down.
8. User Modify
Navigation: Security --> Management Users --> User --> Modify (toolbar)
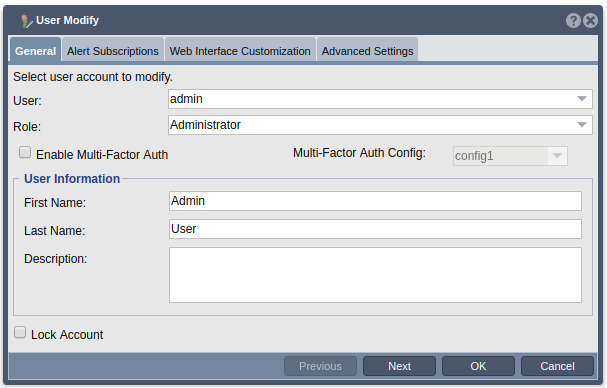

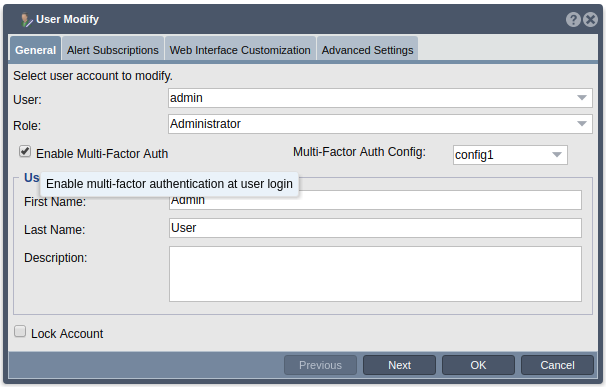

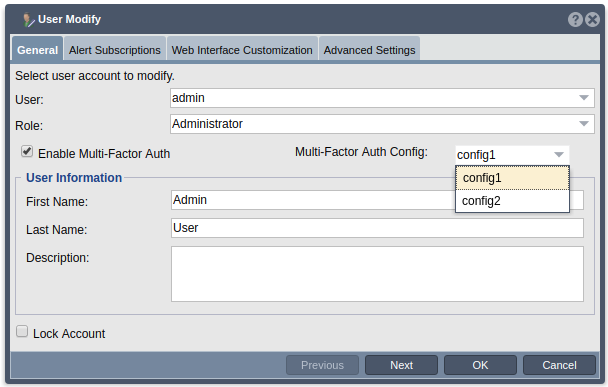

- When modifying an existing user, the MFA mode drop down will auto select which mode the user is currently set to. To change this, select the desired mode form the MFA Mode drop down. If a mode other than Disabled is selected, you will need to select the MFA config which you would like to assign to this user as well. You may select any of the existing MFA configs from the MFA config drop down.
Configuring MFA via QuantaStor CLI
Creating an MFA configuration
To enable MFA for users, you must first create a multi-factor authentication configuration. Use the following CLI commands to setup a MFA configuration:
- qs multi-factor-auth-config-create --api-host=<API Hostname> --integration-key=<IntegrationKey> --secret-key=<Secret Key> --name=<Name>
OR
- qs mfa-config-create --api-host=<API Hostname> --integration-key=<Integration Key> --secret-key=<Secret Key> --name=<Name>
The API Hostname, Integration Key, and Secret Key are from your Duo Admin Dashboard. You must also supply a unique name for your configuration. Optionally, you may also supply a description. If you supply configuration keys which are not valid, the MFA config creation task will fail and an error will be returned.
Viewing MFA configurations
You can view your multi-factor authentication configurations using the following CLI tools:
- qs multi-factor-auth-config-list
OR
- qs mfa-config-list
OR
- qs multi-factor-auth-config-get --mfa-config=<Name or ID>
OR
- qs mfa-config-get=<Name or ID>
Applying MFA to a group QuantaStor User accounts
With these last two, you may specify a specific multi-factor authentication configuration by supplying either its name or ID. Assign/Unassign multi-factor authentication configuration to specific users using these commands:
- qs multi-factor-auth-set-user --mfa-config-user-mapping=<list of users:config mappings>
OR
- qs mfa-set-user --mfa-config-user-mapping=<list of users:config mappings>
The MFA-config mappings which are supplied as a comma delimited list should have the form “user1:config1,user2:config2,~user3,...” where a tilde (~) before the username signals the removal of a multi-factor authentication configuration from the specified user. In this case, the users MFA configuration will be set to an empty string and MFA will be disabled on the user account. Otherwise, the given MFA configuration will be assigned to the specified user and MFA will be enabled on the user account. If a user from the list already has the specified configuration, the user will not be modified.
Modifying an MFA Configuration
You can change any multi-factor authentication configuration using the following commands:
- qs multi-factor-auth-config-modify --mfa-config=<Name or ID> --secret-key=<New Secret Key> --name=<New Name> --description=<New Description>
OR
- qs mfa-config-modify --mfa-config=<Name or ID> --secret-key=<New Secret Key> --name=<New Name> --description=<New Description>
Specify the MFA config you would like to change by supplying either its name or ID. You can also supply either a new secret key, new name, new description, or any combination of the three. You cannot change the API Host or the Integration Key, as that would essentially be making a completely new MFA config.
Deleting an MFA Configuration
Delete a multi-factor authentication configuration with these commands:
- qs multi-factor-auth-config-delete --mfa-config=<Name or ID>
OR
- qs mfa-config-delete --mfa-config=<Name or ID>
Specify which MFA config you would like to be deleted by supplying either its name or ID. This operation cannot be undone. When a MFA config is deleted, all user who have an association with this config will have their MFA config id field set to an empty string and their MFA mode set to NONE.
Enabling Multi-Factor Authentication for specific Users
Now that you understand how to create MFA configs and assign/unassign them to users, you can enable mfa on you chosen user(s).
- qs user-modify --user=<Name or ID> --enable-mfa=<true or false> --mfa-config=<Name or ID>
To enable MFA on your chosen user(s), you must set the enable MFA flag to true.
Next you need to supply a MFA config to the user. You can do this in a couple different ways. One way is using the MFA-config-set-user CLI mentioned earlier. Another is to specify the name or id of the config while modifying the user. If the supplied name or ID does not relate to an existing MFA config, an error will be returned.
If a enable-mfa is set to false and a MFA config is given, the MFA config will be ignored and MFA will be disabled for the given user.
Now that you have a user (or users) with MFA enabled and have a MFA config associated with their account, next time that user logs in, it will be prompted to enroll with DUO. The user will follow the given URL to enroll. This is the last step in the MFA set up process. Now every time the user logs in, he/she will be given the choice between authenticating via push notification, SMS, phone call, or passcode.
Multi-Factor Authentication Login Process (w/ Cisco Duo)
Once you have created at least one MFA config, assigned it to a user, and enabled MFA for that user, you are ready to login using the new MFA login process. To do so, proceed with logging in as normal by entering a username and password and clicking the ‘Login’ button.
Enrollment
If this is your first time logging in with this specific MFA config, you will be prompted at login that enrollment with Duo is required. Follow the given URL to enroll.
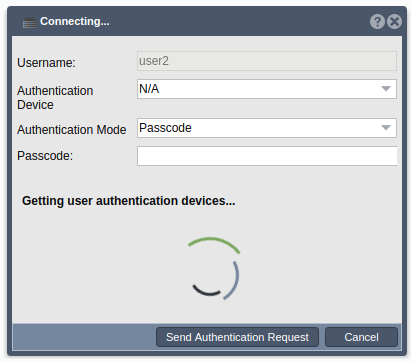

After enrollment, you may attempt another login. You will need to click the ‘Cancel’ button in order to restart the login process. After entering username and password and clicking the ‘Login’ button, a new dialog will appear. After the users registered authentication devices are gathered, the user may choose to use any of the available devices for authentication. If the user would not like to use a device or if the user is using a passcode not associated with a device, the ‘N/A’ option may be chosen.
Once a device has been chosen, the user must choose a mode of authentication. The mode options which are appropriate for the chosen device will be listed in the dropdown. After making a selection, the user can click ‘Send Authentication Request’ to proceed.
Authentication Mode - SMS
If SMS is the chosen authentication mode, the user will be sent a passcode via SMS to the chosen device. Once the user has received the passcode, they may enter it into the ‘Passcode’ field in the web UI and click ‘Enter Passcode’. If they did not receive the passcodes or if they would like new passcodes, they may click the ‘Resend Passcodes’ button to receive a new passcode.


Authentication Mode - Phone Call
If Phone Call is the chosen authentication mode, the user will receive a phone call on the chosen device. Once the user has received the phone call, they can follow the given instructions to either authenticate, which will log them into their quantastor account, or deny authentication.


Authentication Mode - Push
If Push is the chosen authentication mode, the user will receive a push notification on the chosen device. Once the user has received the push notification, they may choose to authenticate, which will log them into their quantastor account, or deny authentication.


Authentication Mode - Passcode
Finally, if Passcode is the chosen authentication mode, the user can enter their code into the ‘Passcode’ field in the Web UI before clicking the ‘Send Authentication Request’ button.


Resetting / Disable Admin Multi-Factor Authentication
If the admin account gets locked out duo to multi-factor authentication failure, there is a way to disable MFA for only the admin account. This may occur when the admin has MFA enabled and the secret key is reset from the duo admin panel. This creates a scenario where the MFA config which is saved in Quantastor is out of date, but the admin can't login to change it because logging in is attempting to use the now invalid MFA config.
To disable MFA from the admin account, one must stop the quantastor service and run ‘./qs_service --disable-mfa’. After this has been run, the quantastor service may be restarted and the admin can log in, bypassing the MFA process.