Network Ports
Network Port Configuration
Network Ports (also referred to as Target Ports or Network Interfaces) represent the Ethernet interfaces through which your system is managed and storage is accessed. Client hosts (aka initiators) access SAN storage Storage Volumes (aka targets) via the iSCSI protocol via network ports, authorized users can access NAS file storage Network Shares via the NFS and SMB/CIFS protocols over configured network ports, and object storage Buckets are accessible over network ports via S3 protocol.
Static vs Dynamic (DHCP) Assigned IP Addresses
QuantaStor supports both statically assigned IP addresses as well as dynamically assigned, Dynamic Host Configuration Protocol (DHCP), addresses. After the initial installation of QuantaStor the eth0 port is typically configured via DHCP with the rest typically disabled. We recommend that one reconfigure all ports with static IP addresses unless the DHCP server is setup to deliver statically assigned addresses via DHCP as identified by MAC address. Network ports setup with DHCP assigned IP addresses run the risk of changing which can lead to outages.
Modifying Network Port Settings
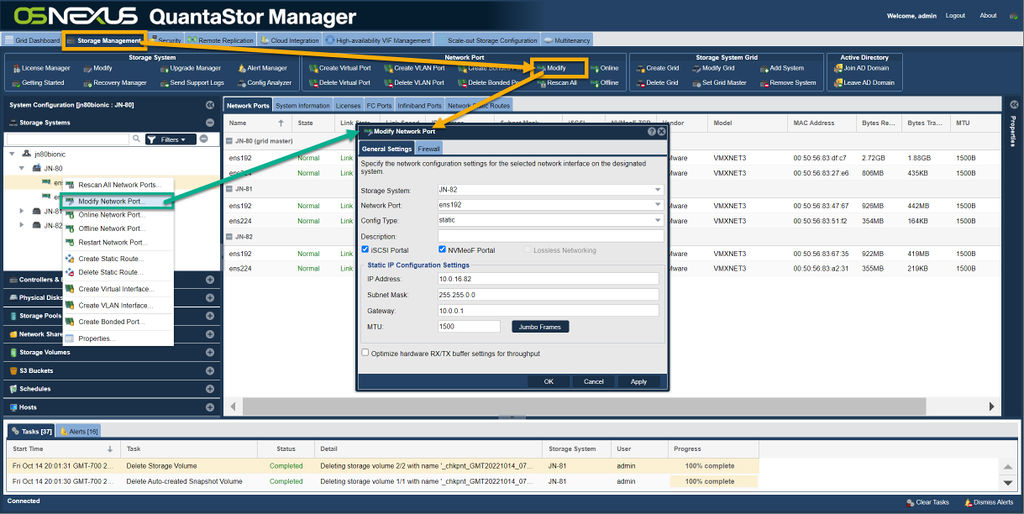
To modify the configuration of a network port first select the Storage Systems section from the tree view under the main Storage Management tab. Then select the Network Ports section from the center of the screen. This section shows the list of all network ports on each system. To modify the configuration of a port, right-click on it and choose Modify Network Port... from the right-click menu. Alternatively, press the "Modify" button in the toolbar at the top of the screen in the "Network Port" section.
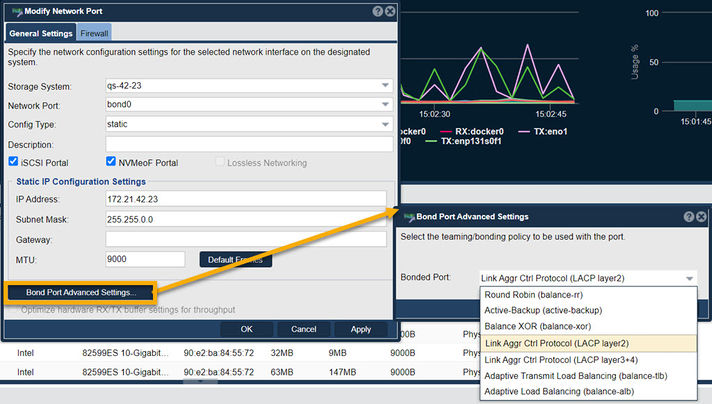
Once the Modify Network Port dialog appears in the Static IP Configuration Settings enter the IP address, network mask, and network gateway for the port. Limit configurations to one active gateway per storage system. The default Maximum Transmission Unit (MTU) should be set to 9000 for all 10GbE and faster network interfaces. If the MTU is changed from the default 1500, be sure that the switch and host side MTU configuration settings are setup to match that of the configured MTU of the QuantaStor system ports for the matching network.
NIC Bonding / Trunking Configuration
QuantaStor supports NIC (Network Interface Card) bonding, also called trunking, which allows one to combine multiple ports together to improve network performance and network fault-tolerance. For all NIC bonding modes except LACP (Link Aggregation Control Protocol) make sure that all physical ports which are part of the bond are connected to the same network switch. LACP mode will work across switches but it is important to make sure that the switch ports are configured properly to enable LACP.
QuantaStor uses a Active-Backup bonding policy by default. Bonding mode defaults can be easily changed via the Modify Network Port dialog. Round-robin mode provides load balancing and fault tolerance by transmitting packets in sequential order from the first available interface through the last but it doesn't span switches. For optimal fault tolerance LACP 802.3ad Dynamic Link aggregation mode is required as it will span switches ensuring network availability to the bonded port in the event of a switch outage.
VLAN Configuration
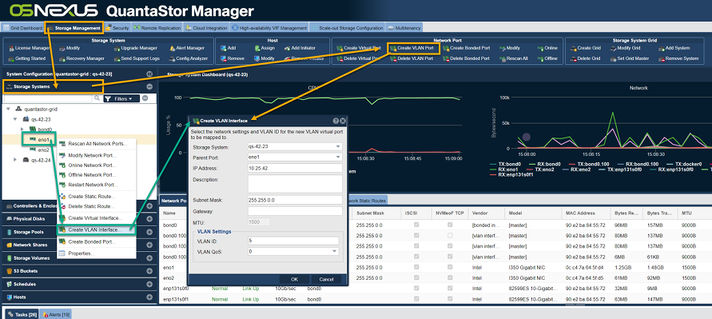
QuantaStor supports the creation of VLAN (Virtual LAN) ports which are simply virtual ports with VLAN tagging and QoS controls. To create a VLAN port simply right-click on a network port and choose the Create VLAN Interface... option as shown in the right-click menu shown at the top of this section. VLANs can be created and deleted at anytime and are easily identified as they are named with a period (.) as a delimiter between the parent port name and the VLAN tag number. For example, a VLAN with ID 56 associated with eth1 will have the name eth1.56. VLANs can also be created on bonded ports which yields ports with names like bond0.56.
Navigation: Storage Management --> Storage Systems --> Network Port --> Create VLAN Port (toolbar)
Virtual Port Configuration
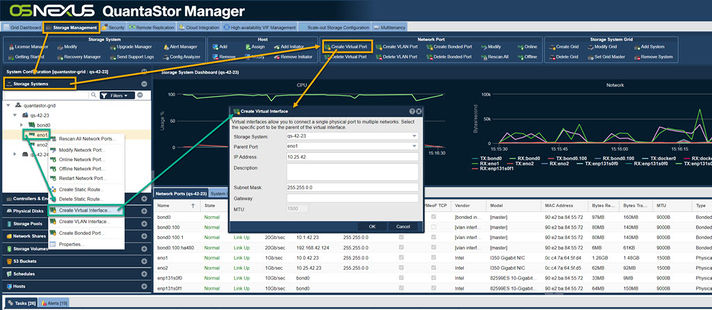
Virtual interfaces (VIFs) allow one to use a given physical port on multiple networks with multiple IP addresses simultaneously. To create a VIF on a physical port simply right-click on it and choose Create Virtual Interface... from the menu. VIFs can be created and deleted at anytime, but cannot be attached to other VIFs.
Navigation: Storage Management --> Storage Systems --> Network Port --> Create Virtual Port (toolbar)
High-availability Virtual Ports/Interfaces
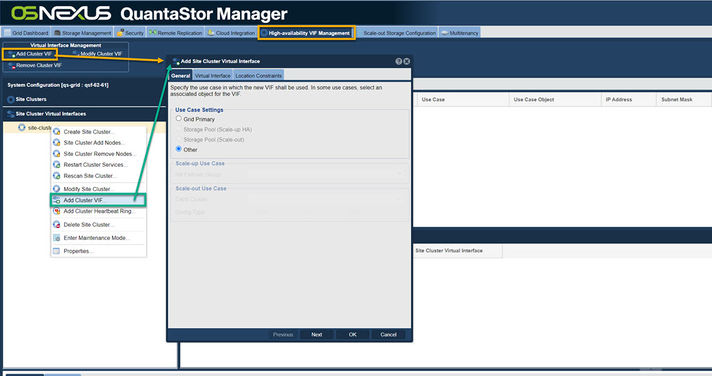
QuantaStor also has some special virtual ports which are used in High-Availability configurations. You'll see these ports with :ha in the name such as eth0:ha345680. These HA virtual interfaces are associated with specific storage pools and move with the pool when the pool is failed-over to another system. Pools can have many VIPs (virtual ports) assigned to them and as more are assigned the last digit of the port name is incremented from 0, 1, 2, 3, 4 and so on.
HA Virtual ports are created by right-clicking on an HA Failover Group in the Storage Pool section and then choosing the Add Cluster VIF... option. They can also be created via the High-availability VIF Management section. Note also that a cluster heartbeat (aka Site Cluster) must be setup between the systems used to manage a given HA pool before HA VIFs/VIPs may be created. See more on HA cluster setup in the walk-thru guide found here.
Configuring Network Management Ports
QuantaStor works with all major 10/25/40/56/100GbE Network Interface Controller cards (NICs) from Intel, Mellanox, Cisco, Dell, HPE, SuperMicro, and others. We recommend that one designate slower 1GbE ports as iSCSI disabled which will prevent their use by iSCSI initiators and relegate them for use only with management traffic. Similarly, one should have the 1GbE ports on a separate network from the ports used for NAS traffic so that performance is not impacted by the system using the 1GbE ports by mistake.
Static Route Management
Static routes provides a way of customizing network traffic flow to bypass the default gateway for communication with a specific network. This is especially useful for routing network traffic through specific VLANs to a network that's not routable by the default gateway or through VPN tunnels. Each static route has two parts, the IP address of the gateway on the local network through which the external network may be accessed, and the bind address and subnet of the external network to route to.
Creating Static Routes
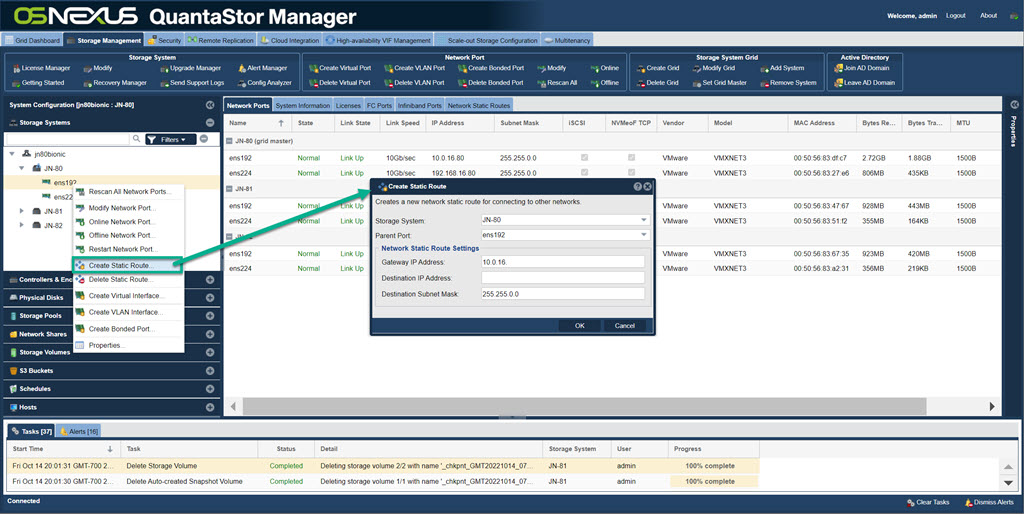
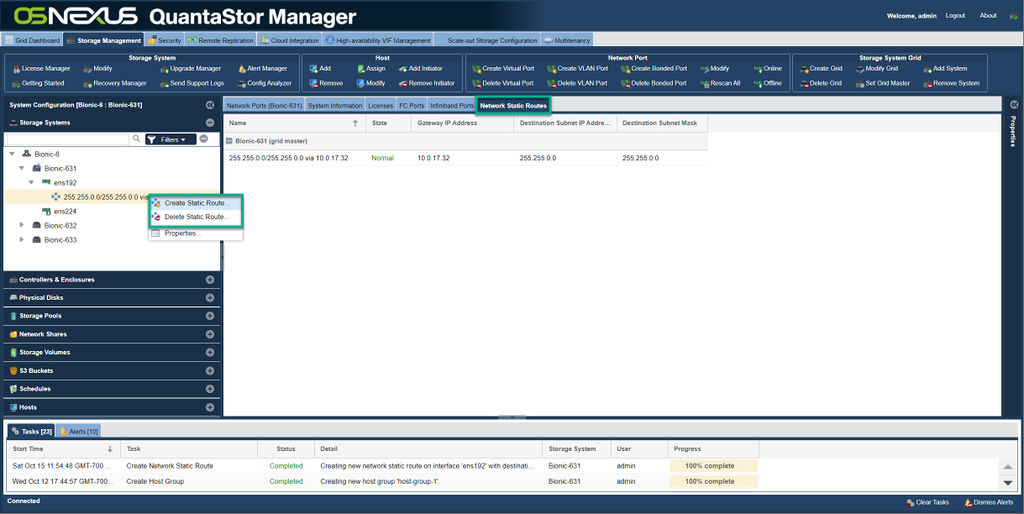
QuantaStor's static route management is port specific which provides strong granular control of static routing on a port specific basis. To create a static route simply right-click on a Network Port in the Storage Systems section on the left, then choose Create Static Route... from the pop-up menu.
The Destination IP Address is the bind address of the network you're setting up routing to. It also requires the subnet mask of that destination network to be specified in the Destination Subnet Mask field.
For example, if you have a QuantaStor server with an IP address of 10.0.8.70/24 on port ens192 and a special gateway at 10.0.8.1 for accessing your 192.168.0.0/16 network then you'd enter a Destination IP Address of 192.168.0.0, a Destination Netmask of 255.255.0.0 and the gateway to route to to access that network Gateway IP Address of 10.0.8.1. Your port on 10.0.8.70 is then going to route all traffic destined for 192.168.0.0/16 via the local gateway at 10.0.8.1.
Static route management is integrated into the platform such that routes will automatically enable and disable via standard commands like ifup and ifdown in cases where one is logged directly into a given QuantaStor server via ssh. We recommend using the qs CLI and/or the QuantaStor web management interface when configuring network ports but the routes will still properly activate in any event.
Deleting Static Routes
To delete a route simply select the Storage Systems section on the left, then expand the port that has the route, then right-click and choose Delete Static Route... from the pop-up menu. Another more direct option is to choose the Network Static Routes tab in the center section, then right-click on the route to be removed and again choose Delete Static Route... from the pop-up menu. Routes may be created and deleted at any time and are activated immediately when created. If a port is disabled the routes associated with the port are also automatically disabled.
