Template:GridSetupProceedure: Difference between revisions
| Line 3: | Line 3: | ||
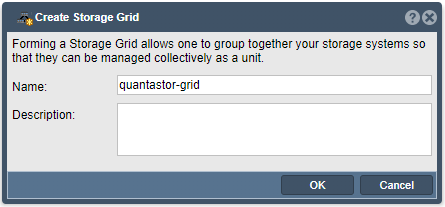
For multi-node deployments, you should configure the networking on a per-appliance basis before creating the grid, as it makes the process faster and simpler. Assuming the network ports are configured with unique static IPs for each appliance (aka node), press the 'Create Grid' button in the tool bar to create an initial grid of one appliance. You may also create the management grid, by right-clicking on the 'Storage System' icon in the tree view and choosing 'Create Grid...'. | For multi-node deployments, you should configure the networking on a per-appliance basis before creating the grid, as it makes the process faster and simpler. Assuming the network ports are configured with unique static IPs for each appliance (aka node), press the 'Create Grid' button in the tool bar to create an initial grid of one appliance. You may also create the management grid, by right-clicking on the 'Storage System' icon in the tree view and choosing 'Create Grid...'. | ||
[[File:qs5_create_grid_menu.png| | [[File:qs5_create_grid_menu.png|512px]] | ||
This first system will be elected as the initial primary/master node for the grid. The primary system has an additional role, in that it acts as a conduit for intercommunication of grid state updates across all nodes in the grid. This additional role has minimal CPU and memory impact. | This first system will be elected as the initial primary/master node for the grid. The primary system has an additional role, in that it acts as a conduit for intercommunication of grid state updates across all nodes in the grid. This additional role has minimal CPU and memory impact. | ||
| Line 11: | Line 11: | ||
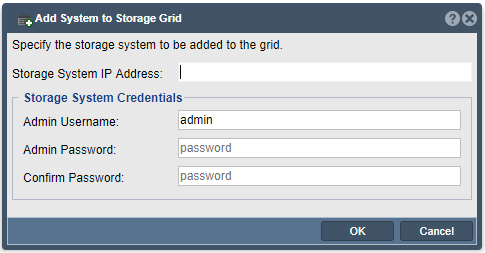
Now that the single-node grid is formed, we can now add all the additional appliances using 'Add System' button in the toolbar, to add them one-by-one to the grid. You can also right-click on the 'Storage Grid', and choose 'Add Grid Node...' from the menu to add additional node. | Now that the single-node grid is formed, we can now add all the additional appliances using 'Add System' button in the toolbar, to add them one-by-one to the grid. You can also right-click on the 'Storage Grid', and choose 'Add Grid Node...' from the menu to add additional node. | ||
[[File:qs5_add_grid_node_menu.png| | [[File:qs5_add_grid_node_menu.png|512px]] | ||
You will be required to enter the IP address and password for the appliance to be added to the grid, and once they are all added, you will be able to manage all nodes from a single appliance via a web browser. | You will be required to enter the IP address and password for the appliance to be added to the grid, and once they are all added, you will be able to manage all nodes from a single appliance via a web browser. | ||
| Line 27: | Line 27: | ||
Appliance to appliance communication typically works itself out automatically but it is recommended that you specify the network to be used for appliance inter-node communication for management operations. This is done by selecting the 'Preferred Grid IP' in the '''Storage System Modify''' dialog by right-clicking on each appliance in the grid and selecting 'Modify Storage System...'. | Appliance to appliance communication typically works itself out automatically but it is recommended that you specify the network to be used for appliance inter-node communication for management operations. This is done by selecting the 'Preferred Grid IP' in the '''Storage System Modify''' dialog by right-clicking on each appliance in the grid and selecting 'Modify Storage System...'. | ||
[[File:qs4_preferred_grid_ip.png| | [[File:qs4_preferred_grid_ip.png|512px]] | ||
==== Completed Grid Configuration ==== | ==== Completed Grid Configuration ==== | ||
| Line 33: | Line 33: | ||
At this point the Grid is setup and one will see all the appliance nodes via the web UI. If you are having problems please double check your network configuration and/or contact OSNEXUS support for assistance. | At this point the Grid is setup and one will see all the appliance nodes via the web UI. If you are having problems please double check your network configuration and/or contact OSNEXUS support for assistance. | ||
[[File:qs4_main_screenshot.png.png| | [[File:qs4_main_screenshot.png.png|512px]] | ||
Revision as of 20:56, 21 March 2019
Grid Setup Procedure
For multi-node deployments, you should configure the networking on a per-appliance basis before creating the grid, as it makes the process faster and simpler. Assuming the network ports are configured with unique static IPs for each appliance (aka node), press the 'Create Grid' button in the tool bar to create an initial grid of one appliance. You may also create the management grid, by right-clicking on the 'Storage System' icon in the tree view and choosing 'Create Grid...'.
This first system will be elected as the initial primary/master node for the grid. The primary system has an additional role, in that it acts as a conduit for intercommunication of grid state updates across all nodes in the grid. This additional role has minimal CPU and memory impact.
Now that the single-node grid is formed, we can now add all the additional appliances using 'Add System' button in the toolbar, to add them one-by-one to the grid. You can also right-click on the 'Storage Grid', and choose 'Add Grid Node...' from the menu to add additional node.
You will be required to enter the IP address and password for the appliance to be added to the grid, and once they are all added, you will be able to manage all nodes from a single appliance via a web browser.
Once completed, all QuantaStor appliances in the grid can be managed as a unit (single pane of glass), by logging into any appliance via a web browser. It is not necessary to connect to the master node, but you may see web management is faster when managing the grid from the master node.
User Access Security Notice
Be aware that the management user accounts across the appliances will be merged including the admin user account. In the event that there are duplicate user accounts the user accounts, the user accounts in the currently elected primary/master node takes precedence.
Preferred Grid IP
Appliance to appliance communication typically works itself out automatically but it is recommended that you specify the network to be used for appliance inter-node communication for management operations. This is done by selecting the 'Preferred Grid IP' in the Storage System Modify dialog by right-clicking on each appliance in the grid and selecting 'Modify Storage System...'.
Completed Grid Configuration
At this point the Grid is setup and one will see all the appliance nodes via the web UI. If you are having problems please double check your network configuration and/or contact OSNEXUS support for assistance.


