Backup Policies
Contents
Overview
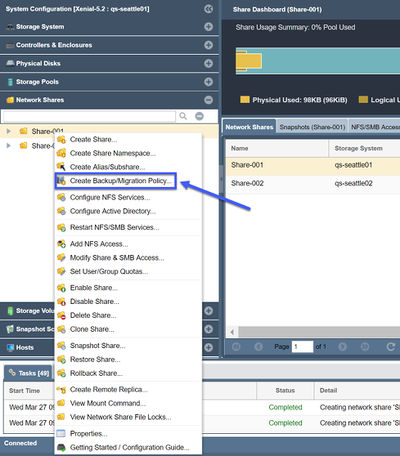
Within QuantaStor you can create backup/migration policies where data from any NFS or CIFS share on your network can be automatically backed up for you to your QuantaStor system. To create a Backup Policy simply right-click on the Network Share where you want the data to be backed up to and choose the 'Create Backup/Migration Policy...' option from the pop-up menu. Backup policies will do a CIFS/NFS mount of the specified NAS share on your network locally to the system in order to access the data to be archived. When the backup starts it creates a Backup Job object which you will see in the web interface and you can see the progress of any given Backup Job by monitoring it in the Backup Jobs tab in the center-pane of the web interface after you select the Network Share to which the backup policy is attached.
Creating Backup Policies
Backup policies in QuantaStor support heavy parallelism so that very large NAS filers with 100m+ files can be easily scanned for changes. The default level of parallelism is 32 concurrent scan+copy threads but this can be reduced or increased to 64 concurrent threads.
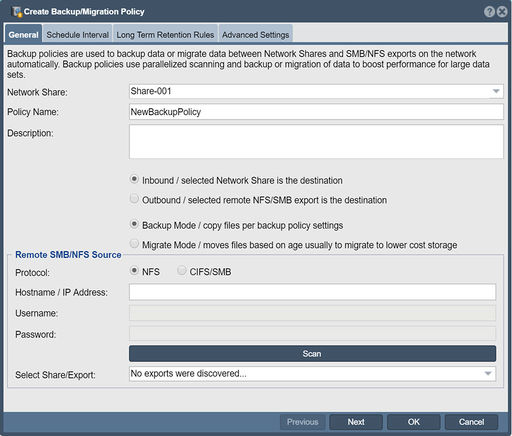
This is where you indicate where you want the data to be backed up to on your QuantaStor systems. With QuantaStor backup policies your data is copied from a NAS share on the network to a Network Share on your QuantaStor system.
Policy Name
This is a friendly name for your Backup Policy. If you are going to have multiple policies doing backups to the same Network Share then each policy will be associated with a directory with the name of the policy. For example, if your share is called "media-backups" and you have a policy called "project1" and a policy called "project2" then there will be sub-directories under the "media-backups" share for "project1" and "project2". In order to support multiple policies per Network Share you must select the option which says 'Backup files to policy specific subdirectory'. If that is not selected then only one policy can be associated with the network share and the backups will go into the root of the share to form an exact mirror copy.
Selecting the Backup Source
In the section which says Hostname / IP Address: enter the IP address of the NAS filer or server which is sharing the NAS folder you want to backup. For NFS shares you should enter the IP address and press the Scan button. If NFS shares are found they'll show up in the CIFS/NFS Export: list. For CIFS share backups you'll need to enter the network path to the share in a special format starting with double forward slashes like so: //username%password@ipaddress. For example, you might scan for shares on a filer located at 10.10.5.5 using the SMB credentials of 'admin' and password 'password123' using this path: //admin%password123@10.10.5.5. In AD environments you can also include the domain in the SMB path like so //DOMAIN/username%password@ipaddress.
Policy Type
You can indicate that you want the backup policy to backup everything by selecting 'Backup All Files' or you can do a 'Sliding Window Backup'. For backing up data from huge filers with 100m+ files it is sometimes useful to only backup and maintain a sliding window of the most recently modified or created files. If you set the Retention Period to 60 days then all files that have been created or modified within the last 60 days will be retained. Files that are older than that will be purged from the backup folder.
Be careful with the Backup All Files mode. If you have a Purge Policy enabled it will remove any files from the network share which were not found on the source NAS share that's being backed up. If you attached such a backup policy to an existing share which has data on it, the purge policy will remove any data/files that exists in your QuantaStor Network Share which is not on the source NAS share on the remote filer. So use caution with this as Backup All Files really means maintain a mirror copy of the remote NAS share.
Purge Policy
Backup policies may run many times per day to quickly backup new and modified files. A scan to determine what needs purging is typically less important so it is more efficient to run it nightly rather than with each and every backup job. For the Sliding Window policies the purge phase will throw out any files that are older than the retention period. For the Backup All Files policies there is a comparison that is done and any files that are no longer present in the NAS source share are removed from the backup. The Purge Policy can also be set to 'Never delete files' which will backup files to your Network Share but never remove them.
Backup Logs
If you select 'Maintain a log of each backup' then a backup log file will be written out after each backup. Backup logs can be found on your QuantaStor system in the /var/log/backup-log/POLICY-NAME directory. The purge process produces a log with the .purgelog suffix and the backup process produces a log with the .changelog suffix.
Deleting Backup Policies
To delete an existing Backup Policy simply right-click on the policy and choose the delete option from the menu. Deleting a backup policy does not delete any data, just the policy itself and any Backup Jobs associated with it.
Data Mover Utility / pwalk
pwalk is a open source command line utility extended by OSNEXUS and included with QuantaStor and used for concurrent file copy/movement and scanning, more information is available here.

