Difference between revisions of "Ceph Object Storage"
From OSNEXUS Online Documentation Site
m (→Overview Configuration Steps) |
m (→Create/Add Cloud Container(s)) |
||
| (6 intermediate revisions by the same user not shown) | |||
| Line 5: | Line 5: | ||
qs ceph-user-access-entry-list --ceph-cluster=<cephClusterName> --verbose | qs ceph-user-access-entry-list --ceph-cluster=<cephClusterName> --verbose | ||
| − | [[File: | + | [[File:Crt S3 Usr - Web.jpg|512px]] |
| + | |||
Double-click on the Access key and Secret key to reveal the values in clear-text. | Double-click on the Access key and Secret key to reveal the values in clear-text. | ||
| Line 12: | Line 13: | ||
===Add provider credentials within QuantaStor=== | ===Add provider credentials within QuantaStor=== | ||
| + | '''Navigation:''' Cloud Integration --> Cloud Storage Containers --> Cloud Storage Provider --> Add Provider ''(toolbar)'' | ||
| + | |||
* In the Cloud Provider tab, right click to select "Add Provider". | * In the Cloud Provider tab, right click to select "Add Provider". | ||
* Change the end-point to the Ceph Object Store. | * Change the end-point to the Ceph Object Store. | ||
| Line 22: | Line 25: | ||
===Create/Add Cloud Container(s)=== | ===Create/Add Cloud Container(s)=== | ||
| − | Now navigate to the Cloud Containers | + | Now navigate to the Cloud Containers tab and then Import or Create a new Cloud Container using the Softlayer S3 credentials you entered before. Note that after you create a new container you will find a Network Share listed in the main Storage Management -> Network Shares section which represents the container and makes it accessible via NFS and SMB. |
Latest revision as of 07:07, 2 November 2023
QuantaStor's Cloud Containers feature enables one to setup a NAS Gateway to custom Ceph Object Storage buckets.
Overview Configuration Steps
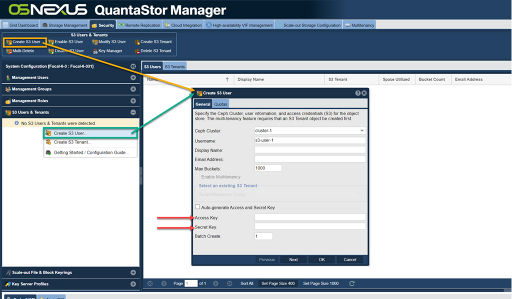
- Get the user credentials from a Ceph setup configured/managed by Quantastor. This can be done through the QS cli or the Quantastor Web UI.
qs ceph-user-access-entry-list --ceph-cluster=<cephClusterName> --verbose
Double-click on the Access key and Secret key to reveal the values in clear-text.
- To get the access key and secret from a Ceph setup not managed by Quantastor, use the native radosgw commands.
radosgw-admin --cluster=<cephClusterName> user info --uid=<userName> --tenant=<tenantName>
Add provider credentials within QuantaStor
Navigation: Cloud Integration --> Cloud Storage Containers --> Cloud Storage Provider --> Add Provider (toolbar)
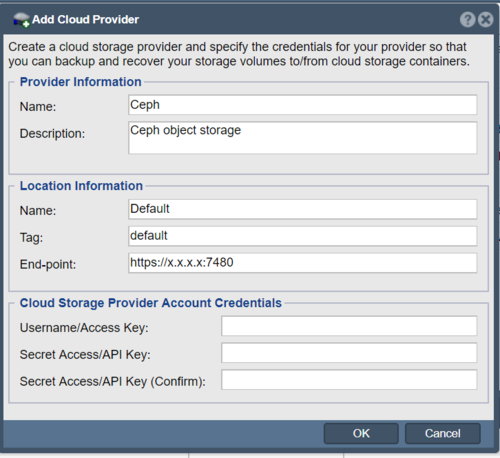
- In the Cloud Provider tab, right click to select "Add Provider".
- Change the end-point to the Ceph Object Store.
- Add the Access Key and Secret Access to the Ceph Object Store.
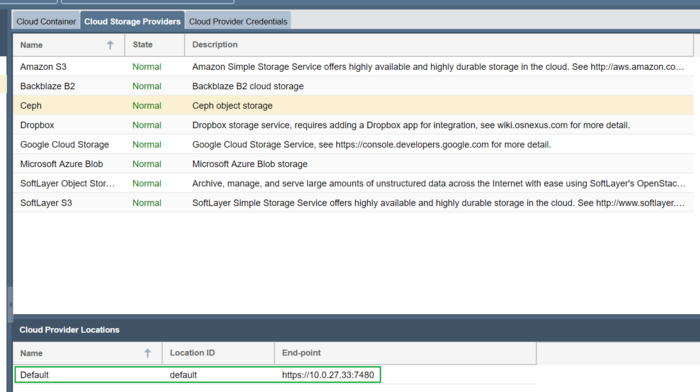
- Select "Ceph" in the "Cloud Storage Providers". The location of the selected end point should be displayed.
Create/Add Cloud Container(s)
Now navigate to the Cloud Containers tab and then Import or Create a new Cloud Container using the Softlayer S3 credentials you entered before. Note that after you create a new container you will find a Network Share listed in the main Storage Management -> Network Shares section which represents the container and makes it accessible via NFS and SMB.


