Hardware Controllers & Enclosures
Hardware Controller & Enclosure Management
QuantaStor has custom integration modules for covering all the major HBA and RAID controller card models. QuantaStor provides integrated management and monitoring of your HBA/RAID attached hardware RAID units, disks, enclosures, and controllers. It is also integrated with QuantaStor's alerting / call home system so when a disk failure occurs within a hardware RAID group an alert email/PagerDuty alert is sent automatically no different than if it was a software RAID disk failure or any another alert condition detected by the system.
QuantaStor's hardware integration modules include support for the following HBAs & RAID controllers:
- LSI HBAs (92xx, 93xx, 94xx and all matching OEM derivative models)
- LSI MegaRAID (all models)
- DELL PERC H7xx/H8xx (all models, LSI/Broadcom derivative)
- Intel RAID/SSD RAID (all models, LSI/Broadcom derivative)
- Fujitsu RAID (all models, LSI/Broadcom derivative)
- IBM ServeRAID (all models, LSI/Broadcom derivative)
- Adaptec 5xxx/6xxx/7xxx/8xxx (all models)
- HP SmartArray P4xx/P8xx
- HP HBAs
Note: Special tools available for some models which are helpful for triage of hardware issues which are outlined here.
Identifying Devices in the Enclosure View
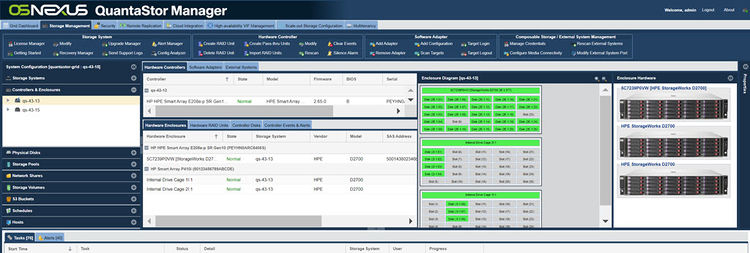
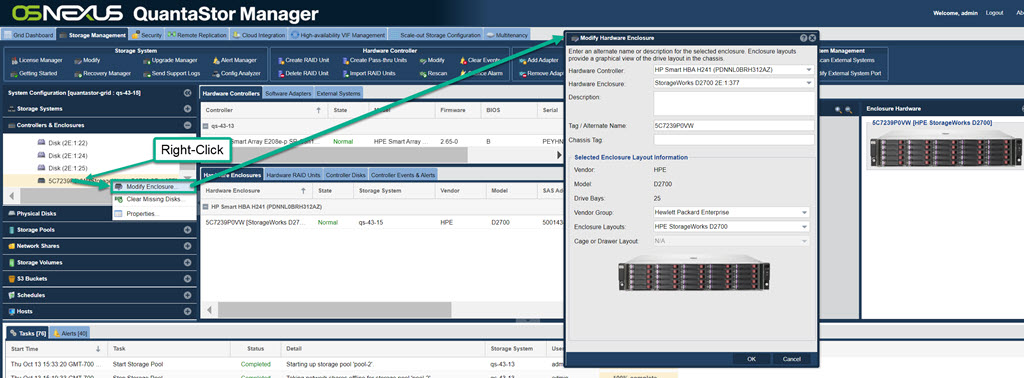
QuantaStor presents an enclosure view of devices that helps to identify where disks are physically located within a server of external disk enclosure chassis (JBOD). By default QuantaStor assumes a 4x column bottom-to-top left to right ordering of the drive slot numbers which is common to SuperMicro hardware. Most other manufacturers have other slot layout schemes to it is important that one select the proper vendor/model of disk enclosure chassis within the Modify Enclosure.. dialog. One the proper chassis model has been selected the layout within the web UI will automatically update. If the vendor/model of external enclosure is not available and there is no suitable alternative one may add new enclosures layout types via a configuration file, instructions for that can be found here.
Selecting the Enclosure Vendor/Model
By right-clicking on the enclosure and choosing Modify Enclosure.. one can set the enclosure to a specific vendor/model type so that the layout of the drive slots matches the hardware appropriately.
Hardware RAID Unit Management
QuantaStor has a powerful hardware RAID unit management system integrated into the platform so that one can create, delete, modify, encrypt, manage hot-spares, and manage SSD caching for hardware RAID units via the QuantaStor Web UI, REST API, and CLI commands. OSNEXUS recommends the use of hardware RAID with scale-out object storage configurations and the use of HBAs for scale-up storage pool configurations (ZFS). In all cases, OSNEXUS recommends the use of a hardware RAID controller to manage the boot devices for an system. The follow sections cover how to manage controllers and view the enclosure layout of devices within a selected system within a QuantaStor storage system grid.
Creating Hardware RAID Units
A logical grouping of drives using hardware RAID controller technology is referred to as a hardware RAID unit within QuantaStor. Since management of the controller is fully integrated into QuantaStor one care create RAID units directly through the web UI or via the CLI/REST API. Creation of hardware RAID units is accessible from the Hardware Controllers & Enclosures section in the main Storage Management tab. For more detailed information on how to create a hardware RAID unit please see the web management interface page on hardware RAID unit creation here.
Importing Hardware RAID Units
If a group of devices representing a hardware RAID unit has been added to the system they may not appear automatically. This is because most RAID controllers treat these devices as a foreign configuration that must be explicitly imported to the system. If a system is rebooted with the attached JBOD storage enclosures powered-off this can also lead to a previously imported configuration being identified as a foreign configuration. To resolve these scenarios simply select Import Unit(s) from the Hardware Controllers & Enclosures section of the web management interface. More information on how to import units using the web UI is available here.
Silencing Audible alarms
We recommend that one disable audible alarms on all systems since the most common deployment scenario is one where the system is in a data-center where the alarm will not be heard by the owner of the system. If for some reason the audible alarm is turned on one can disable all alarms for a given controller or system via the web user interface as outlined here.
Hardware RAID Hot-spare Management
When hardware RAID units are configured for use with storage pools one must indicate hot-spares at the hardware RAID unit level as that is where the automatic repair needs to take place. QuantaStor provides management of hot-spares via the web management interface, CLI and REST API. Simply go to the Hardware Controllers & Enclosures section, then right-click on the disk and choose Mark/Unmark Hot-spare... This will allow one to toggle the hot-spare marker on the device. If a hardware RAID unit is in a degraded state due to one or more failed devices one need only mark one or more devices as hot-spares and the controller will automatically consume the spare and start the rebuild/repair process to restore the affected RAID unit to a fully healthy state. More information on marking/unmarking disks as hot-spares is available here.
Hardware RAID SSD Read/Write Caching
QuantaStor supports the configuration and management of hardware controller SSD caching technology for both Adaptec and LSI/Avago RAID Controllers. QuantaStor automatically detects that these features are enabled on the hardware controllers and presents configuration option within the QuantaStor web management interface to configure caching on a per RAID unit basis.
Hardware SSD caching technologies work by having I/O requests leverage high-performance SSD as a caching layer allowing for large performance improvements in small block IO. SSD caching technology works in tandem with the NVRAM based write back cache technologies. NVRAM cache is typically limited to 1GB-4GB of cache whereas the addition of SSD can boost the size of the cache layer to 1TB or more. The performance boost will depend heavily on the SSD device selected and the system workload. For SSD to be selected to boost write performance, high-endurance SSDs are required with a high (DWPD) of at least 10x or higher and only enterprise grade / data-enter (DC) grade SSDs are certified for use in QuantaStor system. Desktop grade SSD lead to unstable performance and possibly serious outages as they are not designed for continuous sustained loads, as such OSNEXUS does not support their use.
Creating a Hardware SSD Cache Unit
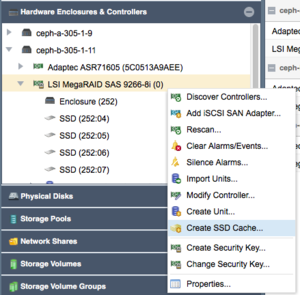
You can create a Hardware SSD Cache Unit for your RAID controller by right clicking on your RAID controller in the Hardware Enclosures and Controllers section of the Web Manager as shown in the below screenshot. If you do not see this option please verify with your Hardware RAID controller manufacturer that the SSD Caching technology offered for your RAID Controller platform is enabled. If you are unsure how to confirm this functionality, please contact OSNEXUS support for assistance.
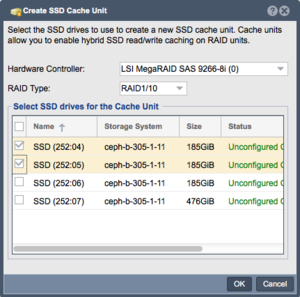
You will now be presented with the Create SSD Cache Unit Dialog:
Please select the SSD's you would like to use for creating your RAID unit. Please note that not all SSD's are supported by the RAID Controller manufacturers for their SSD caching technology. If you cannot create your SSD Cache Unit, please refer to your Hardware RAID Controller manufacturers Hardware Compatibility/Interoperability list.
The SSD Cache Technology from Adaptec and LSI/Avago for their RAID controllers can be configured in one of two ways:
- RAID0 - SSD READ Cache only
- RAID1/10 - Combined SSD READ and WRITE Cache.
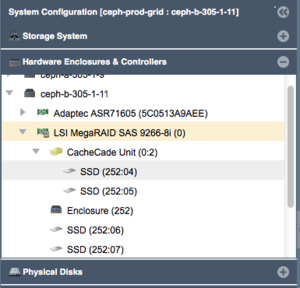
Please choose the option you would like and click the 'OK' button to create the SSD Cache Unit. The SSD Cache Unit will now appear alongside the other Hardware RAID units for your Hardware RAID Controller as shown in the below screenshot:
Enabling the Hardware SSD Cache Unit for your Virtual Drive(s)
Now that you have created your Hardware SSD Cache Unit as detailed above, you can enable it for the specific Virtual Drive(s) you would like to have be cached.
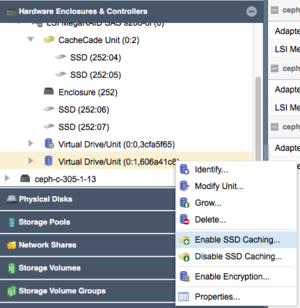
To enable the SSD Cache Unit for a particular Virtual Drive, locate the Virtual Drive in the Hardware Enclosures and Controllers section of the Web Interface and right click and choose the 'Enable SSD Caching' option.
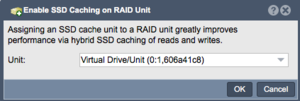
This will open the Enable SSD Caching on RAID Unit dialog where you can confirm your selection and click 'OK'.
The SSD Cache will now be associated with the chosen Virtual Drive, enabling the read or read/write cache function that you specified when creating your SSD Caching RAID Unit.
