QuantaStor Troubleshooting Guide
Installation Issues
The troubleshooting information for install time issues is all maintained at the bottom of the Install Guide which you can find here.
Login & Upgrade Issues
New packages are not advertised in QuantaStor web management interface's Upgrade Manager
If you've got an old version of QuantaStor and the new packages are not showing up in the Upgrade Manager then often times we find that the network gateway IP address is not set correctly. The easiest way to verify this is to login at the console for your QuantaStor system and then use ping to ping a well known address like www.google.com. If it is not reachable then likely you don't have the gateway configured on any of your network ports or you have the gateway configured on too many network ports. The other thing to check is to ping 8.8.8.8 which is a well known google DNS server. If it is reachable then your gateway is configured properly. If at the same time www.google.com is not reachable then your DNS settings need fixing. If you right-click on your storage system in the Storage Systems tree stack and then choose 'Modify Storage System' and that will let you set the correct DNS server(s) for your environment. The gateway setting is on a per port basis so you'll need to right-click on a network port in order to set that.
Cannot login to the QuantaStor web management interface
If you've seen an error like this, there are a few items to check to get it resolved. “Unable to connect to service, QuantaStor service may be down, or a network issue may be present.”
- Make sure that you have cleared your browser cache. QuantaStor's web interface is cached by your browser and this can cause problems when you try to login after an upgrade unless you hit the 'Reload' button or 'F5' in your web browser to force it to reload the web management interface. Also in some instances where the internal web server has restarted you may also need to hit reload to clear your browser cache. This is always the best place to start as it is the easiest thing to check and resolves the issue 90% of the time.
- Make sure that your last upgrade completed successfully. To do this you'll need to login at the console or via SSH and do the upgrade manually. Here are the commands to run:
sudo -i
apt-get -f install
apt-get update
apt-get install qstormanager qstorservice qstortomcat
- Make sure that the Tomcat web service is running, or restart it. To do this you'll need to login at the console or via SSH.
sudo -i
service tomcat status
service tomcat restart
- Make sure that the QuantaStor core service is running, or restart it. To do this you'll need to login at the console or via SSH.
sudo -i
service quantastor status
service quantastor restart
- If the above hasn't resolved the issue try clearing your browser cache, restart your browser, and then hit the reload button after entering the URL of your QuantaStor system.
Missing objects in web management interface
This is due to the web management interface being at a different version than the core service. To resolve this you'll need to login at the console / SSH interface using the 'qadmin' account and then run the following commands:
sudo -i
apt-get -f install
apt-get update
apt-get install qstormanager qstorservice qstortomcat
Be sure to give the service about 30 seconds to start up.
Resetting the admin password
If you forget the admin password you can reset it by logging into the system via the console or via SSH and then run these commands:
sudo -i
cd /opt/osnexus/quantastor/bin
service quantastor stop
./qs_service --reset-password=newpass
service quantastor start
In the above example the new password for the system is set to 'newpass' but you can change that to anything of your choice. After the service starts up you can verify that the password is correct by running this command:
qs sys-get --server=localhost,admin,newpass
You'll need to wait a minute for the service to startup before running the sys-get command but if it succeeds then you've successfully reset the password.
Resetting all the security configuration data
A more brute force way of removing all user accounts and recreating the admin account with the default password ('password') is to do a full --security-reset like so:
sudo -i
cd /opt/osnexus/quantastor/bin
service quantastor stop
./qs_service --reset-security
service quantastor start
CLI login works, Web Manager login fails
Most of the time this is due to the tomcat service being stopped, needing to be restarted, or the web browser cache needing to be flushed (F5). But in some rare instances we've seen the loopback / localhost IP address incorrectly setup. First, type ifconfig and verify that the lo loopback interface exists. If not then you'll need to edit /etc/network/interfaces to put the default lo back in. If it is setup, then you'll need to make sure it has the correct 127.0.0.1 IP address on it. To test this ping localhost and run ifconfig:
ping localhost
ifconfig lo
If you see different IP addresses for lo and localhost then the web servlet in Tomcat won't be able to communicate with the core service. To fix this you'll need to adjust the configuration of /etc/hosts so that there is an entry that reads like so:
127.0.0.1 localhost
Here's the full contents of the hosts file from one of our v3 systems:
127.0.0.1       localhost
127.0.1.1       QSDGRID2-node008

# The following lines are desirable for IPv6 capable hosts
::1     ip6-localhost ip6-loopback
fe00::0 ip6-localnet
ff00::0 ip6-mcastprefix
ff02::1 ip6-allnodes
ff02::2 ip6-allrouters
Once you have the localhost entry set correctly you should be able to login via the web interface again.
Using the Ubuntu 'apt-get upgrade' command
QuantaStor v3
As of QuantaStor v3.5.9 we've fixed the apt package preferences so that you can now safely run an 'apt-get upgrade' on your system. Before you do that though, please make sure that the /etc/apt/preferences file is in place. If that is not there then you will end up upgrading to unstable packages. If the /etc/apt/preferences file is not there, please run this script which will create the preferences file and 'pin' the kernel packages so that the customized QuantaStor kernel is not upgraded in the process.
sudo /opt/osnexus/quantastor/qs_aptpref.sh
QuantaStor v2
With Quantastor v2 you do not want to use the command "apt-get upgrade" or the dist-upgrade. This is because QuantaStor uses a custom kernel based off of a specific version of Ubuntu. Calling apt-get upgrade will result in Ubuntu trying to update to a newer version of the standard kernel which does not include the custom SCSI target drivers.
To keep our software up to date only apt-get update and apt-get install <quantastor packages> need to be called. The four quantastor packages are qstormanager, qstorservice, qstortomcat, and qstortarget. The safest way to do this is through the web interface using the Upgrade Manager but you can also do: apt-get update apt-get install qstormanager qstorservice qstortarget qstortomcat
What to do when you upgrade on accident
The easiest way is to reinstall quantastor. After the install is complete you can go into the Recovery Manager in the web interface. This will recover the metadata and the network configuration, and the pools will auto recover. Alternatively you can use commands like 'update-initramfs -k 3.8.0-8-quantastor' to restore the kernel back to the quantastor custom kernel which include the custom drivers and such.
Driver Issues
If you're having problems with a driver you may need to upgrade. Fortunately the process is documented on our Wiki for many of the popular network cards and RAID cards to be sure to have a look here first: Driver Upgrade Guide
Custom Drivers
The underlying Ubuntu distribution used by QuantaStor v3 is Ubuntu 12.04.1 and we use a 3.5.5 linux kernel. In some cases the drivers included with the kernel we use are not new enough for your hardware and in such cases we recommend downloading and building a the latest driver from the manufacturers web site. If you have questions regarding a particular piece of hardware just send us email to support@osnexus.com, we may have a driver for your hardware already built which you can use to patch your system.
Chelsio T4 (w/ VMware)
We have heard of problems with Jumbo frames with Chelsio T4 controllers with MTU set to 9000 with VMware. If you see this try changing it to MTU 9216 in QuantaStor and MTU 9000 in VMware.
Solarflare NICs
We have seen some problems with these NICs with QuantaStor v2.x which uses the older 2.6 kernel. If you're using a Solarflare NIC be sure to start with QuantaStor v3.x.
Common Pool Creation Issues
Created hardware unit but disks are not visible
If you see a little gear icon on the disk then it has been detected as a boot drive which cannot be used for storage pool creation. In the RAID controller boot BIOS you can reconfigure this so that your RAID unit for storage pool creation is no longer tagged as bootable. QuantaStor does this check to ensure that you cannot inadvertently create a storage pool out of your boot drive and which would reformat it.
Create storage pool using an available disk does not work
You've got a disk you select it to create a storage pool but the pool creation fails part way through. Typically this is because the disk has a partition on it or is marked as a LVM physical volume. If it has LVM information on the disk you'll need to use the pvremove command on the disk to clear it. If the disk has a partition on it, you'll need to remove the partition before QuantaStor can use it. QuantaStor does these checks to ensure that you do not inadvertently overwrite data on a disk that is being used for some other purpose.
Deleting Partitions
If you are unable to create a storage pool because the device has prior partitions on it there is a script you can execute. The script can be found at /opt/osnexus/quantastor/bin/qs_dpart.sh and takes in the device as a command line argument.
Here is an example of how to clear the partitions on /dev/sdb:
/opt/osnexus/quantastor/bin/qs_dpart.sh /dev/sdb
WARNING: Make sure you do not run this script on the boot device or the wrong storage pool!
XenServer Troubleshooting
Verify Network Configuration
Often times XenServer issues can be traced to network issues so anytime you're having trouble accessing your storage it's best to start by doing a 'ping' test from each of your XenServer hosts to each of your QuantaStor systems. To do this just bring up the console window on each of your Dom0 XenServer hosts and then type 'ping <ipaddress of quantastor box>' for example, if you have a QuantaStor system at 192.168.10.10 you would type 'ping 192.168.10.10'. If it says 'destination host unreachable' then you have a network configuration issue. The issue may be with the VLAN configuration in your switch or it may be that the QuantaStor system and XenServer host are on separate networks. Be sure to review your subnet mask (eg 255.255.255.0) and the IP addresses for both. Once corrected try the ping test again. Once you can successfully ping you're ready for the next level of checking.
Verify Storage Volume Assignment
Another common mistake is to forget to assign all the storage volumes to all the XenServer hosts. If you're having trouble connecting a specific host that should be the first thing to check. To do this, go to the Hosts section within the QuantaStor Manager web interface, select the host that should have the volume and then make sure the volume is in the tree list off the host object. If you don't see it there, right-click on the host and assign the missing volume to the host.
Verify XenServer iSCSI Service Configuration
If you're still not able to successfully 'Repair Storage Repository..' in XenServer the next step is to try some low level iSCSI commands from the XenServer host that's not able to connect. The most basic of these is to do an iSCSI discover:
iscsiadm -m discovery -t st -p <quantastor-ipaddress>
For example you 'iscsiadm -m discovery -t st -p 192.168.10.10'. If you don't see the target list come back from the storage system and the list is blank then you've got a storage assignment issue. It could be that you have the incorrect iqn assigned to the host or some typo in it. Re-verify the IQN for the XenServer host and make sure that your QuantaStor system has the volume(s) assigned to the correct IQN. If you get an error back like "iscsiadm: Could not scan /sys/class/iscsi_transport" or the iSCSI service is not started then you'll want to try restarting the iSCSI service on the XenServer host.
/etc/init.d/open-iscsi stop
/etc/init.d/open-iscsi start
You'll also want to look at the file '/etc/iscsi/initiatorname.iscsi' If that file is missing, that's a problem. You'll need to create that file to have contents that look something like this:
InitiatorName=iqn.2012-01.com.example:ee46dcfc
InitiatorAlias=osn-prod1
Note you will want to change the part 'ee46dcfc' to have different letters and numbers so that you have a unique IQN for the host. The host may already have one assigned which you can find in the 'General' tab within XenCenter. Take that IQN and replace the one above with it and the InitiatorAlias should be the name of your XenServer host. Once you have that file in place, try stopping and starting the open-iscsi service as noted above. Then try the iscsiadm discovery command again as noted above.
At this point you should be able to see a list of iSCSI targets from your QuantaStor system. If you're working on repairing an existing SR, try repairing it again.
Manual iSCSI Login Test
If the above is working but you still cannot connect to your iSCSI target in the QuantaStor system then you should try using the iSCSI utility to manually login to the target. An example of that is like this:
iscsiadm --mode node --targetname "iqn.2009-10.com.osnexus:testvol01" -p 192.168.10.10:3260 --login
Once connected you can do a session list:
iscsiadm --mode session -P 1
At this point try repairing or creating the SR again as needed.
CHAP iSCSI Login Test
If you're still having login issues, it may be CHAP related. If you're using CHAP authentication we've seen situations where XenServer gets confused. One way we've seen to resolve this is to manually set the CHAP settings for a given target where 'someuser' and 'secretpassword' are replaced with the CHAP username and password you've assigned to the storage volume:
iscsiadm -m node --targetname "iqn.2009-10.com.osnexus:testvol01" --portal "192.168.10.10:3260" --op=update --name node.session.auth.authmethod --value=CHAP
iscsiadm -m node --targetname "iqn.2009-10.com.osnexus:testvol01" --portal "192.168.10.10:3260" --op=update --name node.session.auth.username --value=someuser
iscsiadm -m node --targetname "iqn.2009-10.com.osnexus:testvol01" --portal "192.168.10.10:3260" --op=update --name node.session.auth.password --value=secretpassword
Once set you can try doing a manual login as noted above or try doing the SR repair again.
iscsiadm --mode node --targetname "iqn.2009-10.com.osnexus:testvol01" -p 192.168.10.10:3260 --login
CHAP iscsid.conf Configuration
If you're editing your /etc/iscsi/iscsid.conf file so that you can have the CHAP settings set automatically you'll want to add these entries:
node.session.auth.authmethod = CHAP
node.session.auth.username = someuser
node.session.auth.password = secretpassword
After you have your iscsid.conf file configured you'll need to restart the initiator service, re-run the discovery, and then login. Re-running the discovery command is important as it seems to clear out stale information about the previous CHAP configuration settings.
service open-iscsi restart
iscsiadm -m discovery -t st -p 192.168.0.116
iscsiadm --mode node --targetname "iqn.2009-10.com.osnexus:58d91bf3-d3525d0558d8e704:asdf" -p 192.168.0.116:3260 --login
ZFS Troubleshooting
ZFS Snapshot Cleanup
In very rare instances you may run into a scenario where you're unable to delete a snapshot in the QuantaStor web interface where the error reported is "Specified storage volume 'volume-name'" has (1) associated snapshots, delete volume failed.". If you see an error like that there's a utility included with QuantaStor that can assist with cleaning up any orphaned snapshots. To use the utility you'll need to login at the console and run some commands.
sudo -i
cd /opt/osnexus/quantastor/bin
zpool list
You'll now see a list of your storage pools like so:
NAME                                      SIZE  ALLOC   FREE    CAP  DEDUP  HEALTH  ALTROOT
qs-ead0438e-3938-cabc-a389-39059aae3acb   195G  2.55G   192G     1%  1.00x  ONLINE  -
Next you'll run the qs_zfscleanupsnaps.py command with the --noop argument so that it doesn't take any action to delete anything, it just scans for orphan snapshots.
./qs_zfscleanupsnaps.py --noop --source=qs-ead0438e-3938-cabc-a389-39059aae3acb
Here's what the output looks like, and you can see that these snapshots it would skip over because they're not orphaned.
would skip: qs-ead0438e-3938-cabc-a389-39059aae3acb/7e2f5a53-d29b-8361-81de-06a18b9b5835@tvolsnap-51b9fdfa_GMT20131211_150150
would skip: qs-ead0438e-3938-cabc-a389-39059aae3acb/bd43ad80-9078-4aaa-1711-ddf93b6807e7@tvolsnap-4da68e77_GMT20131211_160156
would skip: qs-ead0438e-3938-cabc-a389-39059aae3acb/bd43ad80-9078-4aaa-1711-ddf93b6807e7@tvolsnap-9e84f64f_GMT20131211_140207
would skip: qs-ead0438e-3938-cabc-a389-39059aae3acb/7e2f5a53-d29b-8361-81de-06a18b9b5835@tvolsnap-482fa47d_GMT20131211_140220
would skip: qs-ead0438e-3938-cabc-a389-39059aae3acb/ba63ba13-8102-bbe3-6a99-3a489ec8842e@tvolsnap-564adeda_GMT20131211_150135
would skip: qs-ead0438e-3938-cabc-a389-39059aae3acb/7e2f5a53-d29b-8361-81de-06a18b9b5835@tvolsnap-4813e7d4_GMT20131211_160140
would skip: qs-ead0438e-3938-cabc-a389-39059aae3acb/9490b816-0b51-3f9f-3210-0d1b965acdbf@tvolsnap-f155aad8_GMT20131211_160202
would skip: qs-ead0438e-3938-cabc-a389-39059aae3acb/ba63ba13-8102-bbe3-6a99-3a489ec8842e@tvolsnap-133cde1f_GMT20131211_170145
would skip: qs-ead0438e-3938-cabc-a389-39059aae3acb/9490b816-0b51-3f9f-3210-0d1b965acdbf@tvolsnap-60c9867a_GMT20131211_170156
would skip: qs-ead0438e-3938-cabc-a389-39059aae3acb/7e2f5a53-d29b-8361-81de-06a18b9b5835@tvolsnap-c06e10c9_GMT20131211_170151
would skip: qs-ead0438e-3938-cabc-a389-39059aae3acb/bd43ad80-9078-4aaa-1711-ddf93b6807e7@tvolsnap-56bbd7ac_GMT20131211_150142
would skip: qs-ead0438e-3938-cabc-a389-39059aae3acb/9490b816-0b51-3f9f-3210-0d1b965acdbf@tvolsnap-b0958a43_GMT20131211_150156
would skip: qs-ead0438e-3938-cabc-a389-39059aae3acb/ba63ba13-8102-bbe3-6a99-3a489ec8842e@tvolsnap-bca6201b_GMT20131211_160134
would skip: qs-ead0438e-3938-cabc-a389-39059aae3acb/bd43ad80-9078-4aaa-1711-ddf93b6807e7@tvolsnap-e9a385a0_GMT20131211_170202
would skip: qs-ead0438e-3938-cabc-a389-39059aae3acb/9490b816-0b51-3f9f-3210-0d1b965acdbf@tvolsnap-0334882d_GMT20131211_140213
would skip: qs-ead0438e-3938-cabc-a389-39059aae3acb/ba63ba13-8102-bbe3-6a99-3a489ec8842e@tvolsnap-82976dca_GMT20131211_140200
From the output above you can see that this pool has no orphaned snapshots. Running the command again without the --noop argument gives this output:
root@hat103:/opt/osnexus/quantastor/bin# ./qs_zfscleanupsnaps.py --source=qs-ead0438e-3938-cabc-a389-39059aae3acb
skipping: qs-ead0438e-3938-cabc-a389-39059aae3acb/7e2f5a53-d29b-8361-81de-06a18b9b5835@tvolsnap-51b9fdfa_GMT20131211_150150
skipping: qs-ead0438e-3938-cabc-a389-39059aae3acb/bd43ad80-9078-4aaa-1711-ddf93b6807e7@tvolsnap-4da68e77_GMT20131211_160156
skipping: qs-ead0438e-3938-cabc-a389-39059aae3acb/bd43ad80-9078-4aaa-1711-ddf93b6807e7@tvolsnap-9e84f64f_GMT20131211_140207
skipping: qs-ead0438e-3938-cabc-a389-39059aae3acb/7e2f5a53-d29b-8361-81de-06a18b9b5835@tvolsnap-482fa47d_GMT20131211_140220
skipping: qs-ead0438e-3938-cabc-a389-39059aae3acb/ba63ba13-8102-bbe3-6a99-3a489ec8842e@tvolsnap-564adeda_GMT20131211_150135
skipping: qs-ead0438e-3938-cabc-a389-39059aae3acb/7e2f5a53-d29b-8361-81de-06a18b9b5835@tvolsnap-4813e7d4_GMT20131211_160140
skipping: qs-ead0438e-3938-cabc-a389-39059aae3acb/9490b816-0b51-3f9f-3210-0d1b965acdbf@tvolsnap-f155aad8_GMT20131211_160202
skipping: qs-ead0438e-3938-cabc-a389-39059aae3acb/ba63ba13-8102-bbe3-6a99-3a489ec8842e@tvolsnap-133cde1f_GMT20131211_170145
skipping: qs-ead0438e-3938-cabc-a389-39059aae3acb/9490b816-0b51-3f9f-3210-0d1b965acdbf@tvolsnap-60c9867a_GMT20131211_170156
skipping: qs-ead0438e-3938-cabc-a389-39059aae3acb/7e2f5a53-d29b-8361-81de-06a18b9b5835@tvolsnap-c06e10c9_GMT20131211_170151
skipping: qs-ead0438e-3938-cabc-a389-39059aae3acb/bd43ad80-9078-4aaa-1711-ddf93b6807e7@tvolsnap-56bbd7ac_GMT20131211_150142
skipping: qs-ead0438e-3938-cabc-a389-39059aae3acb/9490b816-0b51-3f9f-3210-0d1b965acdbf@tvolsnap-b0958a43_GMT20131211_150156
skipping: qs-ead0438e-3938-cabc-a389-39059aae3acb/ba63ba13-8102-bbe3-6a99-3a489ec8842e@tvolsnap-bca6201b_GMT20131211_160134
skipping: qs-ead0438e-3938-cabc-a389-39059aae3acb/bd43ad80-9078-4aaa-1711-ddf93b6807e7@tvolsnap-e9a385a0_GMT20131211_170202
skipping: qs-ead0438e-3938-cabc-a389-39059aae3acb/9490b816-0b51-3f9f-3210-0d1b965acdbf@tvolsnap-0334882d_GMT20131211_140213
skipping: qs-ead0438e-3938-cabc-a389-39059aae3acb/ba63ba13-8102-bbe3-6a99-3a489ec8842e@tvolsnap-82976dca_GMT20131211_140200
If there was an orphaned snapshot the script would have cleaned it up automatically. If you don't want to use the script to remove an orphaned snapshot you can manually remove it using the 'zfs destroy' command like so:
zfs destroy qs-ead0438e-3938-cabc-a389-39059aae3acb/ba63ba13-8102-bbe3-6a99-3a489ec8842e@tvolsnap-82976dca_GMT20131211_140200
NOTE: Be careful with the 'zfs destroy' command. If used with the -R flag it will recursively destroy all dependents of the snapshot.
Fixing ZFS bad sectors / ZVOL checksum repair process
QuantaStor comes with a special tool for repairing ZVOLs which have bad checksums. If you have a ZFS RAIDZ or RAID10 pool then the filesystem will do automatic repairs during read/write operations so you generally don't need to do anything to repair bit-rot, it's automatic. However, if you have a pool with no ZFS RAID VDEV's that provide Data Redundancy(common when layering over hardware RAID) then the Storage Pool will be unable to automatically make repairs when the filesystem detects a block with a bad checksum. At that point you have a few options:
- Recover the entire the Storage Pool from backups
- Recover just the effected Storage Volume (ZVOL) from backup and then delete the bad one after you've verified the recovered copy
- Attempt to repair the Storage Volume (ZVOL) in place using the zvolutil to correct the bad blocks by overwriting bad blocks (formatting them) with zeros which in turn repairs the ZFS checksum so you can continue using your ZVOL.
If you use the zvolutil repair you must do a file-system check on any filesystems contained within the ZVOL (which may be multiple if there are many guest VMs contained within the ZVOL), so that you can detect and address any downstream files which may have been damaged. The granularity at which zvolutil does repairs is at the 4K block level (which is currently the smallest possible chunk that can be read/written). So if you have a single 4K bad block then that is the only block that will be effected by the repair.
Here's the usage documentation for the tool which is output when you run on the tool with no arguments:
OS NEXUS zvolutil 3.8.2.5389

        zvolutil provides a means of clearing bad sectors in a ZVOL due to bit-rot.
        Bad sectors can occur in RAID0 ZPOOLs which in turn cause I/O errors when the bad
        block resides within a ZVOL and is accessed.  The way zvolutil repairs bad sectors
        is by overwriting them with zeros.  After you repair one or more zvols
        you should run 'zpool scrub' to verify that no errors remain, then use 'zpool clear'
        to clear the pool status. After that you *must* run a filesystem check on any
        downstream guest filesystems contained within the ZVOL to attempt to detect
        which files or filesystems, if any, have been corrupted / effected by bit-rot.


        !WARNING!: This tool does not recover data, it simply repairs ZVOL checksums
        so you can continue using it. You may still need to recover data from backups.


 Usage:
        zvolutil scan dev=/dev/zd0
               : Scan does a non-destructive scan of a given device and
               : prints a '.' for good blocks and a 'e' for bad blocks.

        zvolutil repair dev=/dev/zd0
               : Repair is a scan where each 4K bad sector is overwritten
               : with zeros which in turn updates the ZFS checksum for the block.
               : 'r' indicate repair, good sectors are '.', failed repair is an 'x'
To identify which volume block device correlates with the one you're getting I/O errors on you'll need to run this command:
sudo -i
zfs get "quantastor:volname" -o name,value
If the name of your volume is for example 'lvol_chkpnt' you'll see a line like this:
qs-3bcd4d9d-9b17-7526-395a-a9c6434888fa/02075047-cb6f-7e1c-3bc1-923b870e768d lvol_chkpnt
Now you can get the zvolume device path by specifying the ID like so:
ls -la /dev/zvol/qs-3bcd4d9d-9b17-7526-395a-a9c6434888fa/02075047-cb6f-7e1c-3bc1-923b870e768d
lrwxrwxrwx 1 root root 11 Dec 10 20:06 /dev/zvol/qs-3bcd4d9d-9b17-7526-395a-a9c6434888fa/02075047-cb6f-7e1c-3bc1-923b870e768d -> ../../zd320
Here we can see that the zvolume device for our Storage Volume is zd320 so that's what we'll do the repair on. You can immediately run a repair, but it's always good to start with a non destructive scan like so:
sudo -i
zvolutil scan /dev/zd320
If the scan completes without errors then there are no errors on that volume. If you see a number of 'E' or 'e's in the scan then there are errors that need to be repaired. You can do this by running the tool again with 'repair' like so:
sudo -i
zvolutil repair /dev/zd320
After you are done with your repairs you should run a scrub on the pool and then clear the ZFS pool status if none are reported like so:
sudo -i
zpool scrub qs-3bcd4d9d-9b17-7526-395a-a9c6434888fa
zpool status qs-3bcd4d9d-9b17-7526-395a-a9c6434888fa -v
zpool clear qs-3bcd4d9d-9b17-7526-395a-a9c6434888fa
Here is an example of what the scan output looks like:
zvolutil scan dev=/dev/zd288

STARTING: Scanning device '/dev/zd288' using block size '4096'
INITIATING SCAN
EEEEEEEEEEEEEEEEEEEEEEEEEEEEEEEE,,,,,,,,,,,,,,,,,,,,,,,,,,,,,,,,,,,,,,,,,,,,,,,,,,,,,,,,,,,,,,,,,,,,,,,,,,,,
,,,,,,,,,,,,,,,,,,,,,,,,,,,,,,,,,,,,,,,,,,,,,,,,,,,,,,,,,,,,,,,,,,,,,,,,,,,,,,,,,,,,,,,,,,,,,,,,,,,,,,,,,,,,
,,,,,,,,,,,,,,,,,,,,,,,,,,,,,,,,,,,,,,,,..........1GB..........2GB..........3GB..........4GB...........5GB..
........6GB..........7GB..........8GB...........9GB..........10GB..........11GB..........12GB...........13GB
..........14GB..........15GB..........16GB...........17GB..........18GB..........19GB..........20GB.........
..21GB[EOF]
COMPLETED: Scan found '32' errors, repaired '0' blocks in 21504MB
Grid Formation Troubleshooting
Remote storage system and local system have the same storage systems IDs
If you run into an error like "Remote storage system and local system have the same storage systems IDs" this is because you have two systems with the same storage system ID. To correct this you just need to create a file '/etc/qs_reset_ids' and then restart the QuantaStor service.
sudo -i
service quantastor stop
touch /etc/qs_reset_ids
service quantastor start
This will reset the storage system ID for the local system. Note that your license key is tied to the storage system ID so resetting the storage system ID will require that you reactivate the license or get a new one.
Note also that qs_reset_ids will generate a new storage system ID and a new gluster ID for the system. If you want to generate a new ID for just the system you can use 'touch /etc/qs_reset_sysid' or to just reset the gluster ID you can use 'touch /etc/qs_reset_glusterid'. Generally speaking though you'll want to use /etc/qs_reset_ids because if you have a conflict of IDs with one you'll almost certainly have a collision with the other and /etc/qs_reset_ids will fix both.
QuantaStor System ID changed
When a Storage System ID is changed on a QuantaStor due to a re-install of the OS or the use of the 'qs-util resetids' command, it will present out the Storage Volumes on it's Storage Pool with that new Storage System ID. This will cause some clients to believe it is a new Storage System. When this happens, hypervisors like VMware will mark their Datastores with an all paths down state which will require some manual steps inside of VMware to re-import the datastore and any VM's stored on that datastore. Procedures vary across hypervisors, please consult the documentation for your specific hypervisor platform.
NOTE: If the re-installation was due to a bare metal upgrade from ISO media, you can use the 'Recovery Manager' in the web management interface to recover the old configuration database which is automatically backed up on all storage pools every hour. After recovering a prior database you will need to reboot the system.
Steps for re-importing your VMware DataStore
The following sections will guide you through the process of re-importing a VMware datastore that has a different Storage Volume ID on it. This procedure is necessary if you're importing a remote-replica of a Storage Volume or you have reset the system IDs on a system such that VMware now no longer recognizes the storage volumes as the originals.
Import the VMware DataStore with a new Signature
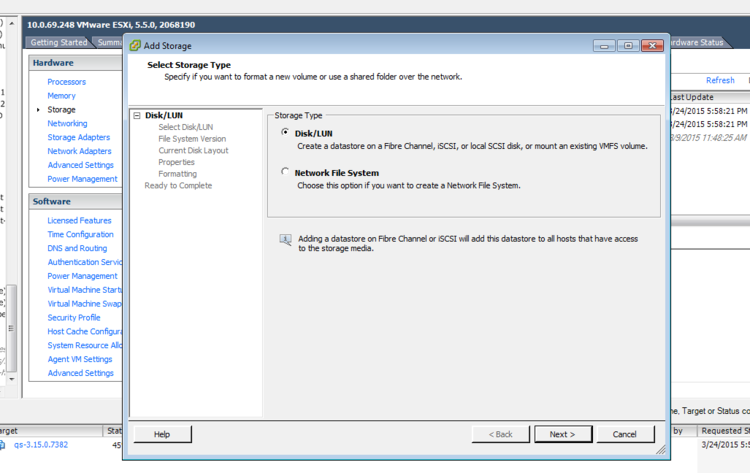
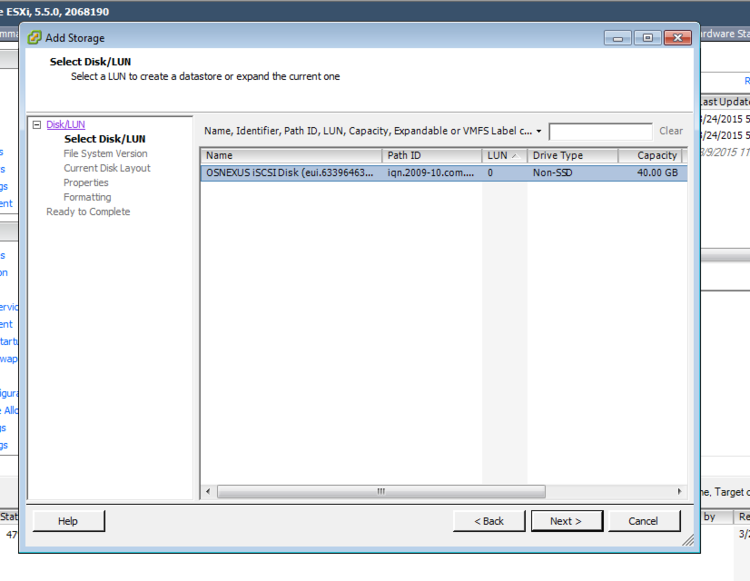
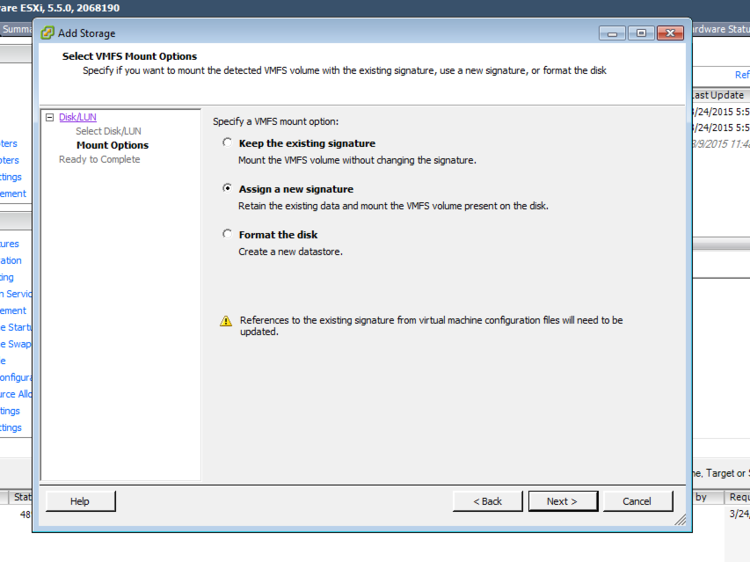
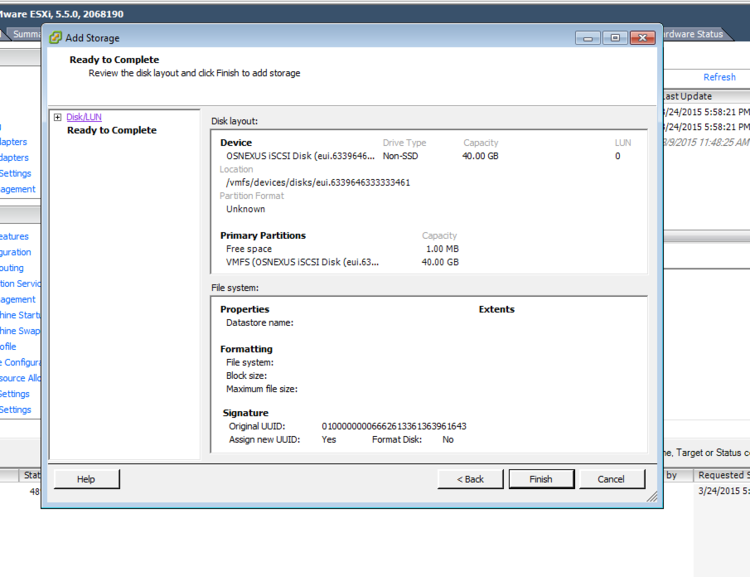
Use the Add Storage Wizard in the Storage section of VMware vSphere to add the LUN and DataStore back into VMware with a new Signature. The key steps in the Add Storage Wizard is detailed in the below screenshots.
Remove inaccessible VM's and rename the Datastore back to it's original name
To be able to rename the Datastore back to it's original name, you will need to remove any inaccessible VM's from inventory that referenced the original datastore name. e.g. in the screenshot below, there are VM's listed as inaccessible that referenced the original datastore.
Once the last of the referencing VM's have been removed from inventory, the old datastore that has an inactive status will no automatically be de-listed by VMware from the list of Datastores.
You can then rename the imported datastore back to the original name as shown in the below screenshots.
Browse Datastore and re-import VM's
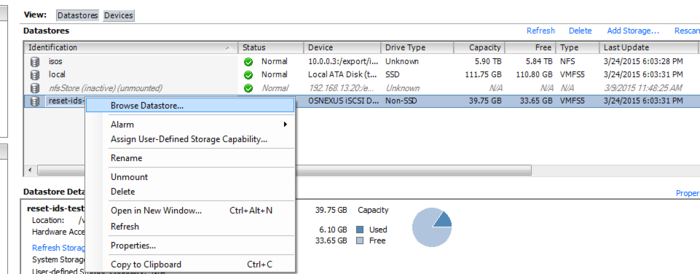
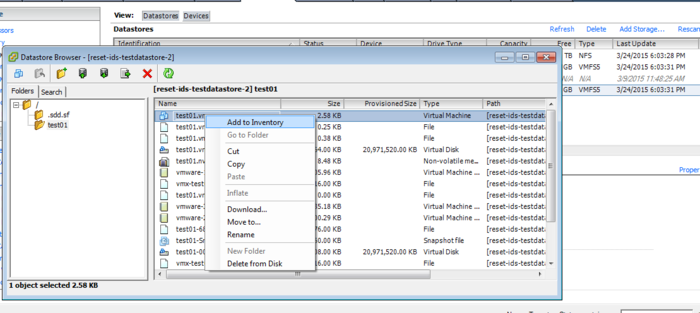
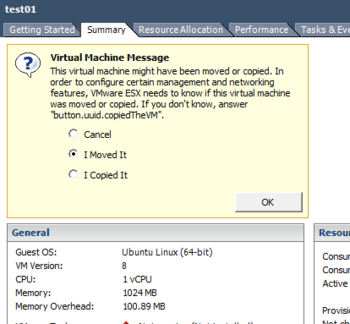
Now that the Datastore is available, you can browse the Datastore and add all of the VM's back to the VMware inventory with the 'Add to Inventory' option. You will need to ensure that when powering the VM's up, that you tell VMware that they were 'Moved'. This is detailed in further detail in the screenshots below.
Firewall configuration
For two QuantaStor systems to communicate in a grid you'll need to open up tcp ports 5151 and 5152. Without those open nodes cannot communicate with each other to exchange metadata. For replication of volumes and network shares between nodes you'll also need to open up port 22 but you've probably already opened that in order to get ssh access to the systems.
Audit Logging
The QuantaStor management services audit logs are located at /var/log/qs_audit.log.
You can view and search them using standard less, more and grep linux utilities while logged onto a QuantaStor unit.
The qs_audit.log file is also included in every QuantaStor log report, so you can grab a log report from the system using qs-sendlogs and instead of uploading the .tar.gz file, you can copy it to a workstation and then extract and review the files using your preferred text editor.
Each line of the audit log represents a single task and it's status that the QuantaStor is processing. every action in QuantaStor is handled by the task manager.
The structure is outlined below:
TIMESTAMP,TASK-ID,[ORIGIN(LOCAL or REMOTE)],TASK_STATE(COMPLETE, FAILED, QUEUED or RUNNING),PROGRESS(1-100%),OPERATION(create, delete, etc.),TYPE,ACTION,DESCRIPTION,CLIENT_IP_ADDRESS,USERNAME/QUANTASTOR_USER_ID
e.g. below:
Fri Mar  6 19:11:16 2015,1d6164cf-e113-8ee5-3b1b-41c0bf5fe09c,[LOCAL],COMPLETE,100%,modify,StorageVolumeAcl,Assign Storage Volumes,"Updating access to storage volumes 'datastore-1' for host  'esxi-test'.",127.0.0.1,admin/437bb0da-549e-6619-ea0e-a91e05e6befb
Fri Mar  6 19:11:16 2015,88ecf9e5-9ed6-c048-e740-4f086020b26d,[REMOTE/1fc8f3ca-9f7f-77b5-36d2-3e6221732f9a],COMPLETE,100%,modify,StorageVolumeAcl,Assign Storage Volumes,"Updating access to storage volumes 'datastore-1' for host  'esxi-test'.",10.0.12.5,admin/437bb0da-549e-6619-ea0e-a91e05e6befb
Much of this information is also available in the properties of a task in the task list view for recent actions in the WebUI.
