+ Admin Guide Overview: Difference between revisions
| Line 730: | Line 730: | ||
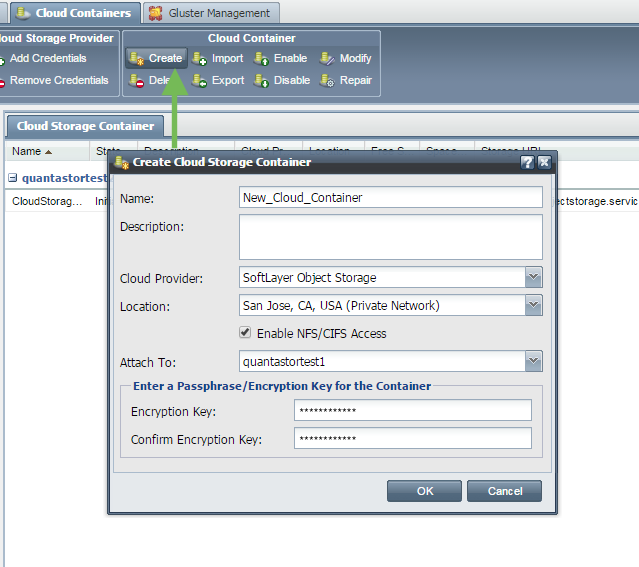
Permanently deleting a Cloud Container, it's objects and it's bucket in the Object Storage: [[Delete_Cloud_Storage_Container|Delete Cloud Container]] | Permanently deleting a Cloud Container, it's objects and it's bucket in the Object Storage: [[Delete_Cloud_Storage_Container|Delete Cloud Container]] | ||
=== Cloud Provider Support === | |||
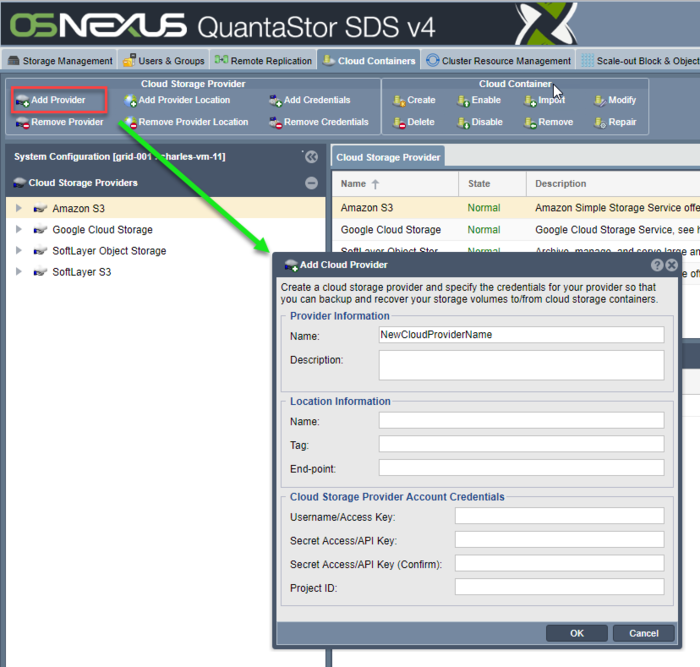
QuantaStor has support for most major public cloud object storage vendors including Amazon AWS S3, IBM Cloud Object Storage (S3 & SWIFT), Microsoft Azure Blob and others. The sections below outline the configuration steps required to create authentication keys required to make an object storage "bucket" available as NAS storage within QuantaStor. | |||
[[Dropbox_Provider|Dropbox Configuration Steps]] | |||
[[Azure_Blob_Provider|Azure Configuration Steps]] | |||
== Backup Policy Management == | == Backup Policy Management == | ||
Revision as of 22:13, 12 December 2018
The QuantaStor Administrators Guide is intended for all administrators and cloud users who plan to manage their storage using QuantaStor Manager as well as for those just looking to get a deeper understanding of how the QuantaStor Storage System Platform (SSP) works.
The QuantaStor web management interface enables IT administrators to manage all their QuantaStor systems via a single-pane-of-glass. What's unique about QuantaStor's web interface is that it is storage grid based and built into every system/appliance so there's no extra software to install. The grid technology and architecture of QuantaStor enables the web (and REST/CLI) management interface for the grid to be available and accessible via all appliances at the same time and by multiple users. No additional software is required, simply connect to any IP address of any appliance within the grid via HTTPS to connect and manage the storage. Storage grid technology enables management of QuantaStor appliances across sites thereby reducing cost of managing, maintaining, and automating multi-site storage configurations, aka, storage grids.
Tab Sections
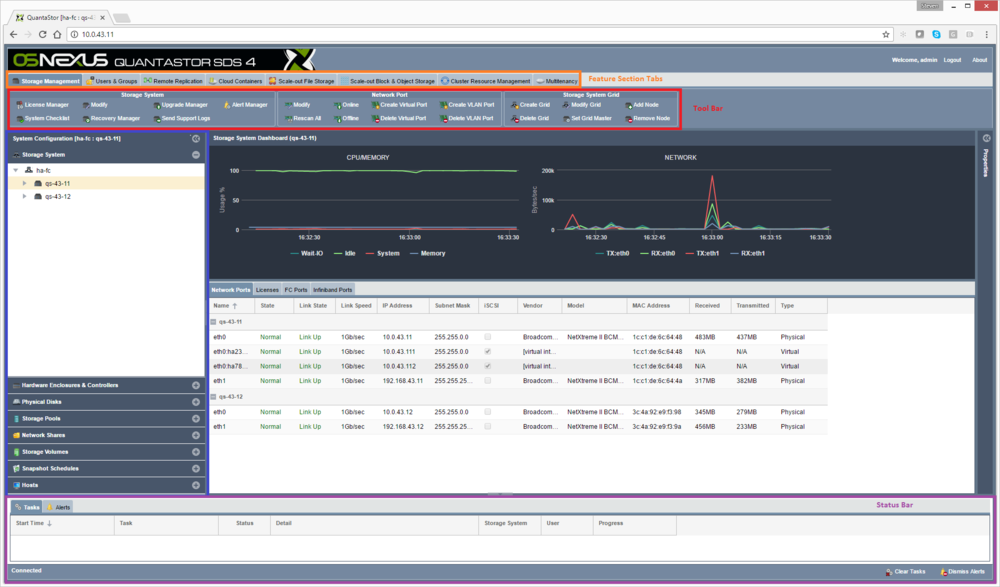
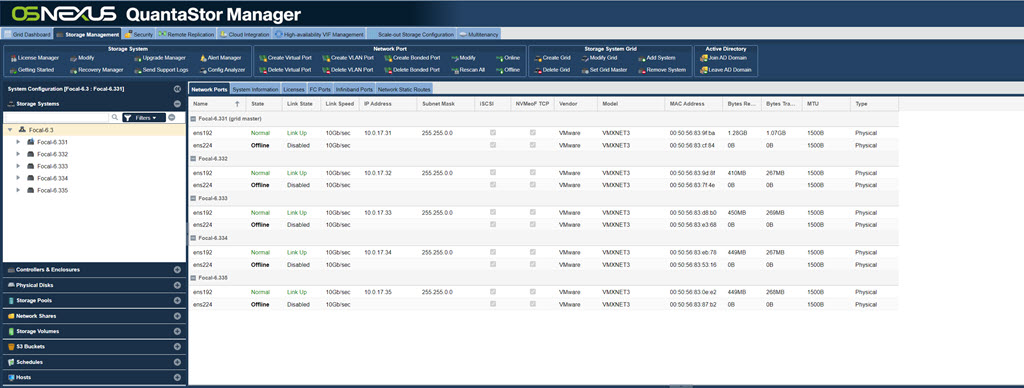
When you initially connect to QuantaStor manager you will see the feature management tabs across the top of the screen (shown in the orange box in the diagram below) including tabs named Storage Management, Users & Groups, Remote Replication, etc. These main tabs divide up the user interface into functional sections. The most common activities are provisioning file storage (NAS) in the Network Shares section and provisioning block storage (SAN) in the Storage Volumes section. The most common management and configuration tasks are all accessible from the toolbars and pop-up menus (right-click) in the Storage Management tab.
Ribbon/Toolbar Section
The toolbar (aka ribbon bar, shown in the red box) is just below the features management tab with group sections including Storage System, Network Port, Storage System Grid, etc. The toolbar section is dynamic so as you select different tabs or different sections in the tree stack area the toolbar will automatically change to display relevant options to that area.
Main Tree Stack
The tree stack panel appears on the left side of the screen (shown in the blue box in the screenshot/diagram below) and shows elements of the system in a tree hierarchy. All elements in the tree have menus associated with them that are accessible by right-clicking on the element in the tree.
Center Dashboards & Tables/Grids
The center of the screen typically shows lists of elements based on the selected tree stack section that is active. This area also often has a dashboard to show information about the selected item be it a storage pool, storage system or other element of the system.
100% Native HTML5/JS with Desktop application ease-of use
By selecting different tabs and sections within the web management interface the items in both the toolbar, tree stack panel, and center panel will change to reflect the available options for the selected area. Although the QuantaStor web UI is all browser native HTML5 it has many of the ease-of-use features one would find in a desktop application. Most notably, one can right-click on most items within the web user interface to access context specific pop-up menus. This includes right-clicking on tree items, the tree stack headers, and items in the center grid/table views.
Storage System & Grid Management
License Management
QuantaStor has two different types of license keys, 'System' licenses and 'Support' licenses. The 'System' license controls the feature set and capacity limits where Enterprise and Trial Edition licenses have all features enabled and Community Edition licenses impose some feature limits. Active QuantaStor license subscriptions are transferable to new hardware and licenses with 3+ year term are non-expireing. Trial Edition licenses are fully featured like Enterprise Edition but are time limited. To replace an old license key simply add a new license key and it will replace the old one automatically.
Recovery Manager
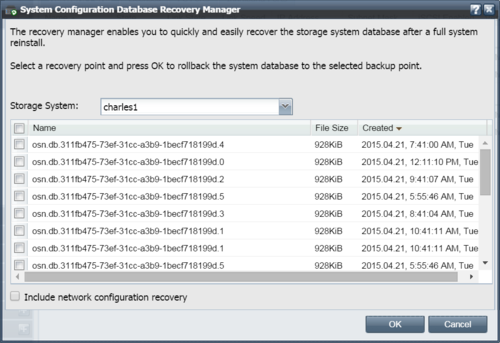
The 'Recovery Manager' is accessible from the ribbon-bar at the top of the screen and is used to recover the internal configuration database from a backup. This is useful to do if one reinstalls the QuantaStor operating system and need to recover all the previous configuration data for Storage Volumes, Network Shares, Users, Hosts, etc. In grid configurations the Recovery Manager is less important as the configuration data is replicated across all nodes.
To use the 'Recovery Manager' select it then select the database you want to recover and press OK. The internal databases are backed up onto all the storage pools hourly so the list of available databases is taken from those discovered on the started Storage Pools. If you choose the 'network configuration recovery' option it will also recover the network configuration.
Be careful with IP address changes as it is possible to change settings such that your current connection to QuantaStor is dropped when the IP address changes. In some cases you will need to use the console to make adjustments if all network ports are inaccessible due to no configuration or mis-configuration. Newly installed QuantaStor units default to using DHCP on eth0 so as to facilitate initial access to the system so that static IPs can then be assigned. Also use caution when recovering an internal DB which may be a backup from another appliance as that could lead to having two appliances with the same unique ID (UUID). If you're having trouble or have questions we recommend contacting support (support@osnexus.com) for assistance in restoring an internal DB.
Upgrade Manager
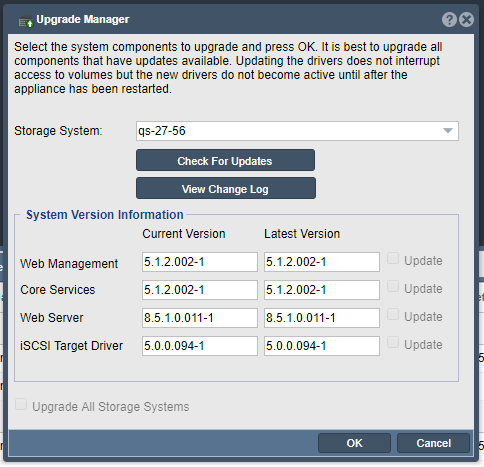
The Upgrade Manager handles the process of upgrading your system to the next available minor release version. Note that Upgrade Manager does not handle upgrading major versions, for that one must login to the console and run 'qs-upgrade'. The Upgrade Manager displays available versions for the four key packages including the QuantaStor core services, QuantaStor web manager, QuantaStor web server, and QuantaStor drivers. You can upgrade any of the packages at any time and it will not block file, block, or object storage access to your appliances. Note though that upgrades of the driver package will require a reboot to activate the new drivers. When rebooting any HA pools active on the system being restarted will automatically fail-over to it's associated cluster pair system. It is recommended that one manually fail-over pools to the paired system before rebooting as that'll make the fail-over a few seconds faster.
Note also that one should always upgrade all packages together, never upgrade just the manager or service package as this may cause problems when you trying to login to the QuantaStor web management interface. On rare occasions one may run into problems upgrading, if so please review the troubleshooting section here: Troublshooting Upgrade Issues
Getting Started
The 'Getting Started' button aka 'Workflow Manager' will appear automatically when you login and there are no license keys within the storage grid or appliance. Once a license has been added the Getting Started dialog is available by selecting it from the Storage System ribbon-bar. As the name implies, it provides step-by-step instructions for common operations including provisioning storage and which covers basic elements like modifying network settings and such to help new admins get acquainted with QuantaStor.
System Hostname & DNS management
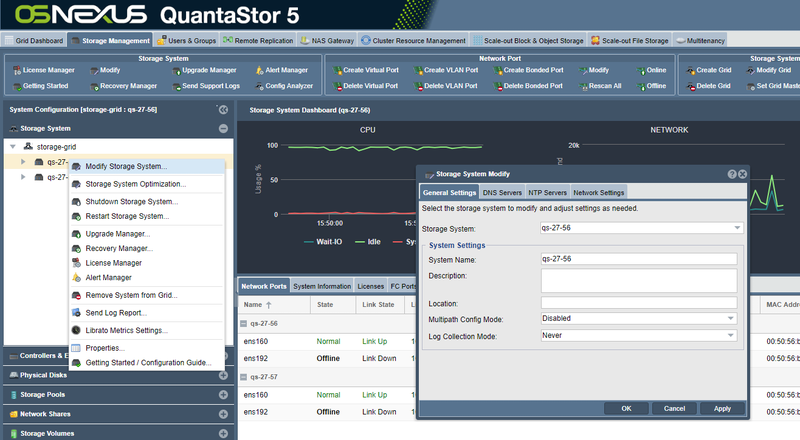
To change the name of your system you can simply right-click on the storage system in the tree stack on the left side of the screen and then choose 'Modify Storage System'. This will bring up a screen where you can specify your DNS server(s) and change the hostname for your system as well as control other global network settings like the ARP Filtering policy.
Grid Setup Procedure
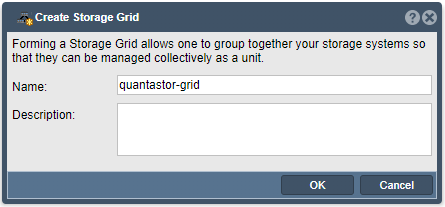
For multi-node deployments, you should configure the networking on a per-system basis before creating the Grid, as it makes the process faster and simpler. Assuming the network ports are configured with unique static IPs for each system (aka node), press the Create Grid button in the Storage System Grid tool bar to create an initial grid of one server. You may also create the management grid by right-clicking on the "Storage System" icon in the tree view and choosing Create Storage Grid....
This first system will be designated as the initial primary/master node for the Grid. The primary system has an additional role, in that it acts as a conduit for intercommunication of Grid state updates across all nodes within the Grid. This additional role has minimal CPU and memory impact.
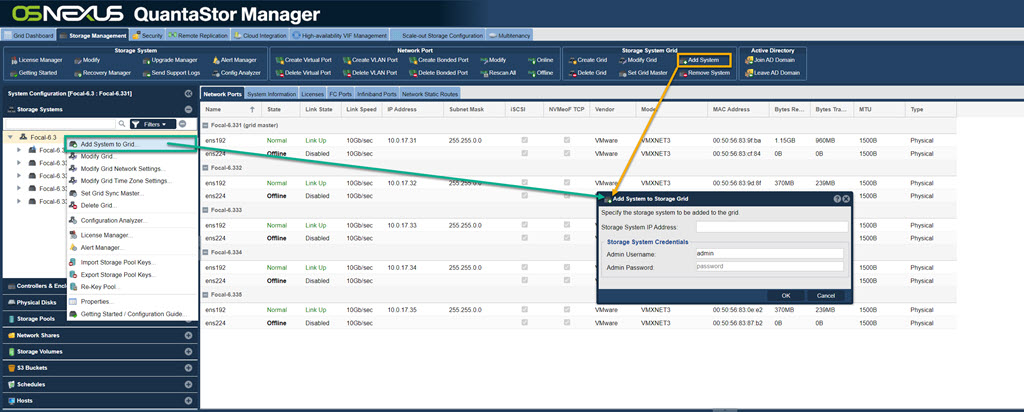
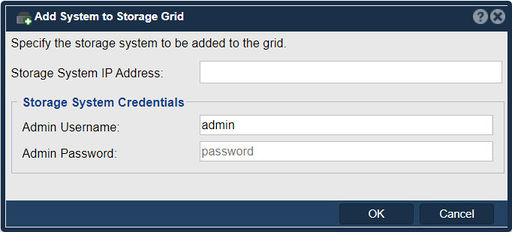
Now that the single-node grid is formed, we can now add all the additional QuantaStor systems using Add System button in the Storage System Grid toolbar to add them one-by-one to the Grid. You can also right-click on the Storage Grid, and choose Add System to Grid... from the menu to add additional node.
You will be required to enter the IP address and password for the QuantaStor systems to be added to the Grid, and once they are all added, you will be able to manage all nodes from a single server via a web browser.
Once completed, all QuantaStor systems in the Grid can be managed as a unit (single pane of glass), by logging into any system via a web browser. It is not necessary to connect to the master node, but you may see web management is faster when managing the grid from the master node.
User Access Security Notice
Be aware that the management of user accounts across the systems will be merged including the admin user account. In the event that there are duplicate user accounts, the user accounts in the currently elected primary/master node takes precedence.
Preferred Grid IP
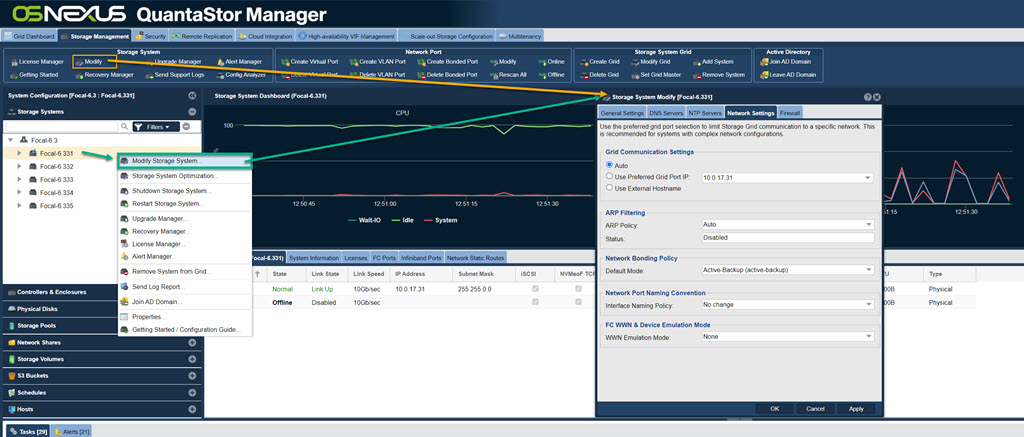
QuantaStor system to system communication typically works itself out automatically. But, it is recommended that you specify the network to be used for system inter-node communication for management operations. This is done by selecting the "Use Preferred Grid Port IP" in the "Network Settings" tab of the "Storage System Modify" dialog by right-clicking on each system in the grid and selecting "Modify Storage System...".
Completed Grid Configuration
At this point the Grid is setup and one will see all the server nodes via the web UI. If you are having problems please double check your network configuration and/or contact OSNEXUS support for assistance.
Network Port Configuration
Network Ports (also referred to as Target Ports and Network Interfaces) represent the Ethernet interfaces through which your appliance is managed and storage is accessed. Client hosts (aka initiators) access SAN storage Storage Volumes (aka targets) via the iSCSI protocol via network ports and NAS file storage which are referred to as Network Shares in QuantaStor are accessible via the NFS and SMB/CIFS protocols via network ports, and finally object storage is accessible via network ports.
Static vs Dynamic (DHCP) Assigned IP Addresses
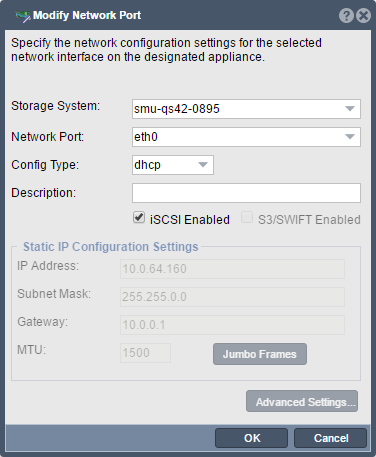
QuantaStor supports both statically assigned IP addresses as well as dynamically assigned (DHCP) addresses. After the initial installation of QuantaStor the eth0 port is typically configured via DHCP with the rest typically disabled. We recommend that one reconfigure all ports with static IP addresses unless the DHCP server is setup to deliver statically assigned addresses via DHCP as identified by MAC address. Network ports setup with DHCP assigned IP addresses run the risk of changing which can lead to outages.
Modifying Network Port Settings
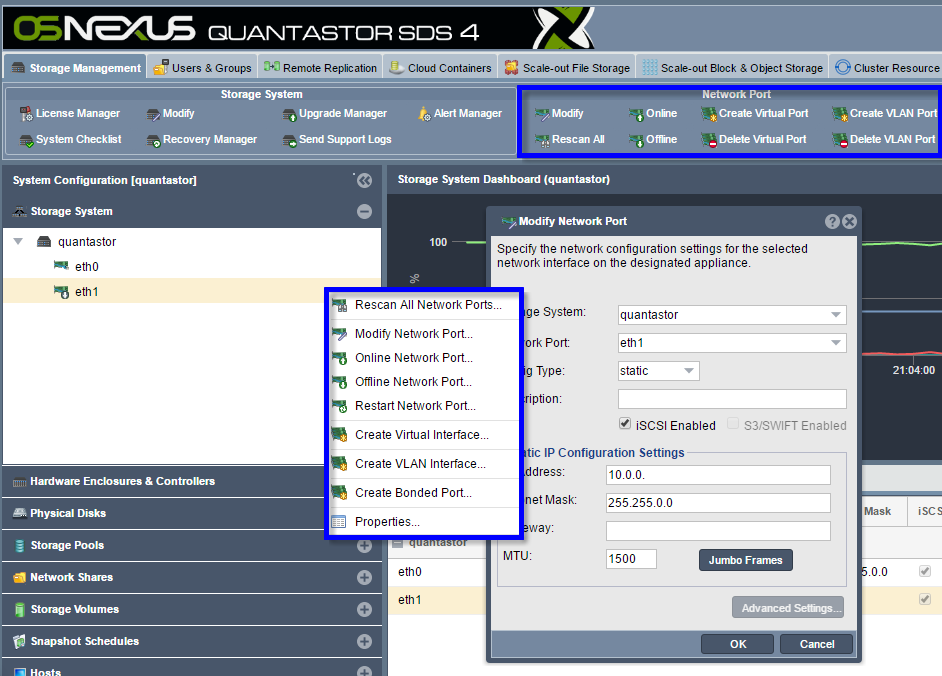
To modify the configuration of a network port first select the Storage System section under the main Storage Management tab then select the Network Ports section center of the screen. This section show the to list of all network ports on each appliance. To modify the configuration of a ports, right-click on it and choose Modify Network Port... from the pop-up menu. Alternatively press the "Modify" button in the toolbar at the top of the screen in the "Network Ports" section.
Once the "Modify Network Port" dialog appears select the static port type and enter the IP address for the port, network mask, and network gateway for the port. The default MTU should be set to 9000 for all 10GbE and faster network interfaces. If the MTU is changed from the default 1500, be sure that the switch and host side MTU configuration settings are setup to match that of the configured MTU of the QuantaStor appliance ports for the matching network.
NIC Bonding / Trunking Configuration
QuantaStor supports NIC bonding, also called trunking, which allows one to combine multiple ports together to improve network performance and network fault-tolerance. For all NIC bonding modes except LACP, make sure that all physical ports which are part of the bond are connected to the same network switch. LACP mode will work across switches but it is important to make sure that the switch ports are configured properly to enable LACP.
QuantaStor uses a round-robin LACP bonding policy by default but the default is easy to change in the Modify Storage System.. dialog. Round-robin mode provides load balancing and fault tolerance by transmitting packets in sequential order from the first available interface through the last but it doesn't span switches. For optimal fault tolerance LACP 802.3ad Dynamic Link aggregation mode is required as it will span switches ensuring network availability to the bonded port in the event of a switch outage.
Note: QuantaStor v4 and newer versions support the selection of bonding mode on a per network bond basis directly through the Web UI. Older systems required some CLI level configuration which is outlined here.
VLAN Configuration
QuantaStor supports the creation of VLAN ports which are simply virtual ports with VLAN tagging and QoS controls. To create a VLAN port simply right-click on a network port and choose the Create VLAN Interface.. option as shown in the pop-up menu shown at the top of this section. VLANs can be created and deleted at anytime and are easily identified as they are named with a period (.) as a delimiter between the parent port name and the VLAN tag number. For example, a VLAN with ID 56 associated with eth1 will have the name eth1.56. VLANs can also be created on bonded ports which yields ports with names like bond0.56.
Virtual Port Configuration
Virtual ports allow one to use a given physical port on multiple networks with multiple IP addresses simultaneously. To create a virtual port on a physical port simply right-click on it and choose Create Virtual Interface.. from the menu. Note that virtual ports (aka virtual interfaces) can only be attached to physical ports or bonded ports and not other virtual ports or VLAN ports. Virtual ports can be created and deleted at anytime.
High-availability Virtual Ports/Interfaces
QuantaStor also has some special virtual ports which are used in High-Availability configurations. You'll see these ports with :ha in the name such as eth0:ha345680. These HA virtual interfaces are associated with specific storage pools and move with the pool when the pool is failed-over to another appliance. Pools can have many VIPs (virtual ports) assigned to them and as more are assigned the last digit of the port name is incremented from 0, 1, 2, 3, 4 and so on.
HA Virtual ports are created by right-clicking on an HA Failover Group in the Storage Pool section and then choosing the Create Virtual Interface.. option. They can also be created via the Cluster Resource Management section. Note also that a cluster heartbeat (aka Site Cluster) must be setup between the appliances used to manage a given HA pool before HA VIFs/VIPs may be created. See more on HA cluster setup in the walk-thru guide found here.
Configuring Network Management Ports
QuantaStor works with all major 10/25/40/56/100GbE network cards (NICs) from Intel, Mellanox, Cisco, Dell, HPE, SuperMicro, and others. We recommend that one designate slower 1GbE ports as iSCSI disabled which will prevent their use by iSCSI initiators and relegate them for use only with management traffic. Similarly, one should have the 1GbE ports on a separate network from the ports used for NAS traffic so that performance is not impacted by the system using the 1GbE ports by mistake.
Physical Disk Management
Identifying physical disks in an enclosure
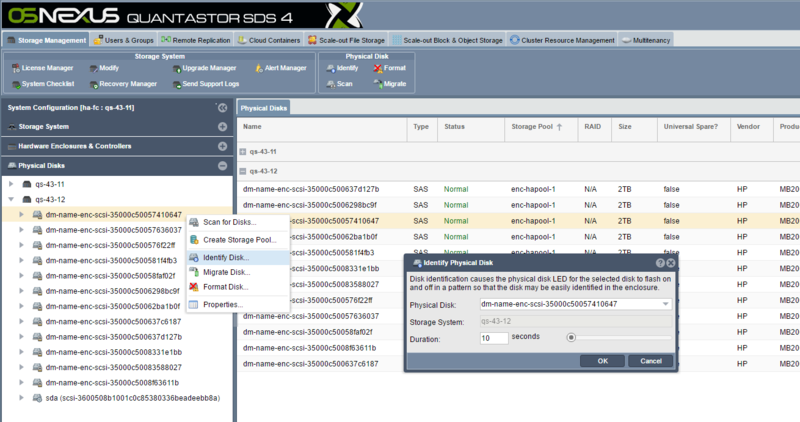
When you right-click on a physical disk you can choose 'Identify' to force the lights on the disk to blink in a pattern which it accomplishes by reading sector 0 on the drive. This is very helpful when trying to identify which disk is which within the chassis. Note that technique doesn't work logical drives exposed by your RAID controller(s) so there is separate 'Identify' option for the hardware disks attached to your RAID controller which you'll find in the 'Hardware Controllers & Enclosures' section.
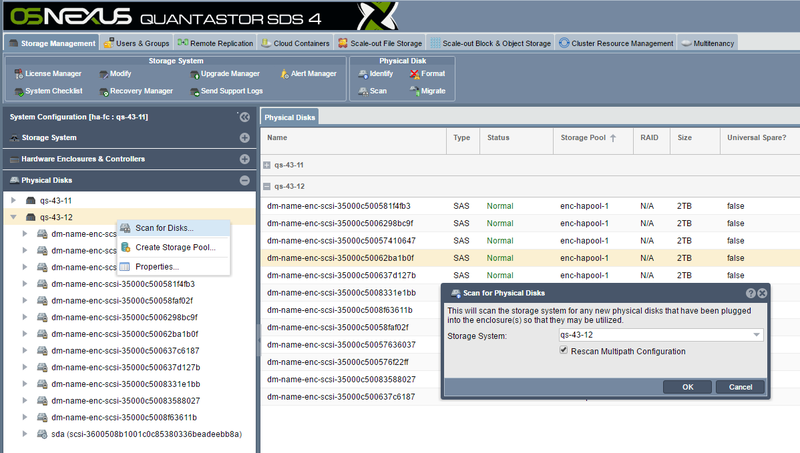
Scanning for physical disks
When new disks have been added to the system you can scan for new disks using the command. To access this command from the QuantaStor Manager web interface simply right-click where it says 'Physical Disks' and then choose scan for disks. Disks are typically named sdb, sdc, sdd, sde, sdf and so on. The 'sd' part just indicates SCSI disk and the letter uniquely identifies the disk within the system. If you've added a new disk or created a new Hardware RAID Unit you'll typically see the new disk arrive and show up automatically but the rescan operation can explicitly re-execute the disk discovery process.
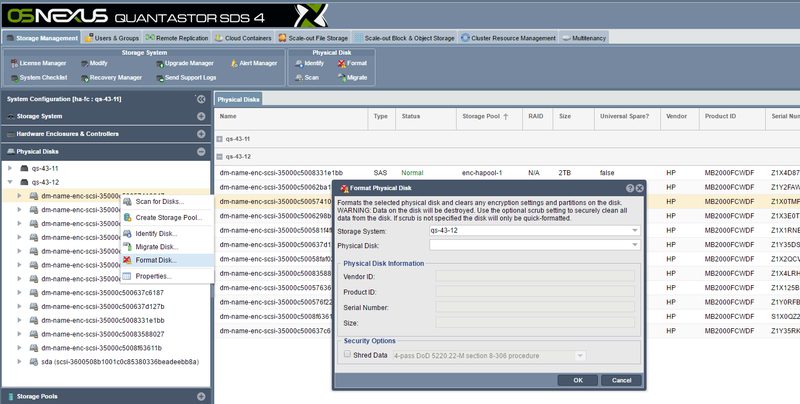
Formatting Disks
Sometimes disks will have partitions or other metadata on them which can prevent their use within QuantaStor for pool creation or other operations. To clear/format a disk simply right-click on the disk and choose Format Disk...
Copying LUNs/Disks from 3rd-Party SANs
Please see the section below on Disk Migration which outlines how to copy a FC/iSCSI attached block device from a 3rd-party SAN directly to a QuantaStor appliance.
Importing disks from an Open-ZFS pool configuration
Please see the section below on importing Storage Pools which includes a section on how to import OpenZFS based storage pools from other systems.
Hardware Controller & Enclosure Management
QuantaStor has custom integration modules for covering all the major HBA and RAID controller card models. QuantaStor provides integrated management and monitoring of your HBA/RAID attached hardware RAID units, disks, enclosures, and controllers. It is also integrated with QuantaStor's alerting / call home system so when a disk failure occurs within a hardware RAID group an alert email/PagerDuty alert is sent automatically no different than if it was a software RAID disk failure or any another alert condition detected by the system.
QuantaStor's hardware integration modules include support for the following HBAs & RAID controllers:
- LSI HBAs (92xx, 93xx, 94xx and all matching OEM derivative models)
- LSI MegaRAID (all models)
- DELL PERC H7xx/H8xx (all models, LSI/Broadcom derivative)
- Intel RAID/SSD RAID (all models, LSI/Broadcom derivative)
- Fujitsu RAID (all models, LSI/Broadcom derivative)
- IBM ServeRAID (all models, LSI/Broadcom derivative)
- Adaptec 5xxx/6xxx/7xxx/8xxx (all models)
- HP SmartArray P4xx/P8xx
- HP HBAs
Note: Special tools available for some models which are helpful for triage of hardware issues which are outlined here.
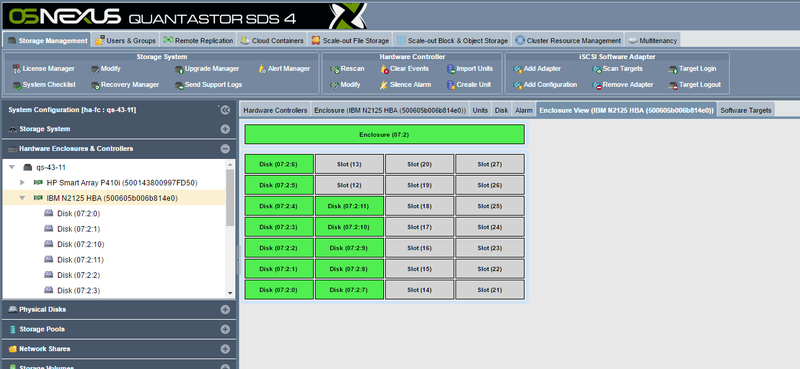
Identifying Devices in the Enclosure View
QuantaStor presents an enclosure view of devices that helps to identify where disks are physically located within a server of external disk enclosure chassis (JBOD). By default QuantaStor assumes a 4x column bottom-to-top left to right ordering of the drive slot numbers which is common to SuperMicro hardware. Most other manufacturers have other slot layout schemes to it is important that one select the proper vendor/model of disk enclosure chassis within the Modify Enclosure.. dialog. One the proper chassis model has been selected the layout within the web UI will automatically update. If the vendor/model of external enclosure is not available and there is no suitable alternative one may add new enclosures layout types via a configuration file, instructions for that can be found here.
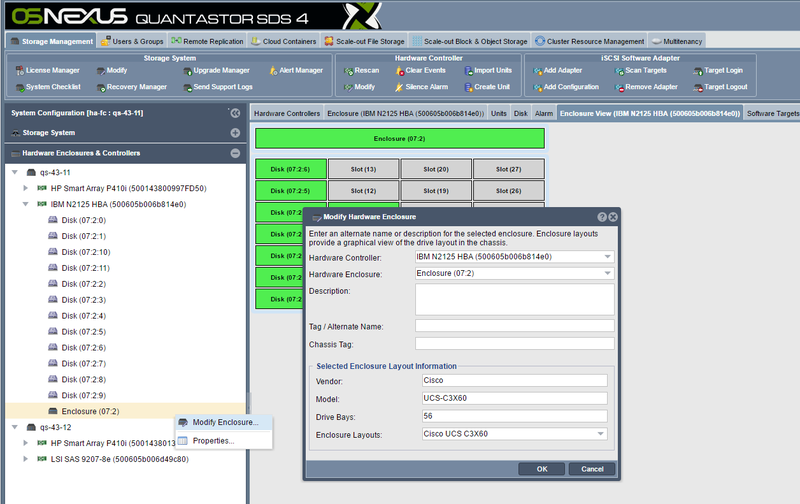
Selecting the Enclosure Vendor/Model
By right-clicking on the enclosure and choosing Modify Enclosure.. one can set the enclosure to a specific vendor/model type so that the layout of the drive slots matches the hardware appropriately.
Hardware RAID Unit Management
QuantaStor has a powerful hardware RAID unit management system integrated into the platform so that one can create, delete, modify, encrypt, manage hot-spares, and manage SSD caching for hardware RAID units via the QuantaStor Web UI, REST API, and CLI commands. OSNEXUS recommends the use of hardware RAID with scale-out object storage configurations and the use of HBAs for scale-up storage pool configurations (ZFS). In all cases, OSNEXUS recommends the use of a hardware RAID controller to manage the boot devices for an appliance. The follow sections cover how to manage controllers and view the enclosure layout of devices within a selected appliance within a QuantaStor storage appliance grid.
Creating Hardware RAID Units
A logical grouping of drives using hardware RAID controller technology is referred to as a hardware RAID unit within QuantaStor. Since management of the controller is fully integrated into QuantaStor one care create RAID units directly through the web UI or via the CLI/REST API. Creation of hardware RAID units is accessible from the Hardware Controllers & Enclosures section in the main Storage Management tab. For more detailed information on how to create a hardware RAID unit please see the web management interface page on hardware RAID unit creation here.
Importing Hardware RAID Units
If a group of devices representing a hardware RAID unit has been added to the system they may not appear automatically. This is because most RAID controllers treat these devices as a foreign configuration that must be explicitly imported to the system. If a system is rebooted with the attached JBOD storage enclosures powered-off this can also lead to a previously imported configuration being identified as a foreign configuration. To resolve these scenarios simply select Import Unit(s) from the Hardware Controllers & Enclosures section of the web management interface. More information on how to import units using the web UI is available here.
Silencing Audible alarms
We recommend that one disable audible alarms on all appliances since the most common deployment scenario is one where the appliance is in a data-center where the alarm will not be heard by the owner of the appliance. If for some reason the audible alarm is turned on one can disable all alarms for a given controller or appliance via the web user interface as outlined here.
Hardware RAID Hot-spare Management
When hardware RAID units are configured for use with storage pools one must indicate hot-spares at the hardware RAID unit level as that is where the automatic repair needs to take place. QuantaStor provides management of hot-spares via the web management interface, CLI and REST API. Simply go to the Hardware Controllers & Enclosures section, then right-click on the disk and choose Mark/Unmark Hot-spare... This will allow one to toggle the hot-spare marker on the device. If a hardware RAID unit is in a degraded state due to one or more failed devices one need only mark one or more devices as hot-spares and the controller will automatically consume the spare and start the rebuild/repair process to restore the affected RAID unit to a fully healthy state. More information on marking/unmarking disks as hot-spares is available here.
FIPS 140-2 Compliant Hardware Encryption Management
QuantaStor integrates with the LSI/Broadcom SafeStore encryption features so that the encryption of data can be pushed to the device/controller layer where FIPS 140-2 compliant SED drives can be leveraged. FDE/SED and FIPS 140-2 variants of both HDD and SSD media are available from various device manufactures and may be used to achieve FIPS 140-2 compliance. QuantaStor provides integration with SafeStore within the Web Management interface which becomes accessible when SafeStore license keys are detected on a given RAID controller. More information on how to setup hardware encryption and information on how to run various license checks on the hardware via the CLI is available here.
Hardware RAID SSD Read/Write Caching
QuantaStor supports the configuration and management of hardware controller SSD caching technology for both Adaptec and LSI/Avago RAID Controllers. QuantaStor automatically detects that these features are enabled on the hardware controllers and presents configuration option within the QuantaStor web management interface to configure caching on a per RAID unit basis.
Hardware SSD caching technologies work by having I/O requests leverage high-performance SSD as a caching layer allowing for large performance improvements in small block IO. SSD caching technology works in tandem with the NVRAM based write back cache technologies. NVRAM cache is typically limited to 1GB-4GB of cache whereas the addition of SSD can boost the size of the cache layer to 1TB or more. The performance boost will depend heavily on the SSD device selected and the application workload. For SSD to be selected to boost write performance, high-endurance SSDs are required with a high (DWPD) of at least 10x or higher and only enterprise grade / data-enter (DC) grade SSDs are certified for use in QuantaStor appliances. Desktop grade SSD lead to unstable performance and possibly serious outages as they are not designed for continuous sustained loads, as such OSNEXUS does not support their use.
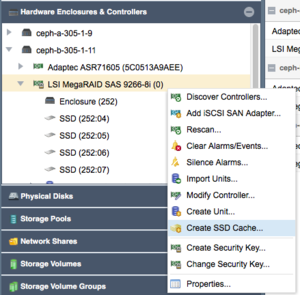
Creating a Hardware SSD Cache Unit
You can create a Hardware SSD Cache Unit for your RAID controller by right clicking on your RAID controller in the Hardware Enclosures and Controllers section of the Web Manager as shown in the below screenshot. If you do not see this option please verify with your Hardware RAID controller manufacturer that the SSD Caching technology offered for your RAID Controller platform is enabled. If you are unsure how to confirm this functionality, please contact OSNEXUS support for assistance.
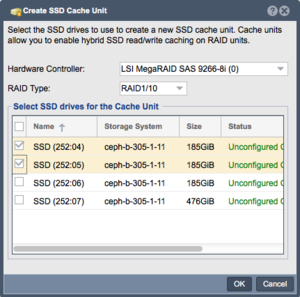
You will now be presented with the Create SSD Cache Unit Dialog:
Please select the SSD's you would like to use for creating your RAID unit. Please note that not all SSD's are supported by the RAID Controller manufacturers for their SSD caching technology. If you cannot create your SSD Cache Unit, please refer to your Hardware RAID Controller manufacturers Hardware Compatibility/Interoperability list.
The SSD Cache Technology from Adaptec and LSI/Avago for their RAID controllers can be configured in one of two ways:
- RAID0 - SSD READ Cache only
- RAID1/10 - Combined SSD READ and WRITE Cache.
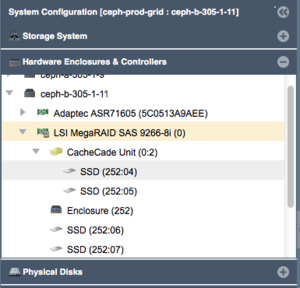
Please choose the option you would like and click the 'OK' button to create the SSD Cache Unit. The SSD Cache Unit will now appear alongside the other Hardware RAID units for your Hardware RAID Controller as shown in the below screenshot:
Enabling the Hardware SSD Cache Unit for your Virtual Drive(s)
Now that you have created your Hardware SSD Cache Unit as detailed above, you can enable it for the specific Virtual Drive(s) you would like to have be cached.
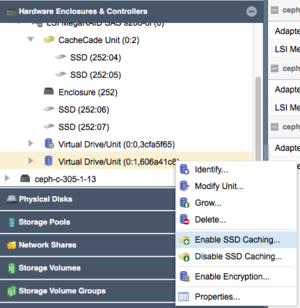
To enable the SSD Cache Unit for a particular Virtual Drive, locate the Virtual Drive in the Hardware Enclosures and Controllers section of the Web Interface and right click and choose the 'Enable SSD Caching' option.
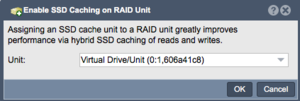
This will open the Enable SSD Caching on RAID Unit dialog where you can confirm your selection and click 'OK'.
The SSD Cache will now be associated with the chosen Virtual Drive, enabling the read or read/write cache function that you specified when creating your SSD Caching RAID Unit.
Storage Pool Management
Storage pools combine or aggregate one or more physical disks (SATA, SAS, or SSD) into a pool of fault tolerant storage. From the storage pool users can provision both SAN/storage volumes (iSCSI/FC targets) and NAS/network shares (CIFS/NFS). Storage pools can be provisioned using using all major RAID types (RAID0/1/10/5/50/6/60/7/70) and in general OSNEXUS recommends RAID10 for the best combination of fault-tolerance and performance. That said, the optimal RAID type depends on the applications and workloads that the storage will be used for. For assistance in selecting the optimal layout we recommend engaging the OSNEXUS SE team to get advice on configuring your system to get the most out of it.
Pool RAID Layout Selection / General Guidelines
We strongly recommend using RAID10 for all virtualization workloads and databases and RAID60 for archive applications that require higher-capacity for applications that produce mostly sequential IO patterns. RAID10 performs very well with sequential IO and random IO patterns but is more expensive since usable capacity before compression is 50% of the raw capacity. With compression the usable capacity may increase to 75% of the raw capacity or higher. For archival storage or other similar workloads RAID60 is best and provides higher utilization with only two drives used for parity/fault tolerance per RAID set (ZFS VDEV). RAID5/50 is not recommended because it is not fault tolerant after a single disk failure.
Creating Storage Pools
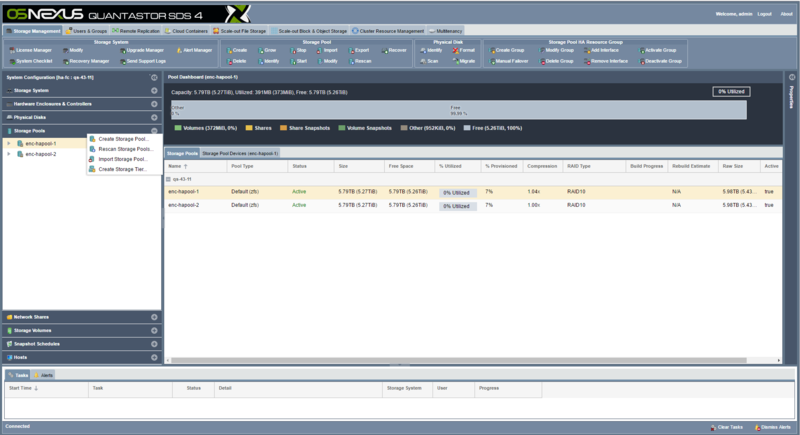
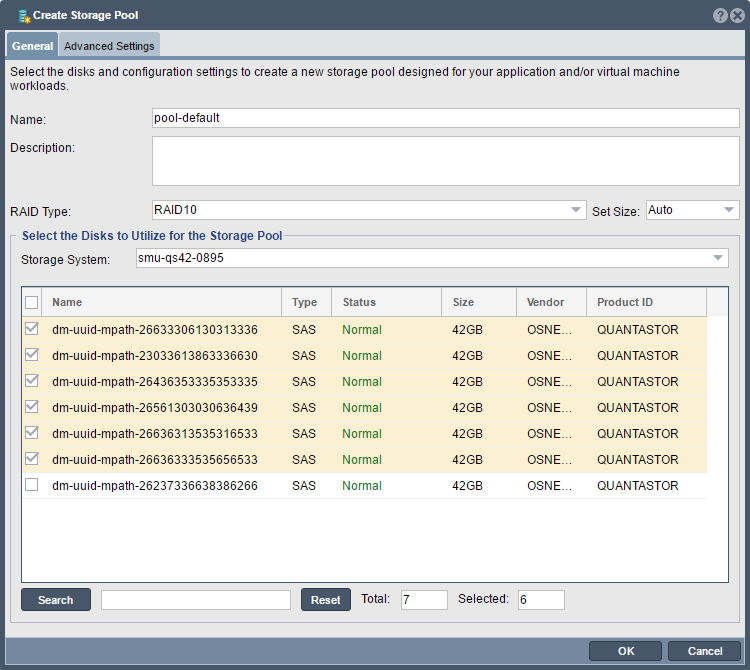
One of the first steps in configuring an appliance is to create a storage pool. The storage pool is an aggregation of one or more devices into a fault-tolerant "pool" of storage that will continue operating without interruption in the event of disk failures. The amount of fault-tolerance is dependent on multiple factors including hardware type, RAID layout selection and pool configuration. QuantaStor's SAN storage (storage volumes) as well as NAS storage (network shares) are both provisioned from Storage Pools. A given pool of storage can be used for SAN and NAS storage at the same time, additionally, clients can access the storage using multiple protocols at the same time (iSCSI & FC for storage volumes and NFS & SMB/CIFS for network shares). Creating a storage pool is very straight forward, simply name the pool (DefaultPool is fine too), select disks and a layout for the pool, and then press OK. If you're not familiar with RAID levels then choose the RAID10 layout and select an even number of disks (2, 4, 8, 20, etc). There are a number of advanced options available during pool creation but the most important one to consider is encryption as this cannot be turned on after the pool is created.
Enclosure Aware Intelligent Disk Selection
For systems employing multiple JBOD disk enclosures QuantaStor automatically detects which enclosure each disk is sourced from and selects disks in a spanning "round-robin" fashion during the pool provisioning process to ensure fault-tolerance at the JBOD level. This means that should a JBOD be powered off the pool will continue to operate in a degraded state. If the detected number of enclosures is insufficient for JBOD fault-tolerance the disk selection algorithm switches to a sequential selection mode which groups vdevs by enclosure. For example a pool with RAID10 layout provisioned from disks from two or more JBOD units will use the "round-robin" technique so that mirror pairs span the JBODs. In contrast a storage pool with the RAID50 layout (4d+1p) with two JBOD/disk enclosures will use the sequential selection mode.
Enabling Encryption (One-click Encryption)
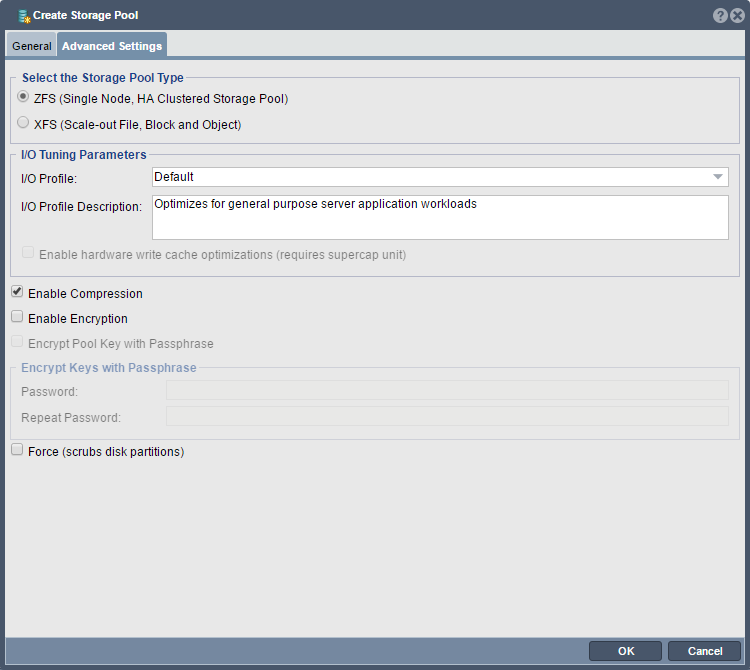
Encryption must be turned on at the time the pool is created. If you need encryption and you currently have a storage pool that is un-encrypted you'll need to copy/migrate the storage to an encrypted storage pool as the data cannot be encrypted in-place after the fact. Other options like compression, cache sync policy, and the pool IO tuning policy can be changed at any time via the Modify Storage Pool dialog. To enable encryption select the Advanced Settings tab within the Create Storage Pool dialog and check the [x] Enable Encryption checkbox.
For older versions of QuantaStor there is a manual process for setting up software based encryption keys on a per device basis documented here. Support for this mode has been deprecated because the key-per-device mode adds unnecessary complexity versus the default mode in QuantaStor v4 and newer which is key-per-pool.
Passphrase protecting Pool Encryption Keys
For QuantaStor used in portable appliances or in high-security environments we recommend assigning a passphrase to the encrypted pool which will be used to encrypt the pool's keys. The drawback of assigning a passphrase is that it will prevent the appliance from automatically starting the storage pool after a reboot. Passphrase protected pools require that an administrator login to the appliance and choose 'Start Storage Pool..' where the passphrase may be manually entered and the pool subsequently started. If you need the encrypted pool to start automatically or to be used in an HA configuration, do not assign a passphrase. If you have set a passphrase by mistake or would like to change it you can change it at any time using the Change/Clear Pool Passphrase... dialog at any time. Note that passphrases must be at least 10 characters in length and no more than 80 and may comprise alpha-numeric characters as well as these basic symbols: .-:_ (period, hyphen, colon, underscore).
Enabling Compression
Pool compression is enabled by default as it typically increases usable capacity and boosts read/write performance at the same time. This boost in performance is due to the fact that modern CPUs can compress data much faster than the media can read/write data. The reduction in the amount of data to be read/written due to compression subsequently boosts performance. For workloads which are working with compressed data (common in M&E) we recommend turning compression off. The default compression mode is LZ4 but this can be changed at any time via the Modify Storage Pool dialog.
Selecting the Pool Type
One should always select ZFS storage pool type with two minor exceptions, namely XFS should be used for scale-out configurations where Ceph or Gluster scale-out object/NAS technology will be layered on top. XFS can be used to directly provision basic Storage Volumes and Network Shares but it is a very limited Storage Pool type lacking most of the advanced features supported by the ZFS pool type (snapshots, HA, DR/remote replication, bit-rot protection, compression, etc).
Boosting Performance with SSD Caching
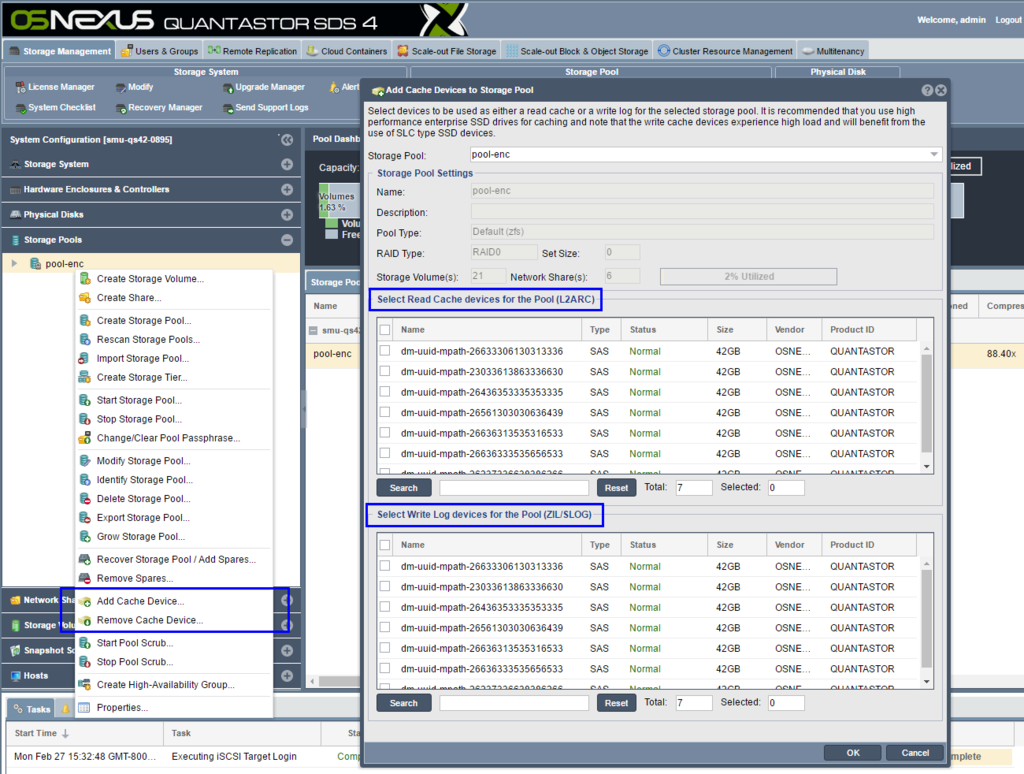
ZFS based storage pools support the addition of SSD devices for use as read or write cache. SSD cache devices must be dedicated to a specific storage pool and cannot be shared across multiple storage pools. Some hardware RAID controllers support SSD caching but in our testing we've found that ZFS is more effective at managing the layers of cache than the RAID controllers so we do not recommend using SSD caching at the hardware RAID controller unless you're creating a older style XFS storage pool which does not have native SSD caching features.
Accelerating Write Performance with SSD Write Log (ZFS SLOG/ZIL)
The ZFS filesystem can use a log device (SLOG/ZIL) for where write for sync based i/o filesystem metadata can be mirrored from the system memory to protect against system component or power failure. Writes are not held for long in the ZIL SSD SLOG so the device does not need to be large as it typically holds no more than 16GB before forcing a flush to the backend disk. Because it is storing metadata and sync based I/O writes that have not yet been persisted to the storage pool the write SSD must be mirrored so that in the event an SSD drive fails that redundancy of the ZIL SLOG is maintained.As writes are occurring constantly on the ZIL SLOG device, we recommend choosing SSD's that have a high wear leveling of 3+ Drive Writes per day (DWPD)
Accelerating Read Performance with SSD Read Cache (L2ARC)
You can add up to 4x devices for SSD read-cache (L2ARC) to any ZFS based storage pool and these devices do not need to be fault tolerant. You can add up to 4x devices directly to the storage pool by selecting 'Add Cache Devices..' after right-clicking on any storage pool. You can also opt to create a RAID0 logical device using the RAID controller out of multiple SSD devices and then add this device to the storage pool as SSD cache. The size of the SSD Cache should be roughly the size of the working set for your application, database, or VMs. For most applications a pair of 400GB SSD drives will be sufficient but for larger configurations you may want to use upwards of 2TB or more of SSD read cache. Note that the SSD read-cache doesn't provide an immediate performance boost because it takes time for it to learn which blocks of data should to be cached to provide better read performance.
RAM Read Cache Configuration (ARC)
ZFS based storage pools use what are called "ARC" as a in-memory read cache rather than the Linux filesystem buffer cache to boost disk read performance. Having a good amount of RAM in your system is critical to deliver solid performance. It is very common with disk systems for blocks to be read multiple times. The frequently accessed "hot data" is cached into RAM where it can serve read requests orders of magnitude faster than reading it from spinning disk. Since the cache takes on some of the load it also reduces the load on the disks and this too leads to additional boosts in read and write performance. It is recommended to have a minimum of 32GB to 64GB of RAM in small appliances, 96GB to 128GB of RAM for medium sized systems and 256GB or more in large systems.
Pool RAID Levels
QuantaStor supports all industry standard RAID levels (RAID1/10/5/50/6/60), some additional advanced RAID levels (RAID1 triple copy, RAID7/70 triple parity), and simple striping with RAID0. Over time all disk media degrades and as such we recommend marking at least one device as a hot-spare disk so that the system can automatically heal itself when a bad device needs replacing. One can assign hot-spare disks as universal spares for use with any storage pools as well as pinning of hot-spares to specific storage pools. Finally, RAID0 is not fault-tolerant at all but it is your only choice if you have only one disk and it can be useful in some scenarios where fault-tolerance is not required. Here's a breakdown of the various RAID types and their pros & cons.
- RAID0 layout is also called 'striping' and it writes data across all the disk drives in the storage pool in a round robin fashion. This has the effect of greatly boosting performance. The drawback of RAID0 is that it is not fault tolerant, meaning that if a single disk in the storage pool fails then all of your data in the storage pool is lost. As such RAID0 is not recommended except in special cases where the potential for data loss is non-issue.
- RAID1 is also called 'mirroring' because it achieves fault tolerance by writing the same data to two disk drives so that you always have two copies of the data. If one drive fails, the other has a complete copy and the storage pool continues to run. RAID1 and it's variant RAID10 are ideal for databases and other applications which do a lot of small write I/O operations.
- RAID5 achieves fault tolerance via what's called a parity calculation where one of the drives contains an XOR calculation of the bits on the other drives. For example, if you have 4 disk drives and you create a RAID5 storage pool, 3 of the disks will store data, and the last disk will contain parity information. This parity information on the 4th drive can be used to recover from any data disk failure. In the event that the parity drive fails, it can be replaced and reconstructed using the data disks. RAID5 (and RAID6) are especially well suited for audio/video streaming, archival, and other applications which do a heavy sequential write I/O operations (such as reading/writing large files) and are not as well suited for database applications which do heavy amounts of small random write I/O operations or with large file-systems containing lots of small files with a heavy write load.
- RAID6 improves upon RAID5 in that it can handle two drive failures but it requires that you have two disk drives dedicated to parity information. For example, if you have a RAID6 storage pool comprised of 5 disks then 3 disks will contain data, and 2 disks will contain parity information. In this example, if the disks are all 1TB disks then you will have 3TB of usable disk space for the creation of volumes. So there's some sacrifice of usable storage space to gain the additional fault tolerance. If you have the disks, we always recommend using RAID6 over RAID5. This is because all hard drives eventually fail and when one fails in a RAID5 storage pool your data is left vulnerable until a spare disk is utilized to recover your storage pool back to a fault tolerant status. With RAID6 your storage pool is still fault tolerant after the first drive failure. (Note: Fault-tolerant storage pools (RAID1,5,6,10) that have suffered a single disk drive failure are called degraded because they're still operational but they require a spare disk to recover back to a fully fault-tolerant status.)
- RAID10 is similar to RAID1 in that it utilizes mirroring, but RAID10 also does striping over the mirrors. This gives you the fault tolerance of RAID1 combined with the performance of RAID10. The drawback is that half the disks are used for fault-tolerance so if you have 8 1TB disks utilized to make a RAID10 storage pool, you will have 4TB of usable space for creation of volumes. RAID10 will perform very well with both small random IO operations as well as sequential operations and it is highly fault tolerant as multiple disks can fail as long as they're not from the same mirror-pairing. If you have the disks and you have a mission critical application we highly recommend that you choose the RAID10 layout for your storage pool.
- RAID60 combines the benefits of RAID6 with some of the benefits of RAID10. It is a good compromise when you need better IOPS performance than RAID6 will deliver and more useable storage than RAID10 delivers (50% of raw).
It can be useful to create more than one storage pool so that you have low cost fault-tolerant storage available in RAID6 for archive and higher IOPS storage in RAID10 for virtual machines, databases, MS Exchange, or similar workloads.
Identifying Storage Pools
The group of disk devices which comprise a given storage pool can be easily identified within a rack by using the Storage Pool Identify dialog which will blink the LEDs in a pattern.
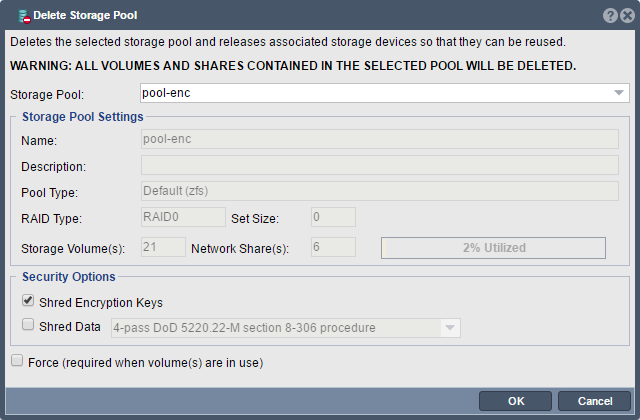
Deleting Storage Pools
Storage pool deletion is final so be careful and double check to make the correct pool is selected. For secure deletion of storage pools please select one of the data scrub options such as the default 4-pass DoD (Department of Defense) procedure.
Data Shredding Options
QuantaStor uses the Linux scrub utility which is compliant to various government standards to securely shred data on devices. QuantaStor provides three data scrub procedure options including DoD, NNSA, and USARMY data scrub modes:
- DoD mode (default)
- 4-pass DoD 5220.22-M section 8-306 procedure (d) for sanitizing removable and non-removable rigid disks which requires overwriting all addressable locations with a character, its complement, a random character, then verify. **
- NNSA mode
- 4-pass NNSA Policy Letter NAP-14.1-C (XVI-8) for sanitizing removable and non-removable hard disks, which requires overwriting all locations with a pseudorandom pattern twice and then with a known pattern: random(x2), 0x00, verify. **
- US ARMY mode
- US Army AR380-19 method: 0x00, 0xff, random. **
** Note: short descriptions of the QuantaStor supported scrub procedures are borrowed from the scrub utility manual pages which can be found here.
Importing Storage Pools
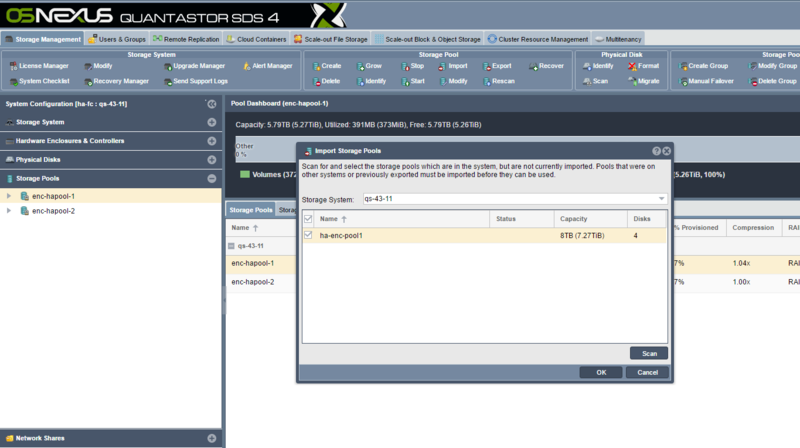
Storage pools can be physically moved from appliance to another appliance by moving all of the disks associated with that given pool from the old appliance to a new appliance. After the devices have been moved over one should use the Scan for Disks... option in the web UI so that the devices are immediately discovered by the appliance. After that the storage pool may be imported using the Import Pool... dialog in the web UI or via QS CLI/REST API commands.
Importing Encrypted Storage Pools
The keys for the pool (qs-xxxx.key) must be available in the /etc/cryptconf/keys directory in order for the pool to be imported. Additionally, there is an XML file for each pool which contains information about which devices comprise the pool and their serial numbers which is located in the /etc/cryptconf/metadata directory which is called (qs-xxxx.metadata) where xxxx is the UUID of the pool. We highly recommend making a backup of the /etc/cryptconf folder so that one has a backup copy of the encryption keys for all encrypted storage pools on a given appliance. With these requirements met, the encrypted pool may be imported via the Web Management interface using the Import Storage Pools dialog the same one used do for non-encrypted storage pools.
Importing 3rd-party OpenZFS Storage Pools
Importing OpenZFS based storage pools from other servers and platforms (Illumos/FreeBSD/ZoL) is made easy with the Import Storage Pool dialog. QuantaStor uses globally unique identifiers (UUIDs) to identify storage pools (zpools) and storage volumes (zvols) so after the import is complete one would notice that the system will have made some adjustments as part of the import process. Use the Scan button to scan the available disks to search for pools that are available to be imported. Select the pools to be imported and press OK to complete the process.
For more complex import scenarios there is a CLI level utility that can be used to do the pool import which is documented here Console Level OpenZFS Storage Pool Importing.
Hot-Spare Management Policies
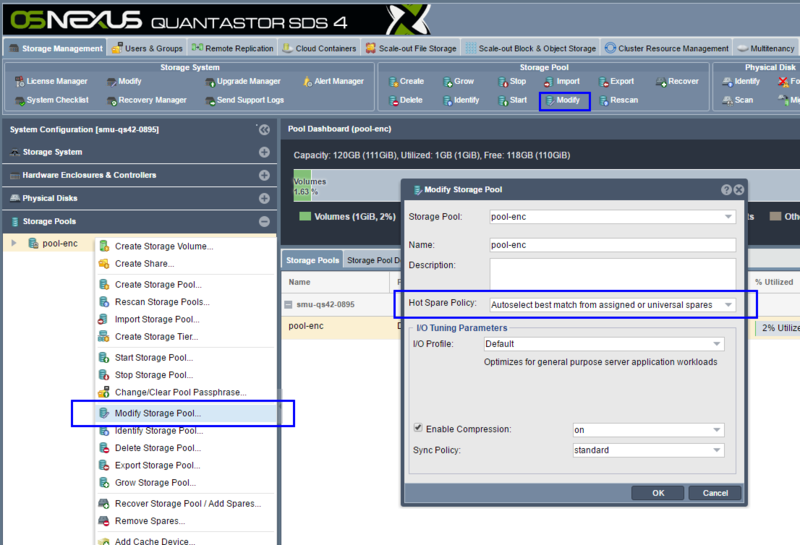
Modern versions of QuantaStor include additional options for how Hot Spares are automatically chosen at the time a rebuild needs to occur to replace a faulted disk. Policies can be chosen on a per Storage Pool basis and include:
- Auto-select best match from assigned or universal spares (default)
- Auto-select best match from pool assigned spares only
- Auto-select exact match from assigned or universal spares
- Auto-select exact match from pool assigned spares only
- Manual Hot-spare Management Only
If the policy is set to one that includes 'exact match', the Storage Pool will first attempt to replace the failed data drive with a disk that is of the same model and capacity before trying other options. The Manual Hot-spare Management Only mode will disable QuantaStor's hot-spare management system for the pool. This is useful if there are manual/custom reconfiguration steps being run by an administrator via a root SSH session.
Storage Volume (SAN) Management
Each storage volume is a unique block device/target (a.k.a a 'LUN' as it is often referred to in the storage industry) which can be accessed via iSCSI, Fibre Channel, or Infiniband/SRP. A storage volume is essentially a virtual disk drive on the network (the SAN) that you can assign to any host in your environment. Storage volumes are provisioned from a storage pool so you must first create a storage pool before you can start provisioning volumes.
Creating Storage Volumes
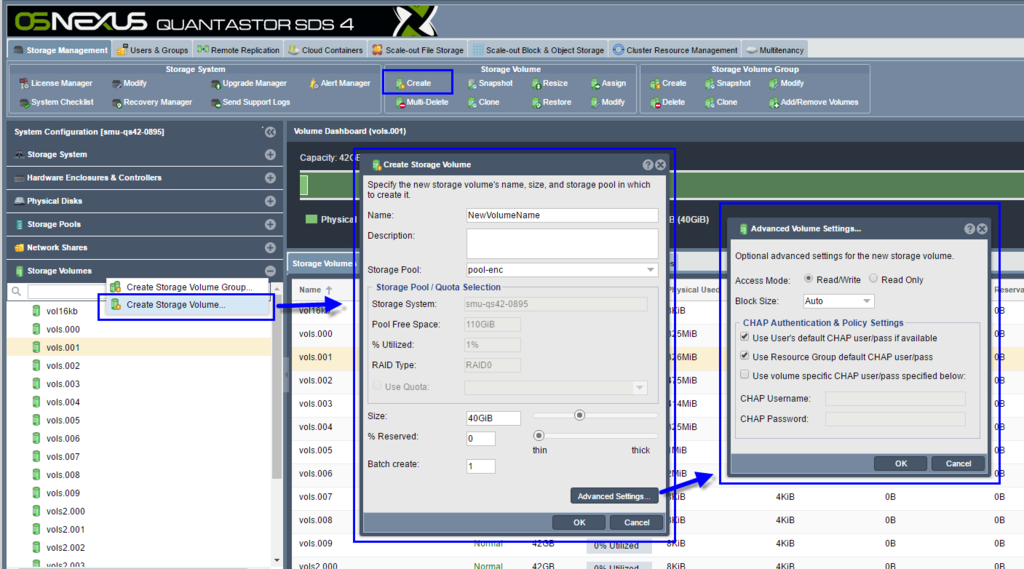
Storage volumes may be provisioned 'thick' or 'thin' which indicates the amount of pre-reserved storage assigned to the volume. Since thick provisioning is simply a reservation it can be adjusted at any time using the Modify Storage Volume dialog via the right-click pop-up menu after selecting a given volume. Choosing thick versus thin-provisioning has very little to no impact on the overall performance of the storage volume so the default mode and recommended mode is to use thin-provisioning.
Batch Create
To create a large number of volumes all at once select a batch count greater than one. Batch created volumes will be named with a numbered suffix increasing from ".000", ".001", ".002" and so on. If a given suffix number is taken it will automatically be skipped.
Advanced Volume Settings
Volumes may be customized via the Create and Modify Volume dialogs to set a number of advanced settings including CHAP settings, and access mode settings.
Volume Access Mode
By default volumes are all read-write including storage volume snapshots. Read-only mode is useful for volumes that will be used as a template for cloning to produce new volumes from a common image to ensure that the template is not changed.
Volume Block Size
The block size selection is only available at the time the volume is created and cannot be adjusted afterwards. In the Advanced Settings...' section one will see that the Block Size is set to Auto by default. In the Auto mode the block size for the storage volume will be set to 128K when the underlying Storage Pool for the volume has no SSD write log devices (SLOG/ZIL) configured. Once write log SSD devices (ZIL/SLOG) are assigned to the pool then the storage volume block size in Auto mode will be selected as 8KB (rather than 128K) so that the ZIL can engage for sync writes and small block IO will be grouped into larger transaction groups to boost IOPS performance. The 128K volume block size is optimal for pools without ZIL and the 8K block size is optimal for pools with ZIL. Be sure to configure the pool with write log SSDs before provisioning storage volumes as the block size cannot be changed later.
Delete & Multi-Delete Storage Volumes
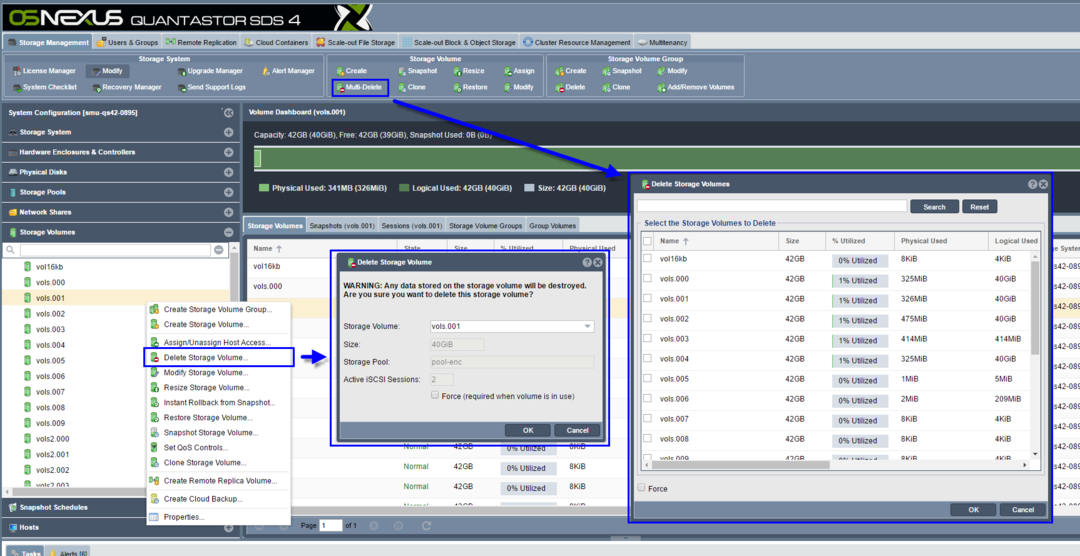
There are two dialogs for deleting storage volumes, one for deleting individual volumes and one for deleting volumes in bulk which is especially useful for deleting snapshots. Pressing the "Delete Volumes" button in the ribbon bar will be presented the multiple Delete Storage Volumes dialog whereas right-clicking on a specific volume in the tree view will present one with the Delete Volume... option from the pop-up menu for single volume deletion. The multi-volume delete dialog also has a Search button so that volumes can be selected based on a partial name match. WARNING: Once a storage volume is deleted all the data is destroyed so use caution when deleting storage volumes.
Quality of Service (QoS) Controls
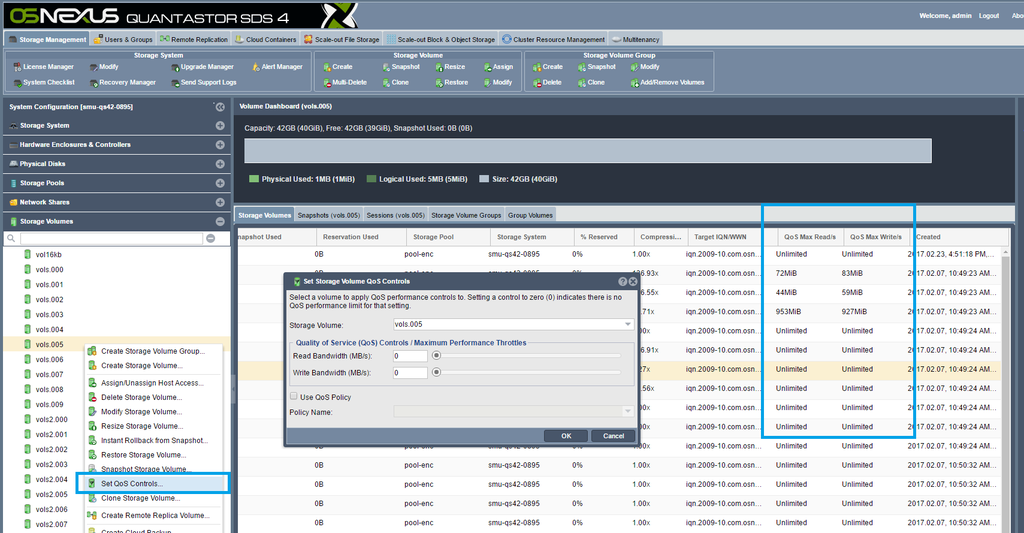
When QuantaStor appliances are in a shared or multi-tenancy environment it is important to be able to limit the maximum read and write bandwidth allowed for specific storage volumes so that a given user or application cannot unfairly consume an excessive amount of the storage appliance's available bandwidth. This bandwidth limiting feature is often referred to as Quality of Service (QoS) controls which limit the maximum throughput for reads and writes to ensure a reliable and predictable QoS for all applications and users of a given appliance. Once you've setup QoS controls on a given Storage Volume settings will be visible in the main center table.
QoS Support Requirements
- Appliance must be running QuantaStor v3.16 or newer
- QoS controls can only be applied to Storage Volumes (not Network Shares)
- Storage Volume must be in a ZFS or Ceph based Storage Pool in order to adjust QoS controls for it
QoS Policies
QoS levels may also be set by policy. QoS Policies makes it easy to adjust QoS settings for a given group of Storage Volumes across the storage grid in a single operation. To create a QoS Policy using the QuantaStor CLI run the following command with the MB/sec settings adjusted as required.
qs qos-policy-create high-performance --bw-read=300MB --bw-write=300MB
Policies may be adjusted at any time and the changes will be immediately applied to all Storage Volumes associated with the given QoS policy.
qs qos-policy-create high-performance --bw-read=400MB --bw-write=400MB
QoS Policies may also be used to dynamically increase or decrease the maximum throughput for Storage Volumes at certain hours of the day where storage I/O loads are expected to be lower or higher.
Note: QoS settings applied to a specific Storage Volume clear any QoS policy setting associated with the Storage Volume. The reverse is also true, if you have a specific QoS setting for a Storage Volume (eg: 200MB/sec reads, 100MB/sec writes) and then you apply a QoS policy to the volume, the limits set in the policy will clear the Storage Volume specific settings.
Resizing Storage Volumes
QuantaStor supports increasing the size of storage volumes but due to the high probability of data-loss that would come from truncation of the end of a disk QuantaStor does not support shrink. To resize a volume simply right-click on it then choose Resize Volume... from the pop-up menu. After the resize is complete a signal is sent to the connected iSCSI and FC initiator sessions to let the client hosts know that the block device has been resized. Some operating systems will detect the new size automatically, others will require a device rescan to detect the new expanded size. In most cases additional steps are required in the host OS to expand partitions or other volume settings adjusted to make use of the additional space.
Creating Volume Snapshots
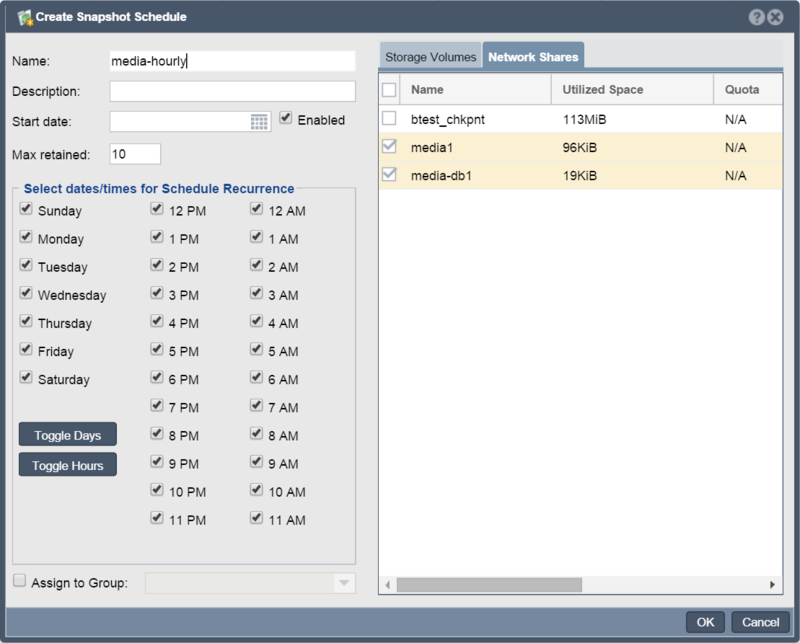
QuantaStor supports creation of snapshots and even snapshots of snapshots. Snapshots are R/W by default and read-only snapshots are also supported. QuantaStor uses what we call a lazy cloning technique where the underlying clone to make a snapshot writable is not done until the snapshot has been assigned to a host. Most snapshots are created by a schedule and then deleted without ever being accessed, so the lazy cloning technique boosts the performance and scalability of the Snapshot Schedules and Remote Replication system.
- snapshots are 'thin', that is they are a copy of the meta-data associated with the original volume and not a full copy of all the data blocks.
All of these advanced snapshot capabilities make QuantaStor ideally suited for virtual desktop solutions, off-host backup, and near continuous data protection (NCDP). If you're looking to get NCDP functionality, just create a 'snapshot schedule' and snapshots can be created for your storage volumes as frequently as every hour.
To create a snapshot or a batch of snapshots you'll want to select the storage volume that you which to snap, right-click on it and choose 'Snapshot Storage Volume' from the menu.
If you do not supply a name then QuantaStor will automatically choose a name for you by appending the suffix "_snap" to the end of the original's volume name. So if you have a storage volume named 'vol1' and you create a snapshot of it, you'll have a snapshot named 'vol1_snap000'. If you create many snapshots then the system will increment the number at the end so that each snapshot has a unique name.
Creating Clones
Clones represent complete copies of the data blocks in the original storage volume, and a clone can be created in any storage pool in your storage system whereas a snapshot can only be created within the same storage pool as the original. You can create a clone at any time and while the source volume is in use because QuantaStor creates a temporary snapshot in the background to facilitate the clone process. The temporary snapshot is automatically deleted once the clone operation completes. Note also that you cannot use a cloned storage volume until the data copy completes. You can monitor the progress of the cloning by looking at the Task bar at the bottom of the QuantaStor Manager screen. (Note: In contrast to clones (complete copies), snapshots are created near instantly and do not involve data movement so you can use them immediately.)
By default QuantaStor systems are setup with clone bandwidth throttling to 200MB/sec across all clone operations on the appliance. The automatic load balancing ensures minimal impact to workloads due to active clone operations. The following CLI documentation covers how to adjust the cloning rate limit so that you can increase or decrease it.
  Volume Clone Load Balancing
    qs-util clratelimitget            : Current max bandwidth setting to be divided among active clone operations.
    qs-util clratelimitset NN         : Sets the max bandwidth available in MB/sec shareed across all clone operations.
    qs-util clraterebalance           : Rebalances all active volume clone operations to use the shared limit (default 200).
                                       QuantaStor automatically reblanances active clone streams every minute unless
                                       the file /etc/clratelimit.disable is present.
For example, to set the clone operations rate limit to 300MBytes/sec you would need to login to the appliance via SSH or via the console and run this command:
sudo qs-util clratelimitset 300
The new rate is applied automatically to all active clone operations. QuantaStor automatically rebalances clone operation bandwidth, so if you have a limit of 300MB/sec with 3x clone operations active, then each clone operation will be replicating data at 100MB/sec. If one of them completes first then the other two will accelerate up to 150MB/sec, and when a second one completes the last clone operation will accelerate to 300MB/sec. Note also that cloning a storage volume to a new storage volume in the same storage pool will be rate limited to whatever the current setting is but because the source and destination are the same it will have double the impact on workloads running in that storage pool. As such, if you are frequently cloning volumes within the same storage pool and it is impacting workloads you will want to decrease the clone rate to something lower than the default of 200MB/sec. In other cases where you're using pure SSD storage you will want to increase the clone rate limit.
Restoring from Snapshots
If you've accidentally lost some data by inadvertently deleting files in one of your storage volumes, you can recover your data quickly and easily using the 'Restore Storage Volume' operation. To restore your original storage volume to a previous point in time, first select the original, the right-click on it and choose "Restore Storage Volume" from the pop-up menu. When the dialog appears you will be presented with all the snapshots of that original from which you can recover from. Just select the snapshot that you want to restore to and press ok. Note that you cannot have any active sessions to the original or the snapshot storage volume when you restore, if you do you'll get an error. This is to prevent the restore from taking place while the OS has the volume in use or mounted as this will lead to data corruption.
WARNING: When you restore, the data in the original is replaced with the data in
the snapshot.  As such, there's a possibility of loosing data as everything that
was written to the original since the time the snapshot was created will be lost.
Remember, you can always create a snapshot of the original before you restore it
to a previous point-in-time snapshot.
Managing Host Initiators
Hosts represent the client computers that you assign storage volumes to. In SCSI terminology the host computers initiate the communication with your storage volumes (target devices) and so they are called initiators. Each host entry can have one or more initiators associated with it and the reason for this is because an iSCSI initiator (Host) can be identified by IP address or IQN or both at the same time. We recommend using the IQN (iSCSI Qualified Name) at all times as you can have login problems when you try to identify a host by IP address especially when that host has multiple NICs and they're not all specified.
For details of installation please refer to QuantaStor Users Guide under iSCSI Initiator Configuration.
Managing Host Initiator Groups
Sometimes you'll have multiple hosts that need to be assigned the same storage volume(s) such as with a VMware or a XenServer resource pool. In such cases we recommend making a Host Group object which indicates all of the hosts in your cluster/resource pool. With a host group you can assign the volume to the group once and save a lot of time. Also, when you add another host to the host group, it automatically gets access to all the volumes assigned to the group so it makes it very easy to add nodes to your cluster and manage storage from a group perspective rather than individual hosts which can be cumbersome especially for larger clusters.
Disk Migration / LUN Copy to Storage Volume
Migrating LUNs (iSCSI and FC block storage) from legacy systems can be time consuming and potentially error prone as it generally involves mapping the new storage and the old storage to a host, ensuring the the newly allocated LUN is equal to or larger than the old LUN and then the data makes two hops from Legacy SAN -> host -> New SAN so it uses more network bandwidth and can take more time.
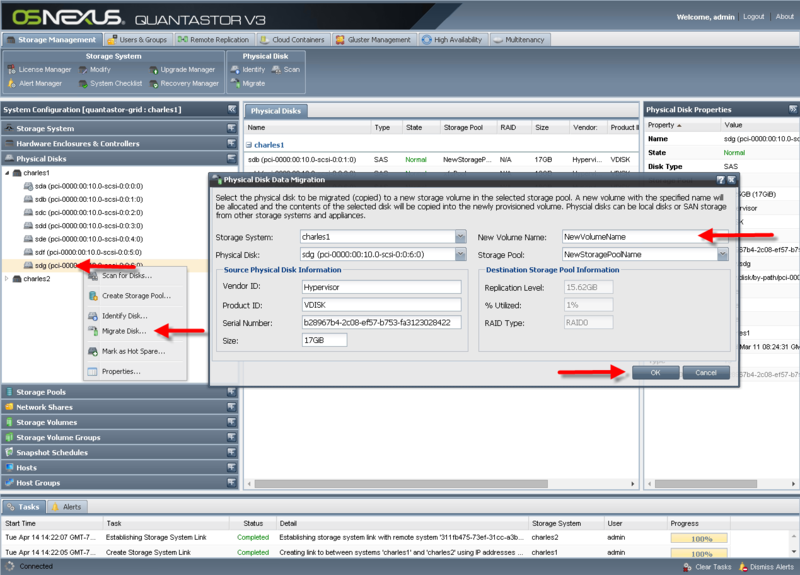
QuantaStor has a built-in data migration feature to help make this process easier and faster. If your legacy SAN is FC based then you'll need to put a Emulex or Qlogic FC adapter into your QuantaStor appliance and will need to make sure that it is in initiator mode. Using the WWPN of this FC initiator you'll then setup the zoning in the switch and the storage access in the legacy SAN so that the QuantaStor appliance can connect directly to the storage in the legacy SAN with no host in-between. Once you've assign some storage from the legacy SAN to the QuantaStor appliance's initiator WWPN you'll need to do a 'Scan for Disks' in the QuantaStor appliance and you will then see your LUNs appear from the legacy SAN (they will appear with devices names like sdd, sde, sdf, sdg, etc). To copy a LUN to the QuantaStor appliance right-click on the disk device and choose 'Migrate Disk...' from the pop-up menu.
You will see a dialog like the one above and it will show the details of the source device to be copied on the left. On the right it shows the destination information which will be one of the storage pools on the appliance where the LUN is connected. Enter the name for the new storage volume to be allocated which will be the destination for the copy. A new storage volume will be allocated with that name which is exactly the same size as the source volume. It will then copy all the blocks of the source LUN to the new destination Storage Volume.
3rd Party Volume Data Migration via iSCSI
QuantaStor v4 and newer includes iSCSI Software Adapter support so that one can directly connect to and access iSCSI LUNs from a SAN without having to use the CLI commands outlined below. The option to create a new iSCSI Software Adapter is in the Hardware Enclosures & Controllers section within the web management interface.
The process for copying a LUN via iSCSI is similar to that for FC except that iSCSI requires an initiator login from QuantaStor appliance to the remote iSCSI SAN to initially establish access to the remote LUN(s). This can be done via the QuantaStor console/SSH using the qs-util iscsiinstall', 'qs-util iscsiiqn', and 'qs-util iscsilogin' commands. Here's the step-by-step process:
sudo qs-util iscsiinstall
This command will install the iSCSI initiator software (open-iscsi).
sudo qs-util iscsiiqn
This command will show you the iSCSI IQN for the QuantaStor appliance. You'll need to assign the LUNs in the legacy SAN that you want to copy over to your QuantaStor appliance to this IQN. If your legacy SAN supports snapshots it's a good idea to assign a snapshot LUN to the QuantaStor appliance so that the data isn't changing during the copy.
sudo qs-util iscsilogin 10.10.10.10
In the command above, replace the example 10.10.10.10 IP address with the IP address of the legacy SAN which has the LUNs you're going to migrate over. Alternatively, you can use the iscsiadm command line utility directly to do this step. There are several of these iscsi helper commands, type 'qs-util' for a full listing. Once you've logged into the devices you'll see information about the devices by running the 'cat /proc/scsi/scsi' command or just go back to the QuantaStor web management interface and use the 'Scan for Disks' command to make the disks appear. Once they appear in the 'Physical Disks' section you can right-click on them and to do a 'Migrate Disk...' operation.
3rd Party Volume Data Migration via Fibre Channel
Note that for FC data migration one may use either a Qlogic or a Emulex FC HBA in initiator mode but QuantaStor only supports Qlogic QLE24xx/25xx/26xx series cards in FC Target mode. One may also use OEM versions of the Qlogic QLE series cards. It is best to use Qlogic cards as they may be used in both initiator and target mode. FC mode is switched in the Fibre Channel section by right-clicking on a given port and then selecting FC Port Enable (Target Mode).. or FC Port Disable (Initiator Mode)...
Managing iSCSI Sessions
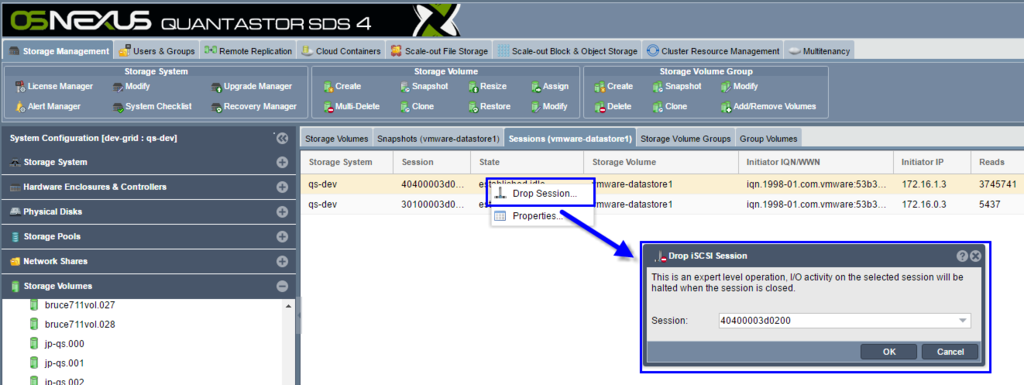
A list of active iSCSI sessions for a given volume can be found by selecting the Storage Volume in the tree section and then select the 'Sessions' tab. The Sessions tab shows both active FC and iSCSI session information. To drop an iSCSI session simply right-click on a session in the table and choose Drop Session... from the pop-up menu.
Note: Some initiators will automatically re-establish a new iSCSI session if one is dropped by the storage system. To prevent this, unassign the Storage Volume from assigned Host or Host Group so that the host may not automatically re-login.
QuantaStor Network Shares provide NAS access to storage pools via NFSv3, NFSv4, SMB2, and SMB3 protocols. To provision a Network Share first a Storage Pool must be created which Network Shares may be provisioned from. With QuantaStor's storage grid technology one can provision Network Shares from any pool on any appliance in the grid regardless of where it is located. QuantaStor also has Network Share Namespaces which span appliances and make it easy to categorize network shares into folders which are called namespaces. QuantaStor Network Shares support a broad spectrum of features including, quotas, user & group quotas, compression, encryption (inherited from the pool), remote-replication, snapshots, cloning, snapshots of snapshots, Avid integration, and more. Each Network Share resides within a specific Storage Pool and storage pools can move between appliances (much like a VM can move between hypervisor hosts) if configured in high-availability mode. Storage Pools may be used to provision and serve NAS storage (Network Shares) and SAN storage (Storage Volumes) at the same time.
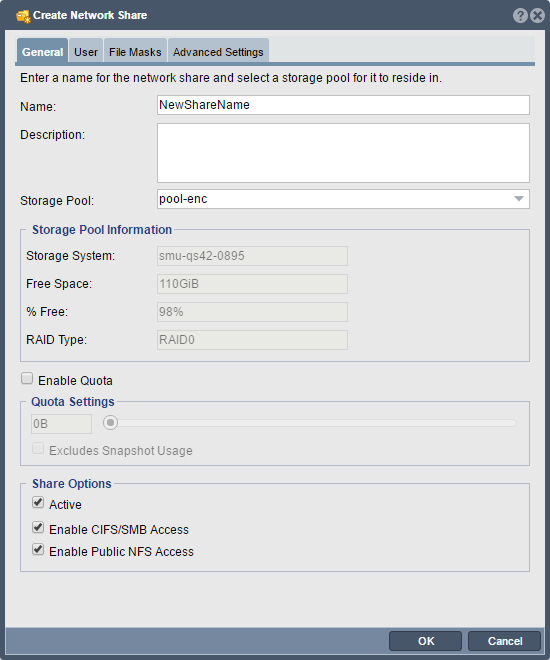
To create a Network Share simply right-click on a Storage Pool and select 'Create Network Share...' or select the Network Shares section and then choose Create Network Share from the toolbar or right-click for the pop-up menu. Network Shares can be concurrently accessed via both NFS and CIFS protocols. After providing a name, and optional description for the share, and selecting the storage pool in which the network share will be created there are a few other options you can set including protocol access types and a share level quota. After a Network Share has been created/provisioned it may be modified via the Modify Network Share dialog from the Network Shares section.
Quota Management
Each Network Share may be configured with a quota to limit how much storage users can place in the share. Quotas are adjustable from both the Create Network Share and Modify Network Share dialogs. Quotas are important in shared environments with heavy storage users or when charge-back accounting necessitates setting quotas. Network Shares with no quotas assigned may use all the available free space in the storage pool in which it resides. To enable hard quota capacity limits on a share select [x] Enable Quota and then move the slider bar or enter a specified quota amount. When typing in a specific quota capacity the suffixes of TB, GB, MB are all allowed.
Enable CIFS/SMB Access
Select this check-box to enable CIFS access to the network share. When you first select to enable CIFS access the default is to make the share public with read/write access. To adjust this so that you can assign access to specific users or to turn on special features you can adjust the CIFS settings further by pressing the CIFS/SMB Advanced Settings button.
Enable Public NFS Access
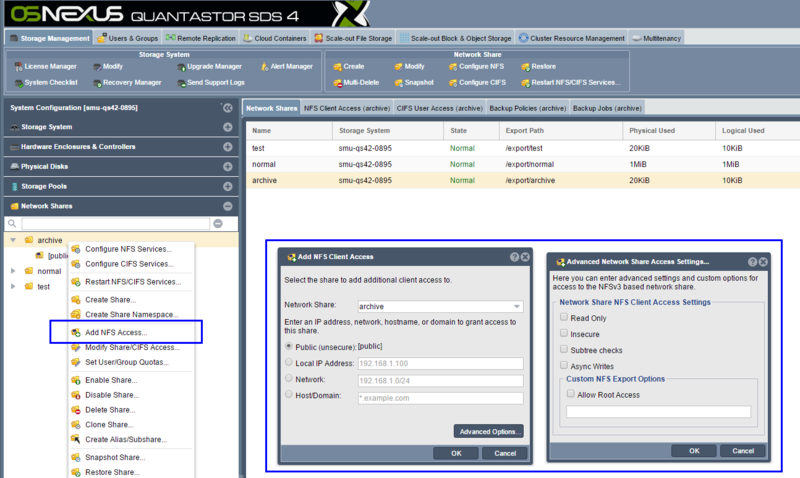
By default public NFS access is enabled, you can un-check this option to turn off NFS access to this share. Later you can add NFS access rules by right-clicking on the share and choosing 'Add NFS Client Access..'.
Controlling SMB/CIFS User & Group Access
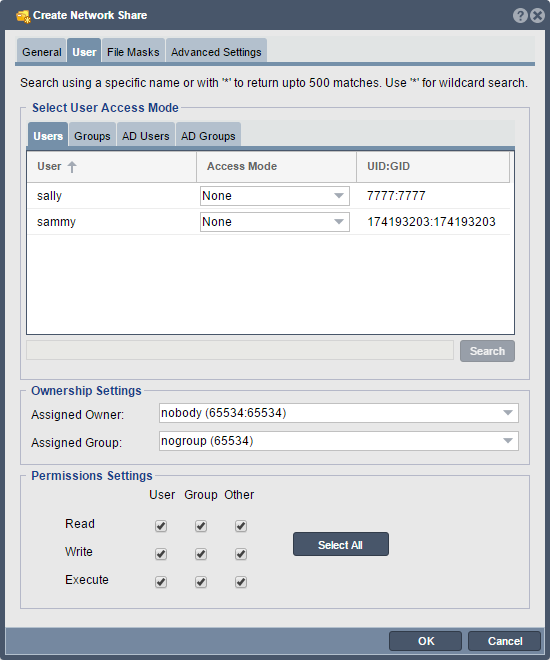
User and group access via the SMB/CIFS protocol is adjustable from the User tab in both the Network Share Create and the Network Share Modify dialogs. After selecting the User tab one is presented with a group of tabs which categorize storage grid users and groups separately from Active Directory Users and Groups. Unless a given share is configured as public each user that needs access to the share must be explicitly assigned as a Valid User or Admin User for the share. To assign groups of users access to a given share use the Groups and/or AD Groups section to assign access at the group level. Admin Users are given special rights to adjust the Windows ACLs associated with a given share so that they may manage access control to the share from the Windows side and within the Windows MMC. Storage grid users which were added via the Users & Groups tab within QuantaStor may also be assigned access to shares. These users and groups have Unix UIDs and GIDs which are auto-generated but they may also be changed via the create and modify dialogs for users and groups respectively (added in QS v4.1).
Ownership Settings
Separately from controlling specific SMB/CIFS access are the Ownership Settings which sets the POSIX UID (user ID) and GID (group ID) ownership settings for a given network share. This setting is important for both SMB and NFS access. The owner of the share is allowed to change the ownership of files and subdirectories of the share and to assign SMB ACLs to the share to delegate management to other users and groups from within Windows. Note that the Windows ACL settings need to work together with the User Access Mode settings discussed above. For example, if an AD user Mary is given access via adjustment of Windows ACLs from an administrator accessing a given share via the Windows MMC, the Mary user account also needs access via an AD User or AD Group setting on the share of Valid User which grants her access.
Permissions Settings
The permission settings are the permissions settings assigned to the share. The User column applies to the owner of the share whereas the Group and Other columns refer to group members and non-group user access to the share. In most cases the User column should be set such that the Owner of the share has access to read/write/execute.
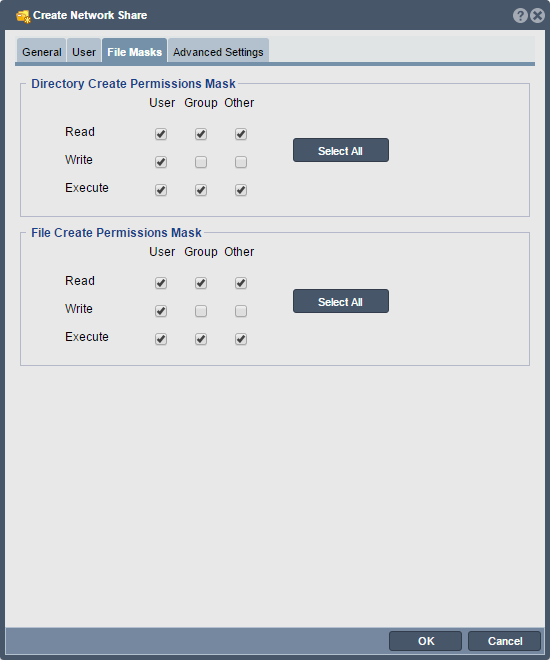
Adjusting Default File Permissions Mask Settings
When new files and directories are created within a given network share, they'll inherit the file and directory permissions mask settings indicated here.
Advanced Configuration Options
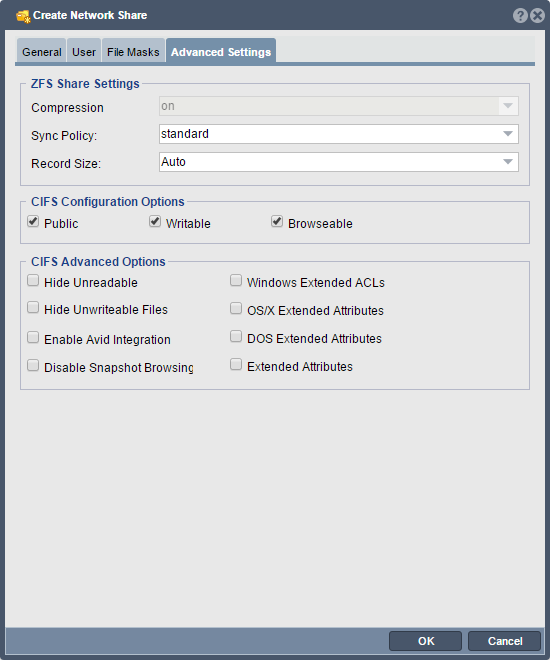
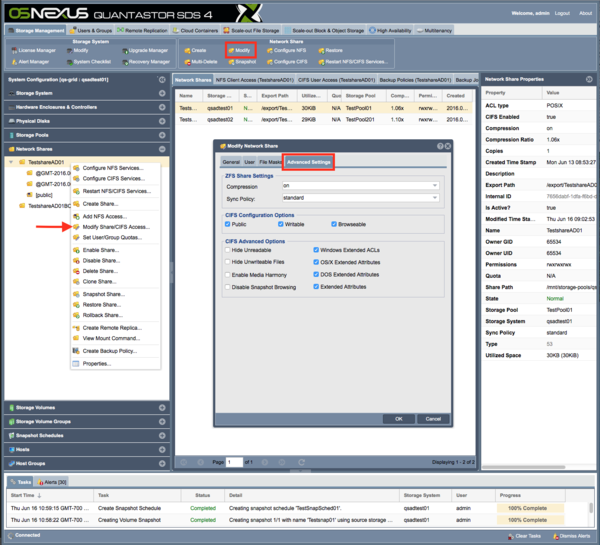
There are several advanced configuration options available to be adjusted for Network Shares including compression, sync policy, record size (similar to block size), extended attributes, and special features like Avid Media Composer(tm) integration.
Data Compression
Network Shares and Storage Volumes inherit the compression mode and type from whatever is set for the Storage Pool from which they are provisioned unless explicitly adjusted. Compression levels may be adjusted specifically for any given Network Share to meet the needs of the data contained within the share. For network shares that contain files which are heavily compressible you might increase the compression level to gzip (gzip6) but note that it'll use more CPU power for higher compression levels. For network shares that contain data that is already compressed, you may opt to turn compression 'off'. Note, this feature is specific to ZFS based Storage Pools.
Cache Sync Policy
The Sync Policy indicates the strategy that the pool uses to optimize writes to a given network share. Standard mode is the default and uses a combination of synchronous and asynchronous write modes to ensure consistency while optimizing write performance. If I/O write requests have been tagged as SYNC_IO then all IO is first sent to the file-system intent log (ZIL) and then staged out to disk, otherwise the data can be written directly to disk without first staging to the intent log. In the "Always" mode the data is always sent to the file-system intent log first irrespective of whether the client has specified a given write request as SYNC. The Always mode is generally a bit slower but technically safer if the client is not properly tagging the IO. Databases and virtualization platfoms generally mark all write I/O as SYNC. An SSD based write log will greatly accelerate storage pool performance for all workloads and applications using the SYNC write mode. With an SSD write log in place IOs are combined into transaction groups which greatly improves overall IOPs performance. The Sync Policy for each Network Share is inherited from the Storage Pool from which the share is provisioned but may be adjusted on a per-share basis using the Modify Network Share dialog.
Advanced CIFS Options
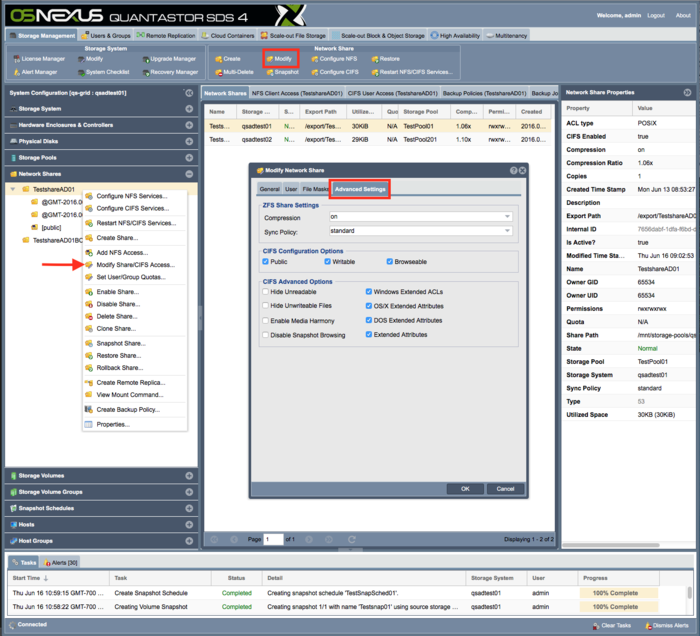
When creating or modifying a Network Share there are a number of advanced options which can be set to tune the share to work better in a Windows or OS/X environment including options for extended attributes, and for hiding unreadable and/or unwriteable files.
Hide Unreadable & Hide Unwriteable
To only show users those folders and files to which they have access you can set these options so that things that they do not have read and/or write access to are hidden.
Avid(tm) Integration / Unityed Media VFS Support
Unityed Media is a special Samba VFS module that's integrated into QuantaStor to provide Avid Media Composer(tm) users with capabilities typically only available on Avid Nexus hardware. To enable the special share features for Avid media sharing simply check the box indicating [x] Enable Avid Integration. With Avid integration enabled SMB users each get a separate Avid meta-data MXF folder which enables them to concurrently work on the same Avid project folders at the same time.
Disable Snapshot Browsing
Snapshots can be used to recover data and by default your snapshots are visible under a special ShareName_snaps folder. If you don't want users to see these snapshot folders you can disable it. Note that you can still access the snapshots for easy file recovery via the Previous Snapshots section of Properties page for the share in Windows.
QuantaStor network shares can be managed directly from the MMC console Share Management section from Windows Server. This is often useful in heterogeneous environments where a combination of multiple different filers from multiple different vendors is being used. To turn on this capability for your network share simply select this option. It is also possible to set this capability globally for an appliance by customizing the underling configuration file for SMB which is outlined here.
Extended Attributes
Extended attributes are a filesystem feature where extra metadata an be associated with files. This is useful for enabling security controls (ACLs) for DOS and OS/X. Extended attributes can also be used by a variety of other applications so if you need this capability simply enable it by checking the box(es) for DOS, OS/X and/or for plain Extended Attribute support.
SMB/CIFS Configuration Options
There are a number of custom options that can be set to adjust the SMB/CIFS access to your network share for different use cases. The 'Public' option makes the network share public so that all users can access it. The 'Writable' option makes the share writable as opposed to read-only and the 'Browseable' option makes it so that you can see the share when you browse for it from your Windows server or desktop.
NFS Access Management
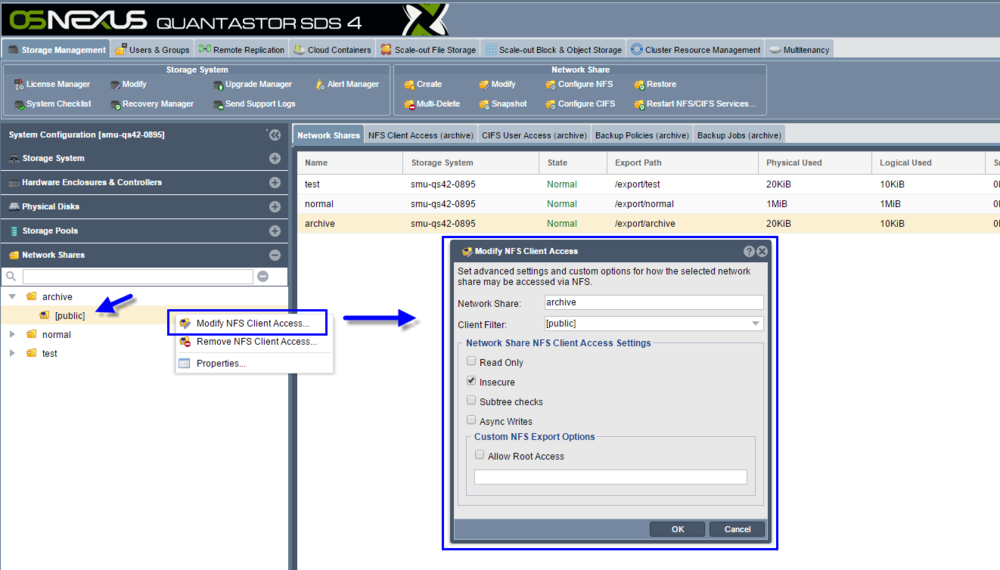
QuantaStor supports NFS access via NFSv3 and NFSv4 at the same time. To use one mode versus another simply change the NFS mount options at the client side to use ones preferred protocol. NFS access may be managed via Kerberos but in general NFS access is managed by allowing or disallowing access to specific IP addresses and/or networks. In QuantaStor these NFS access entries are called Network Share Client Access entries and sometimes NFS Client Access entries. NFS access entries appear in the tree view as child objects of the Network Share and can be modified/edited to apply special options or deleted by using the right-click pop-up menu when the share or Client Access entry is selected.
Configuring NFS Services
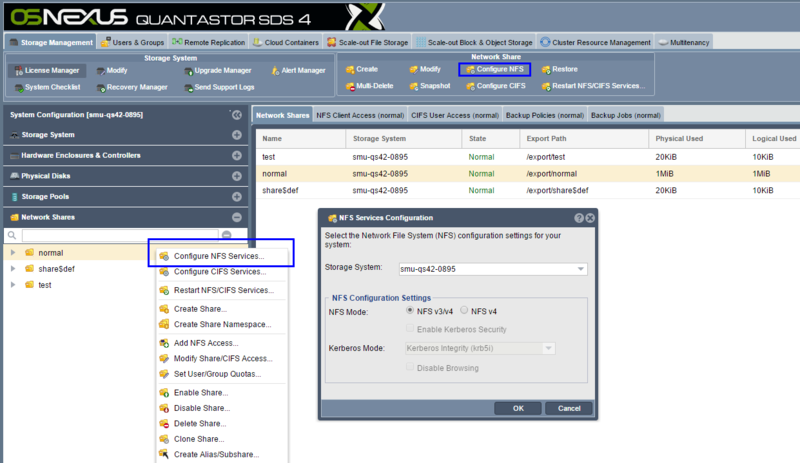
The default NFS mode is to support both NFSv3 and NFSv4 but the service may be configured via the NFS Services Configuration dialog to force the system into NFSv4 mode. To access this dialog navigate to the "Network Shares" tab, then select "Configure NFS" from the ribbon bar or via "Configure NFS Services..." in the pop-up menu.
Controlling NFS Access
NFS share access is filtered by IP address. This can be done by right clicking on a network share, and selecting "Add NFS Access...". By default the share is set to have [public] access. This dialog allows one to enable access to specific IP address, a range of IP addresses, or to specific networks.
NFS Client Access Settings & Custom Options
Often times shares access will require special options like no_root_squash and these are all adjustable in the from within the "Modify NFS Client Access" dialog and in the Advanced Settings section in the Add NFS Client Access dialog. To access the Modify NFS Client Access... dialog simply expand the Network Share in the tree view, then right-click on an access entry and select "Modify NFS Client Access..". Various NFS client access options are presented including "Read Only", "Insecure", etc. You can also add custom options such as "no_root_squash" in the space provided below.
SMB3 Support
QuantaStor v4.1 and newer comes with Samba 4 installed which supports SMB3 and SMB2.1. Note that older versions of QuantaStor require an extra upgrade step to upgrade from Samba v3 to Samba v4. An OSNEXUS Knowledge Base article details how to install samba4 here on older QS v3 appliances.
Active Directory Configuration
QuantaStor appliances can be joined to an AD domain so that SMB/CIFS access can be applied to specific AD users and AD groups. Note that each QuantaStor appliance can only be joined to a single AD domain and that each appliance must be individually joined to an AD domain.
Joining an AD Domain
To join a domain first navigate to the "Network Shares" main tab section. Next select "Configure CIFS" from the toolbar, or by right-clicking in the "Network Shares" section and selecting "Configure CIFS Services..." from the pop-up mentu. Check the box to enable active directory, and provide the necessary information. KDC is most likely your domain controllers FQDN (DC.DOMAIN.COM).
Note: Your storage system name must be <= 15 characters long.
If there are any problems joining the domain please verify that you can ping the IP address of the domain controller, and that you are also able to ping the domain itself.
Once a given QuantaStor appliance has been joined to an AD domain, verify that it has been added by logging into the AD Domain Controller and then check under the Computer entry tab for the appliance.
Active Directory User & Group Name/ID Caching
QuantaStor caches AD user names and their associated Unix user ID and group ID (UID/GID) information to accelerate user and group searching from within the web UI. If one has recently added users or groups to an Active Directory configuration then the user or group name should be explicitly specified when searching since the QuantaStor service cache may be stale. User and group specific lookups do not rely on the cache so they will return a result even if the cache is out of date.
Active Directory Caching for Large Enterprise Deployments
For large Active Directory environments (10K-100K+ users and groups) it can take a long time for QuantaStor to gather information from AD to populate QuantaStor's internal cache. If it takes too long the scan will timeout and the AD information list presented to the user in the web user interface will be empty. To account for the slow interaction with some AD servers in large environments QuantaStor has some advanced options for pre-caching information for large Active Directory environments which is documented and outlined in this section.
Leaving an Active Directory Domain
To leave a domain first navigate to the Network Shares section and press the Active Directory Configuration button in the toolbar or by right-clicking in the "Network Shares" space and selecting "Active Directory Configuration" from the pop-up menu. Uncheck the checkbox to disable Active Directory integration and press OK. To remove the Computer entry from to AD domain controller one must specify the Domain Administrator username and password. After pressing OK the selected QuantaStor appliance will leave the domain.
Verifying Users Have CIFS/SMB Passwords
Older QuantaStor v2 & v3 systems were designed such that user accounts could not be implicitly used for SMB access, just management access. If a given user has the CIFS Ready property set to Password Change Required then the password for that user must be changed before the user account can be used to access SMB/CIFS shares. To do this simply select the user from the User & Groups section then select "Set Password" to change it via the change password dialog. Administrator users may change the password without having to supply the old password. After the password has been changed the property will update and will now show up as SMB/CIFS Ready.
Remote-Replication (Disaster Recovery/DR Configuration Setup)
A separate administration guide was developed specifically to cover Remote-Replication and DR which is accessible here..
Call-home / Alert Configuration Settings
QuantaStor has a number of mechanisms for monitoring of storage appliance alerts including:
- SNMP
- PagerDuty
- User supplied custom script (/var/opt/osnexus/alerthandlers)
The Alert Manager also allows one to specify thresholds for low storage pool capacity remaining. Administrators should take action to expand the available capacity or migrate resources to ensure continuous normal operation of appliances whenever a pool reaches 80% full as performance can degrade and an out-of-space condition can lead to downtime for users. For more information on the configuration of PagerDuty and other monitoring mechanisms see the Monitoring and Cloud Metrics Integration guide here.
External Monitoring
Besides access via REST APIs and the scriptable QS CLI, QuantaStor supports traditional protocols like SNMP and cloud services like Librato Metrics and CopperEgg. Appliances report alerts at various severity levels like ERROR and WARNING. For example, when a disk or battery needs to be replaced it will produce WARNING and some ERROR level events from the controller which in turn generate alerts. Alerts are sent via all configured mechanisms so a system with email and PagerDuty configured will send events to administrators both via email and as a PagerDuty alert to their smart phone. For more information on the configuration of Librato Metrics and other monitoring mechanisms see the Monitoring and Cloud Metrics Integration guide here.
Snapshot Schedule Management
Snapshot schedules create a space efficient snapshots automatically on a schedule. Schedules may contain any number of Storage Volumes and Network Shares from any number of appliances in a given storage grid. We recommend that a snapshot schedule be created for all mission critical storage volumes and network shares so that one has rollback ability in the event that a user deletes data or in the event that there's a security breach so that auditing and any necessary data recovery can be done using snapshots.
Snapshots schedules automatically expire the oldest snapshot once the specified maximum retained snapshots setting has been reached. One may also configure multiple snapshot schedules with any number of Storage Volumes and Network Shares from any number of appliances in a storage grid. Volumes and Shares may also be associated with multiple Snapshot Schedules each maintaining independent snapshot rotations. For storage volumes and network shares containing critical data one should create a Snapshot Schedule that will create snapshots at least once a day. A second schedule that creates weekly snapshots is also recommended.
Scale-out NAS File Storage Management (GlusterFS)
See special section on GlusterFS setup and configuration here.
Storage Pool Provisioning Tier Management
Storage Tiers provide a way of grouping Storage Pools together for simplified provisioning from automated systems and frameworks like OpenStack Cinder. A common problem in cloud environments is that you may have many storage appliances in a grid each with one or more storage pools. This creates a conundrum when you go to provision a Storage Volume or Network Share as several questions must be answered to find the ideal placement for your new volume or share including:
- Which Storage Pool has the most free space?
- Which Storage Pool has the least number of storage volumes in it?
- Which Storage Pool has the least amount of over-provisioning?
- Does the Storage Pool meet the IOPS and throughput requirements of my workload?
When you create a Storage Tier you select one or more Storage Pools to associate it with and then set various attributes on the Storage Tier so that you provisioning system can make intelligent decisions about which Storage Tier to provision from based on the needs of the workload. Placement is automatic so you don't have to think about which storage pool within the storage tier the storage volume should be provisioned from.
All REST APIs and CLI commands which take a Storage Pool name or ID as an argument can have the pool identifier substituted with the name or ideally the UUID of a Storage Tier instead.
Over-provisioning with Storage Tiers
Note that Storage Tiers provide a convenient grouping mechanism and intelligent placement but you cannot create a storage volume which is larger than the pool with the largest available free space in the Storage Tier. As an example, if you have three storage pools in your storage tier, Pool1 (10TB free), Pool2 (20TB free), Pool3 (4TB free) and you request allocation of a new Storage Volume which is 22TB the provisioning will fail because there are no pools available with that much free space. Note however that you could allocate 10x thin-provisioned storage volumes which are 6TB in size because newly thin-provisioned volumes use a negligible amount of space until data has been written to them. So Storage Tiers do provide support for over-provisioning storage pools with some limits.
NAS Gateway / Cloud Container Management
QuantaStor can be configured to be a NAS gateway to object storage provided by OpenStack SWIFT, SoftLayer Object Storage, Amazon S3, and Google Cloud Storage. This is done by creating one or more Cloud Containers on your QuantaStor appliance which then show up as Network Shares which can be accessed via the standard NFS and CIFS protocols. Cloud Containers use the s3ql filesystem which provides compression, encryption and deduplication of data so that you get maximum utilization of your cloud storage.
Each Cloud Container can have a unique Passphrase/Encryption key. Each Cloud Container is represented by a bucket in your public or private object storage cloud that starts with a qs-bucket-* prefix. Because the data placed into the Cloud Container is written in a reduced and encrypted format, the data is secure and cannot be accessed directly via REST APIs.
Note that a given Cloud Container can only be used by one QuantaStor appliance at a time. If you need to add it to another appliance, please disable it from the first appliance before activating the container on another.
Adding Cloud Provider Credentials
To begin using the Cloud Container feature, you will need to provide the QuantaStor appliance access to your Object Storage using the 'Add Cloud Provider Credentials' dialog available in the Cloud Container tab of the WebUI as shown in the example below:
The credentials for your object storage cloud can be found in the security/authentication pages of your Amazon S3, Google Cloud Storage, or SoftLayer Cloud Storage accounts. Once your credentials have been added you can begin creating cloud containers within QuantaStor.
Creating a Cloud Container
Create a Cloud Container using the 'Create Cloud Storage Container' Dialog. In the dialog, specify a name for the Cloud Container, the Cloud Provider, the Location for the Cloud Provider object storage you wish to use (public or private) , which of the appliances in your grid you wish to attach to the Cloud Container and the Passphrase/Encryption Key to secure the object storage and click OK to create your Cloud Container.
This is shown in the example below:
Once the Cloud Container has been created, you can configure Network Share users and permissions via the Network Shares section of the Web interface: Managing Network Shares
Cloud Container Operations
Offline/Disable access to a Cloud Container on a a QuantaStor Appliance: Disable Cloud Container
Enabling access to a offline Cloud Container on a a QuantaStor Appliance: Enable Cloud Container
Troubleshooting and Repairing a Cloud Container if a Cloud Container does not mount: Repair Cloud Container
Exporting/removing access to a Cloud Container from a QuantaStor Appliance: Export/Remove Cloud Container
Importing existing Cloud Containers to a QuantaStor Appliance: Import/Add Cloud Container
Permanently deleting a Cloud Container, it's objects and it's bucket in the Object Storage: Delete Cloud Container
Cloud Provider Support
QuantaStor has support for most major public cloud object storage vendors including Amazon AWS S3, IBM Cloud Object Storage (S3 & SWIFT), Microsoft Azure Blob and others. The sections below outline the configuration steps required to create authentication keys required to make an object storage "bucket" available as NAS storage within QuantaStor.
Backup Policy Management
Within QuantaStor you can create backup policies where data from any NFS or CIFS share on your network can be automatically backed up for you to your QuantaStor appliance. To create a backup policy simply right-click on the Network Share where you want the data to be backed up to and choose the 'Create Backup Policy..' option from the pop-up menu. Backup policies will do a CIFS/NFS mount of the specified NAS share on your network locally to the appliance in order to access the data to be archived. When the backup starts it creates a Backup Job object which you will see in the web interface and you can see the progress of any given backup job by monitoring it in the Backup Jobs tab in the center-pane of the web interface after you select the Network Share to which the backup policy is attached.
Creating Backup Policies
Backup policies in QuantaStor support heavy parallelism so that very large NAS filers with 100m+ files can be easily scanned for changes. The default level of parallelism is 32 concurrent scan+copy threads but this can be reduced or increased to 64 concurrent threads.
This is where you indicate where you want the data to be backed up to on your QuantaStor appliance. With QuantaStor backup policies your data is copied from a NAS share on the network to a network share on your QuantaStor appliance.
Policy Name
This is a friendly name for your backup policy. If you are going to have multiple policies doing backups to the same network share then each policy will be associated with a directory with the name of the policy. For example, if your share is called media-backups and you have a policy called 'project1' and a policy called 'project2' then there will be sub-directories under the media-backups share for project1 and project2. In order to support multiple policies per Network Share you must select the option which says Backup files to policy specific subdirectory. If that is not selected then only one policy can be associated with the network share and the backups will go into the root of the share to form an exact mirror copy.
Selecting the Backup Source
In the section which says Hostname / IP Address: enter the IP address of the NAS filer or server which is sharing the NAS folder you want to backup. For NFS shares you should enter the IP address and press the Scan button. If NFS shares are found they'll show up in the CIFS/NFS Export: list. For CIFS share backups you'll need to enter the network path to the share in a special format starting with double forward slashes like so: //username%password@ipaddress. For example, you might scan for shares on a filer located at 10.10.5.5 using the SMB credentials of 'admin' and password 'password123' using this path: //admin%password123@10.10.5.5. In AD environments you can also include the domain in the SMB path like so //DOMAIN/username%password@ipaddress.
Policy Type
You can indicate that you want the backup policy to backup everything by selecting 'Backup All Files' or you can do a 'Sliding Window Backup'. For backing up data from huge filers with 100m+ files it is sometimes useful to only backup and maintain a sliding window of the most recently modified or created files. If you set the Retention Period to 60 days then all files that have been created or modified within the last 60 days will be retained. Files that are older than that will be purged from the backup folder.
Be careful with the Backup All Files mode. If you have a Purge Policy enabled it will remove any files from the network share which were not found on the source NAS share that's being backed up. If you attached such a backup policy to an existing share which has data on it, the purge policy will remove any data/files that exists in your QuantaStor Network Share which is not on the source NAS share on the remote filer. So use caution with this as Backup All Files really means maintain a mirror copy of the remote NAS share.
Purge Policy
Backup policies may run many times per day to quickly backup new and modified files. A scan to determine what needs purging is typically less important so it is more efficient to run it nightly rather than with each and every backup job. For the Sliding Window policies the purge phase will throw out any files that are older than the retention period. For the Backup All Files policies there is a comparison that is done and any files that are no longer present in the NAS source share are removed from the backup. The Purge Policy can also be set to 'Never delete files' which will backup files to your Network Share but never remove them.
Backup Logs
If you select 'Maintain a log of each backup' then a backup log file will be written out after each backup. Backup logs can be found on your QuantaStor appliance in the /var/log/backup-log/POLICY-NAME directory. The purge process produces a log with the .purgelog suffix and the backup process produces a log with the .changelog suffix.
pwalk
pwalk is a open source command line utility included with QuantaStor (see /usr/bin/pwalk). It was originally written by John Dey to work as a parallelized version of the 'du -a' unix utility which would be suitable for scanning filesystems with 100s of millions of files. It was then reworked at OSNEXUS to support backups, sliding window backups, additional output formats, etc. If you type 'pwalk' by itself at the QuantaStor ssh or console window you'll see the following usage page / documentation. The pwalk utility has three modes, 'walk' which does a parallelized crawl of a directory, 'copy' which does a backup from a SOURCEDIR to a specified --targetdir, and 'purge' mode which removes files in the PURGEDIR which are not found in the --comparedir. In general you would never need to use pwalk directly but the documentation is provided here to support special use cases like custom backup or replication cron jobs.
pwalk version 3.1 Oct 22nd 2013 - John F Dey john@fuzzdog.com, OSNEXUS, eng@osnexus.com

Usage :
pwalk --help --version
          Common Args :
             --dryrun : use this to test commands
                        without making any changes to the system
       --maxthreads=N : indicates the number of threads (default=32)
           --nototals : disables printing of totals after the scan
               --dots : prints a dot and total every 1000 files scanned.
              --quiet : no chatter, speeds up the scan.
             --nosnap : Ignore directories with name .snapshot
              --debug : Verbose debug spam
        Output Format : CSV
               Fields : DateStamp,"inode","filename","fileExtension","UID",
                        "GID","st_size","st_blocks","st_mode","atime",
                        "mtime","ctime","File Count","Directory Size"

Walk Usage :
pwalk SOURCEDIR
         Command Args :
            SOURCEDIR : Fully qualified path to the directory to walk

Copy/Backup Usage :
pwalk --targetdir=TARGETDIR SOURCEDIR
pwalk --retain=30 --targetdir=TARGETDIR SOURCEDIR
         Command Args :
          --targetdir : copy files to specified TARGETDIR
              --atime : copy if access time change (default=no atime)
  --backuplog=LOGFILE : log all files that were copied.
  --status=STATUSFILE : write periodic status updates to specified file
             --retain : copy if file ctime or mtime within retention period
                        specified in days. eg: --retain=60
            --nomtime : ignore mtime (default=use mtime)
            SOURCEDIR : Fully qualified path to the directory to walk

Delete/Purge Usage :
pwalk --purge [--force] --comparedir=COMPAREDIR PURGEDIR
pwalk --purge [--force] --retain=N PURGEDIR
         Command Args :
         --comparedir : compare against this dir but dont touch any files
                        in it. comparedir is usually the SOURCEDIR from
                        a prior copy/sync stage.
              --purge : !!WARNING!! this deletes files older than the
                        retain period -OR- if retain is not specified
                        --comparedir is required. The comparedir is
                        compared against the specified dir and any files
                        not found in the comparedir are purged.
              --force : !NOTE! default is a *dry-run* for purge, you must
                        specify --force option to actually purge files
              --atime : keep if access time within retain period
             --retain : keep if file ctime or mtime within retention period
                        specified in days. eg: --retain=60
OSNEXUS modified version of the C source code for pwalk is available here pwalk.c. The original version is available here.
IO Tuning
ZFS Performance Tuning
One of the most common tuning tasks that is done for ZFS is to set the size of the ARC cache. If your system has less than 10GB of RAM you should just use the default but if you have 32GB or more then it is a good idea to increase the size of the ARC cache to make maximum use of the available RAM for your storage appliance. Before you set the tuning parameters you should run 'top' to verify how much RAM you have in the system. Next, run this command to set the amount of RAM to some percentage of the available RAM. For example to set the ARC cache to use a maximum of 80% of the available RAM, and a minimum of 50% of the available RAM in the system, run these, then reboot:
qs-util setzfsarcmax 80
qs-util setzfsarcmax 50
Example:
sudo -i
qs-util setzfsarcmax 80
INFO: Updating max ARC cache size to 80% of total RAM 1994 MB in /etc/modprobe.d/zfs.conf to: 1672478720 bytes (1595 MB)
qs-util setzfsarcmin 50
INFO: Updating min ARC cache size to 50% of total RAM 1994 MB in /etc/modprobe.d/zfs.conf to: 1045430272 bytes (997 MB)
To see how many cache hits you are getting you can monitor the ARC cache while the system is under load with the qs-iostat command:
qs-iostat -a

Name                              Data
---------------------------------------------
hits                              237841
misses                            1463
c_min                             4194304
c_max                             520984576
size                              16169912
l2_hits                           19839653
l2_misses                         74509
l2_read_bytes                     256980043
l2_write_bytes                    1056398
l2_cksum_bad                      0
l2_size                           9999875
l2_hdr_size                       233044
arc_meta_used                     4763064
arc_meta_limit                    390738432
arc_meta_max                      5713208


ZFS Intent Log (ZIL) / writeback cache statistics

Name                              Data
---------------------------------------------
zil_commit_count                  876
zil_commit_writer_count           495
zil_itx_count                     857
A description of the different metrics for ARC, L2ARC and ZIL are below.
hits = the number of client read requests that were found in the ARC
misses = the number of client read requests were not found in the ARC
c_min = the minimum size of the ARC allocated in the system memory.
c_max = the maximum size of the ARC that can be allocated in the system memory.
size = = the current ARC size
l2_hits = the number of client read requests that were found in the L2ARC
ls_misses = the number of client read requests were not found in the L2ARC
ls_read_bytes = The number of bytes read from the L2ARC ssd devices.
l2_write_bytes = The number of bytes written to the L2ARC ssd devices.
l2_chksum_bad = The number of checksums that failed the check on an SSD (a number of these occurring on the L2ARC usually indicates a fault for a SSD device that needs to be replaced)
l2_size = the current L2ARC size
l2_hdr_size = The size of the L2ARC reference headers that are present in ARC Metadata
arc_meta_used = The amount of ARC memory used for Metadata
arc_meta_limit =  The maximum limit for the ARC Metadata
arc_meta_max = The maximum value that the ARC Metadata has achieved on this system

zil_commit_count = How many ZIL commits have occurred since bootup
zil_commit_writer_count = How many ZIL writers were used since bootup
zil_itx_count  = the number of indirect transaction groups that have occurred sinc bootup
Pool Performance Profiles
Read-ahead and request queue size adjustments can help tune your storage pool for certain workloads. You can also create new storage pool IO profiles by editing the /etc/qs_io_profiles.conf file. The default profile looks like this and you can duplicate it and edit it to customize it.
[default]
name=Default
description=Optimizes for general purpose server application workloads
nr_requests=2048
read_ahead_kb=256
fifo_batch=16
chunk_size_kb=128
scheduler=deadline
If you edit the profiles configuration file be sure to restart the management service with 'service quantastor restart' so that your new profile is discovered and is available in the web interface.
Storage Pool Tuning Parameters
QuantaStor has a number of tunable parameters in the /etc/quantastor.conf file that can be adjusted to better match the needs of your application. That said, we've spent a considerable amount of time tuning the system to efficiently support a broad set of application types so we do not recommend adjusting these settings unless you are a highly skilled Linux administrator. The default contents of the /etc/quantastor.conf configuration file are as follows:
[device]
nr_requests=2048
scheduler=deadline
read_ahead_kb=512

[mdadm]
chunk_size_kb=256
parity_layout=left-symmetric
There are tunable settings for device parameters which are applied to the storage media (SSD/SATA/SAS), as well as settings like the MD device array chunk-size and parity configuration settings used with XFS based storage pools. These configuration settings are read from the configuration file dynamically each time one of the settings is needed so there's no need to restart the quantastor service. Simply edit the file and the changes will be applied to the next operation that utilizes them. For example, if you adjust the chunk_size_kb setting for mdadm then the next time a storage pool is created it will use the new chunk size. Other tunable settings like the device settings will automatically be applied within a minute or so of your changes because the system periodically checks the disk configuration and updates it to match the tunable settings. Also, you can delete the quantastor.conf file and it will automatically use the defaults that you see listed above.
Security Configuration
Change Your Passwords
One of the most important steps in the configuration of a new QuantaStor appliance is to just change the admin password for the appliance to something other than the default. You'll want to start by logging into the console using the 'qadmin' account and 'qadmin' password. Next type 'passwd' and change the password from 'qadmin' to something else. Next you'll want to login to the web management interface and change the 'admin' account password from 'password' to something else.
Port Lock-down via IP Tables configuration
QuantaStor comes with non-encrypted port 80 / http access to the appliance enabled. For more secure installations it is recommended that port 80 and non-essential services are blocked. To disable port 80 access run this command:
sudo qs-util disablehttp
To re-enable port 80 access use:
sudo qs-util enablehttp
Note that the web management interface will still be accessible via https on port 443 after you disable http access.
Changing the SSL Key for QuantaStor Web Management Interface
The SSL key provided with QuantaStor is a common self-signed SSL key that is pre-generated and included with all deployments. This is generally OK for most deployments on private networks but for increased security it is recommended to generate a new SSL keystore for the Apache Tomcat server used to serve the QuantaStor web management interface.
Keystore Password Selection
IMPORTANT NOTE You must set the password for the keystore to 'changeit' (without the quotes) as this is the default password that Tomcat uses to unlock the keystore. If you do not want to use the default password ('changeit') you can select a password of your choice but you will also need to manually edit the connector section of the /opt/osnexus/quantastor/tomcat/conf/server.xml file to add a line containing the keystore password (example: keystorePass="YOURPASSWORD"). Here's an example of what that will look like if you select the password "YOURPASSWORD".
<Connector port="8443" protocol="HTTP/1.1" SSLEnabled="true"
               maxThreads="150" scheme="https" secure="true"
               keystoreFile="/opt/osnexus/quantastor/tomcat/conf/keystore"
               keystorePass="YOURPASSWORD"
               clientAuth="false" sslProtocol="TLS" />
New Keystore Generation
To generate a new keystore you'll need to do the following steps.
- Login to QuantaStor via the console or via SSH then generate a keystore using the keytool utility. It will prompt you to enter a bunch of data including name, company, location, etc. This will produce a new .keystore file in the current directory. Remember to use the default Tomcat 'changeit' password for the keystore unless you plan to edit the /opt/osnexus/quantastor/tomcat/conf/server.xml file to add your custom keystore password.
keytool -genkey -alias tomcat -keyalg RSA -validity 365
- Next, backup the original keystore file and then overwrite the original with your newly generated keystore file:
cp /opt/osnexus/quantastor/tomcat/conf/keystore ./keystore.qs.conf
cp .keystore /opt/osnexus/quantastor/tomcat/conf/keystore
mv .keystore keystore.custom
- Finally, restart tomcat services so that the new key is loaded.
service tomcat restart
IMPORTANT NOTE If you are using Firefox as your browser, you must clear the browser history in order to clear the old cached key information. If you don't clear the history you'll see that the "Confirm Security Exception" button will be greyed out and you won't be able to login to your QuantaStor appliance via https. IE and Chrome do not have this issue.
That's the whole process. Here's an example of what we enter into these fields as OSNEXUS Engineering, you'll want to put your own company name and other details here:
keytool -genkey -alias qs-tomcat -keyalg RSA -validity 365

Enter keystore password:
Re-enter new password:
What is your first and last name?
  [Unknown]:  OSNEXUS
What is the name of your organizational unit?
  [Unknown]:  OSNEXUS Engineering
What is the name of your organization?
  [Unknown]:  OSNEXUS, Inc.
What is the name of your City or Locality?
  [Unknown]:  Bellevue
What is the name of your State or Province?
  [Unknown]:  Washington
What is the two-letter country code for this unit?
  [Unknown]:  US
Is CN=OSNEXUS, OU=OSNEXUS Engineering, O="OSNEXUS, Inc.", L=Bellevue, ST=Washington, C=US correct?
  [no]:  yes
Internal SAS Device Multi-path Configuration
If your appliance is dual-path connected to a SAS JBOD or has an internal SAS expander with SAS disks you have the option of setting up multiple paths to the SAS devices for redundancy and in some cases improved performance. If you are not familiar with ZFS or using the Linux shell utilities we strongly recommend getting help with these steps from customer support.
Multi-path Configuration with RAID Controllers
If you are using a RAID controller it will internally manage the multiple paths to the device automatically so there is no additional configuration required except to make sure that you have two cables connecting the controller to the SAS expander.
Multi-path Configuration with HBAs
For appliances with SAS HBAs there are some additional steps required to setup the QuantaStor appliance for multipath access. Specifically, you must add entries to the /etc/multipath.conf file then restart the multipath services.
Configuring the /etc/multipath.conf File
QuantaStor being Linux based uses the DMMP (Device Mapper Multi-Path) driver to manage multipathing. The multipath service can be restarted at any time at the command line using the command 'service multipath-tools restart'. Configuration of this service is managed via the configuration file located at /etc/multipath.conf which contains a set of rules indicating which devices (identified by Vendor / Model) should be managed by the multipath service and which should be ignored. The base configuration is setup so that no multipath management is done for SAS devices as this is the most common and simplest configuration mode. To enable multipath management you must add a section to the 'blacklist_exceptions' area of the file indicating the vendor and model of your SAS devices. The vendor model information for your SAS devices can be found using this command 'grep Vendor /proc/scsi/scsi'. To summarize:
- grep Vendor /proc/scsi/scsi
- Returns the vendor / model information for your SAS devices
- nano /etc/multipath.conf
- Add a section to the blacklist_exceptions area for your SAS device, example (note the use of a wildcard '*') :
   device {
           vendor "SEAGATE"
           model "ST33000*"
   }
- service multipath-tools restart
- Restarts the multipath service
- multipath -ll
- Shows your devices with multiple paths to them
Pool Configuration
Once all the above is done you'll need to go into the QuantaStor web management interface and choose 'Scan for Disks' to make the new device mapper paths appear. If you have already created a storage pool using standard paths rather than the /dev/mapper/mpath* paths then you'll need to run a zpool export/import operation to re-import the pool using the device mapper paths. To do this you will need to first do a 'Stop Storage Pool' then at the command line / console you'll need to run these commands:
- zpool export qs-POOLID
- zpool import -d /dev/mapper qs-POOLID
Note that you must replace qs-POOLID with the actual ID of the storage pool. You can also get this ID by running the 'zpool status' command.
Troubleshooting Multipath Configurations
- Only Single Path
- If you only see one path to your device but the multipath driver is recognizing your device by displaying it in the output of 'multipath -ll' then you may have a cabling problem that is only providing the appliance with a single path to the device.
- No Paths Appear
- If you don't see any devices in the output of 'multipath -ll' then there's probably something wrong with the device entry you added to the multipath.conf file into the blacklist_exceptions for your particular vendor/model of SAS device. Double check the output from 'cat /proc/scsi/scsi' to make sure that you have a correct rule added to the multipath.conf file.
